Abstract
Bony vault management is a particularly demanding aspect of rhinoplasty and is a common reason for secondary surgery.
From the late 19th century and for many decades the tool used were mechanical, including saws, rasps, chisels, scissors and osteotomes. Although they gradually improved, they were quite crude, imprecise and often hard to control when operating on the thin, fragile nasal bones.
Power-assisted instruments without these shortcomings have been developed in recent decades (although even today most surgeons rely exclusively on mechanical tools).
The most advanced of these modern instruments is the ultrasonic piezoelectric system, which owes its efficacy to the fact that its vibrations can be set at 25-29 kHz, affecting only hard tissue (bone and firm cartilage) and leaving soft tissue (soft cartilage, skin, muscles, vessels and nerves) totally intact.
In this article, we present an analysis of bony vault surgery with piezoelectric instruments, examining the surgical sequence – extended dissection, rhinosculpture, osteotomies – as well as possible improvements/complications of the procedure.
Introduction
The word “piezoelectricity” is derived from two Greek words: πιέζειν (piezein), which means to press, and ἤλεκτρον (electron), which means amber, a source of electricity in ancient times.
The piezoelectric effect was first discovered by the French physicists Jacques and Pierre Curie in 1880 and the inverse piezoelectric effect was used in the production of ultrasonic sound waves.1 An electric current passes across a ceramic material, resulting in an oscillation of ultrasonic frequency which is then transferred to a vibrating tip.2
The key feature of a piezoelectric (PE) device or piezoelectric instrumentation (PEI) is that a frequency of 25-29 kHz affects only hard tissue (bone and hard cartilage, like rib cartilage) and totally preserves soft tissue like soft cartilage, skin, muscles, vessels and nerves. A frequency of 50 kHz is needed to affect these soft tissues.3
PE devices were built and initially used in dental and orosurgical procedures, like dental implant preparation, cyst excision, maxillary sinus opening or elevation.4 At a later time, PE devices were utilized in maxillofacial surgery (LeFort I osteotomies, mandibular sagittal split osteotomies etc)5 as well as in craniofacial surgery for multiple osteotomies.6 PEI was subsequently used in otologic surgery(stapes surgery, acoustic chain surgery and facial decompression)7 and hand surgery (multiple osteotomies).8
The management of the nasal bony vault is most often performed with standard instruments like saws, rasps, chisels, scissors and osteotomes.9,10,11 In rhinoplasty surgery, PEI use was first reported by Robiony in 2004 and published in 2007.12
During the following years, PEI was reported in rhinoplasty surgery in various kinds of use, like en-bloc hump removal, medial and lateral osteotomies,13 deepening of the radix area, septoplasty, turbinectomy, ANS resection and smoothing of mobile bones following osteotomies.14
A different perspective of PEI use was first reported by Gerbault in 2014 and published in 2016.3 Based on cadaver studies, he proposed the complete dissection of the bony vault, eliminating the external skin lining and exclusively relying on the internal support.
Piezo Surgery Sequence
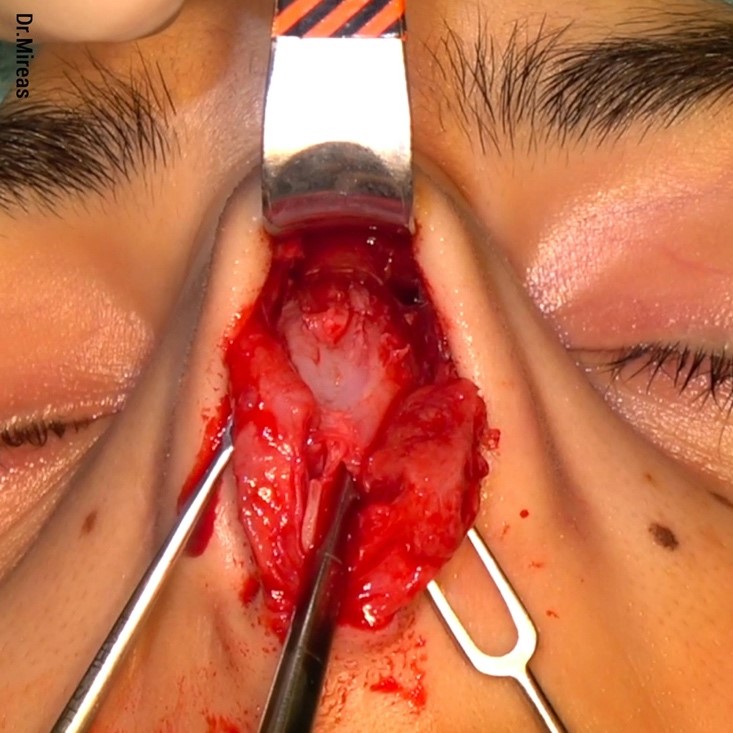
The surgery usually starts with a wide subperichondrial/subperiosteal dissection of the osseocartilaginous vault that extends from the one nasofacial groove to the other, while in cases where the lateral wall will remain intact, the dissection is limited to the dorsum area.
Then, after thorough observation of the whole surgical area for deformities, piezo surgery begins under direct vision at all times.
Modification of the osseocartilaginous vault starts with ultrasonic rhinosculpture (URS), to make a bone thinner as well as to reduce or eliminate a hump, a local deformity or a bone convexity.
Osteotomies are then performed to mobilize the bones and at the end of the surgery a fine contouring with rasps -even on mobile bones- is utilized to achieve an extra fine and natural final result.
No dissection is permitted under the osseocartilaginous vault in order to preserve the internal supports because the external support has been removed, especially after an extended dissection has been performed.
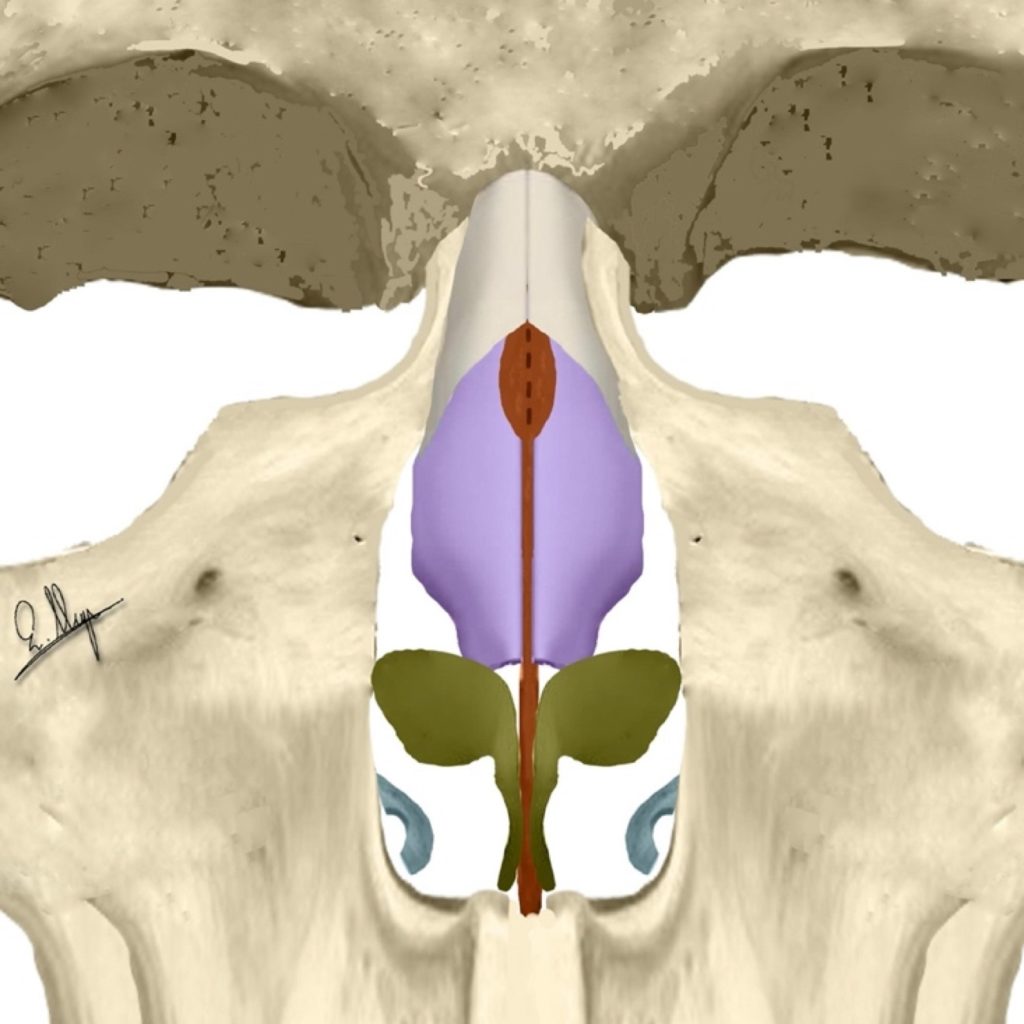
Extended Dissection & Exposure of The Osseocartilaginous Vault
The dissection starts caudally at the level of the anterior septal angle and it continues cephalically beneath the dorsal perichondrium until the nasal bones.3
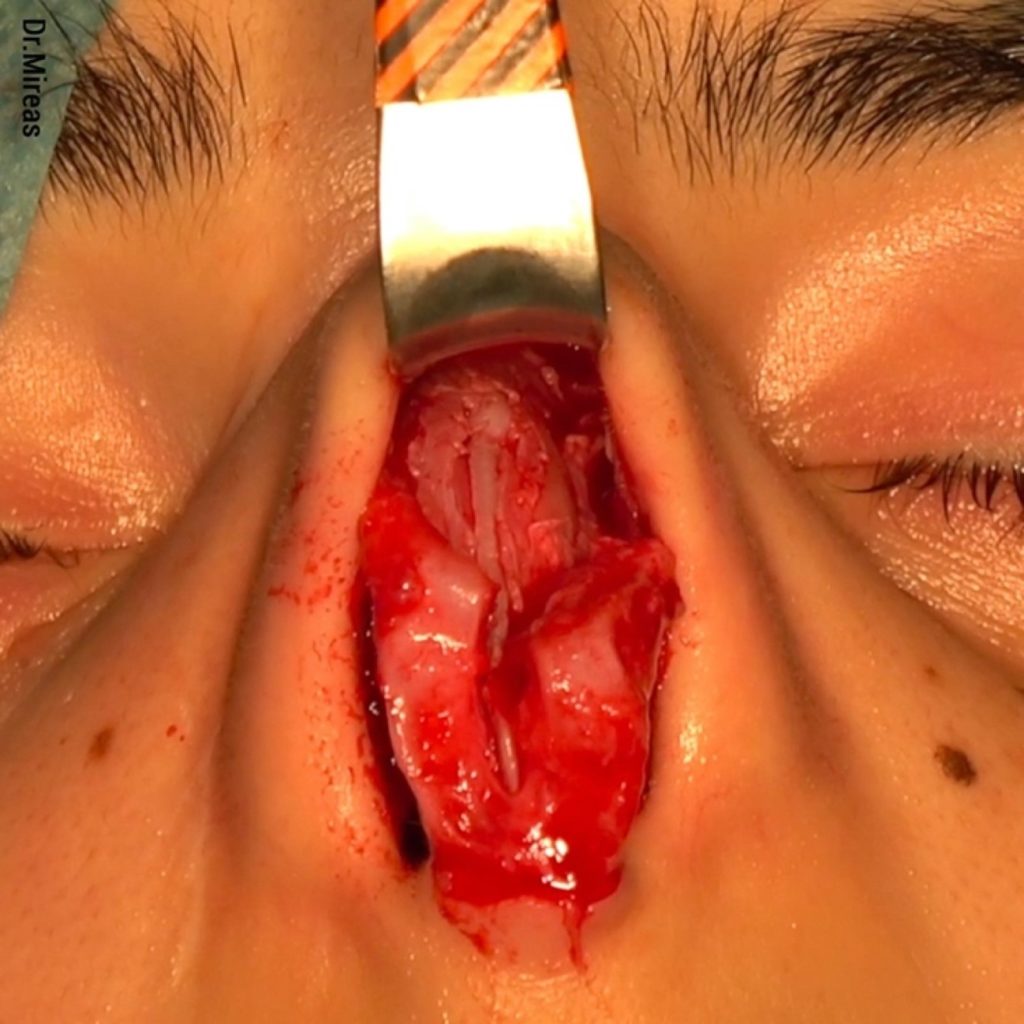
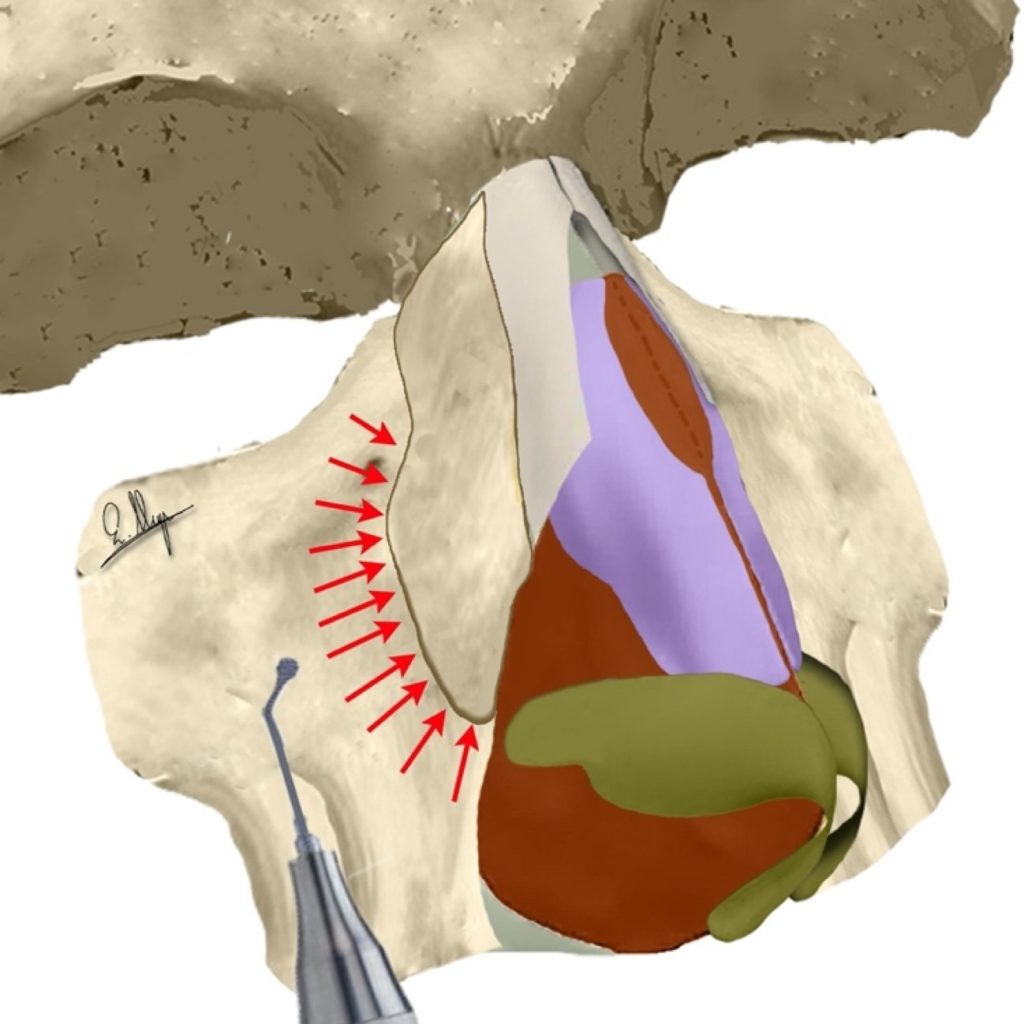
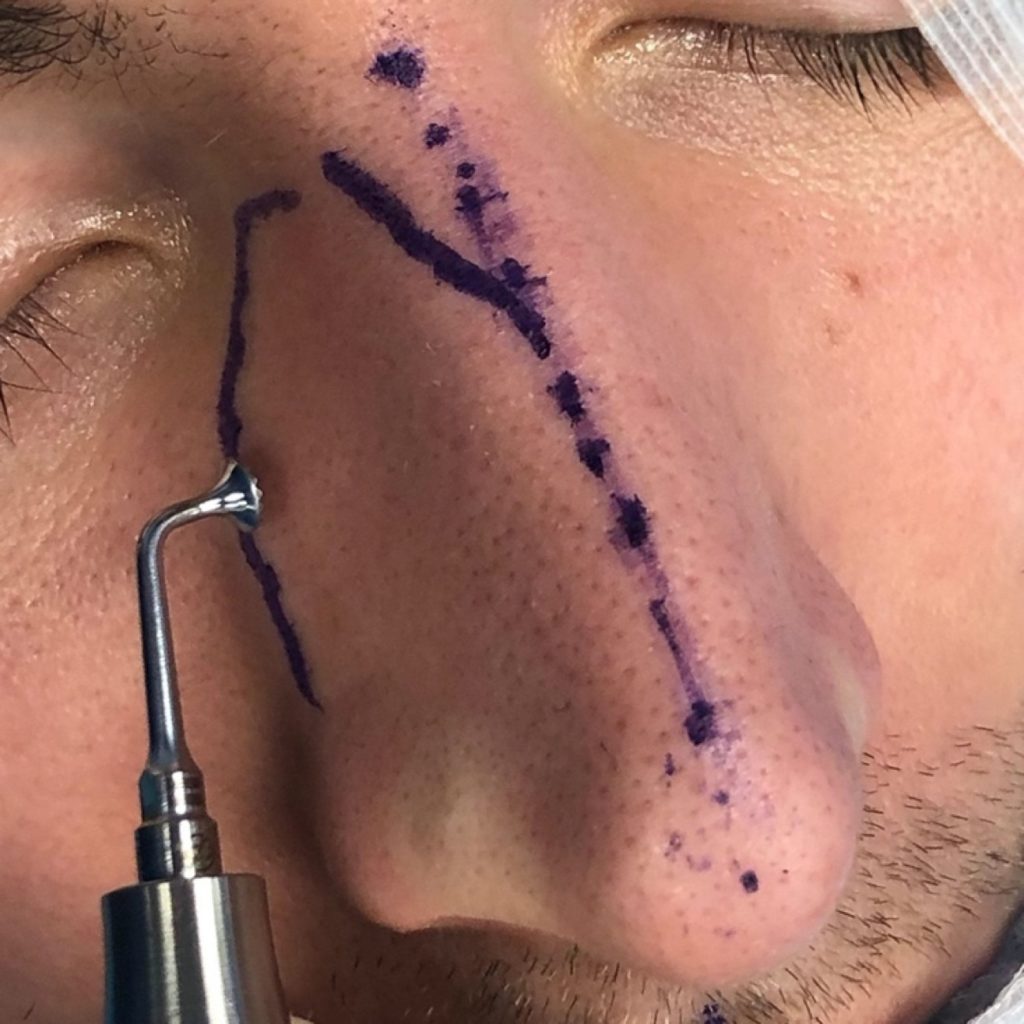
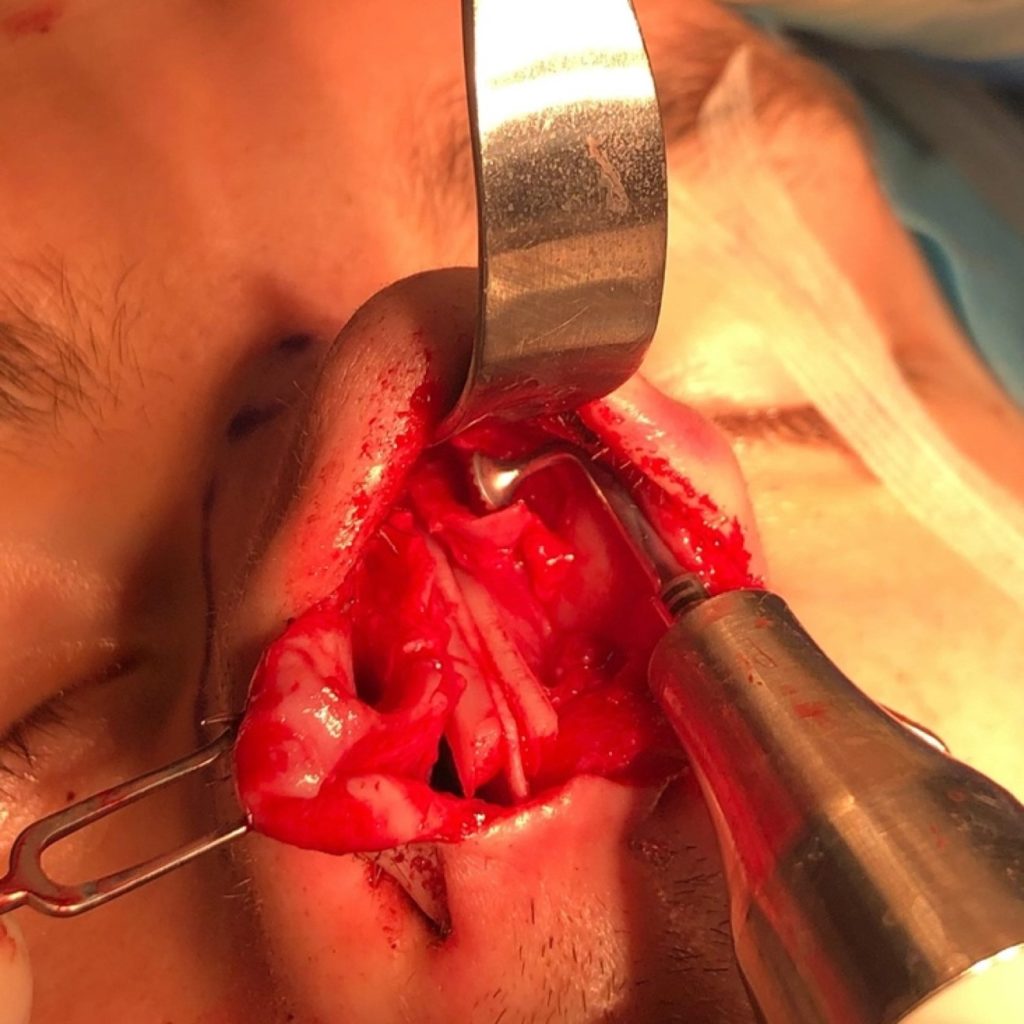
At this point, in order to fully expose the bony vault, it is recommended to start the subperiosteal dissection bilaterally at the lateral keystone area and then, by moving medially, to finally unify both sides. The central area is more adherent and the entrance to the right plane is much easier laterally.

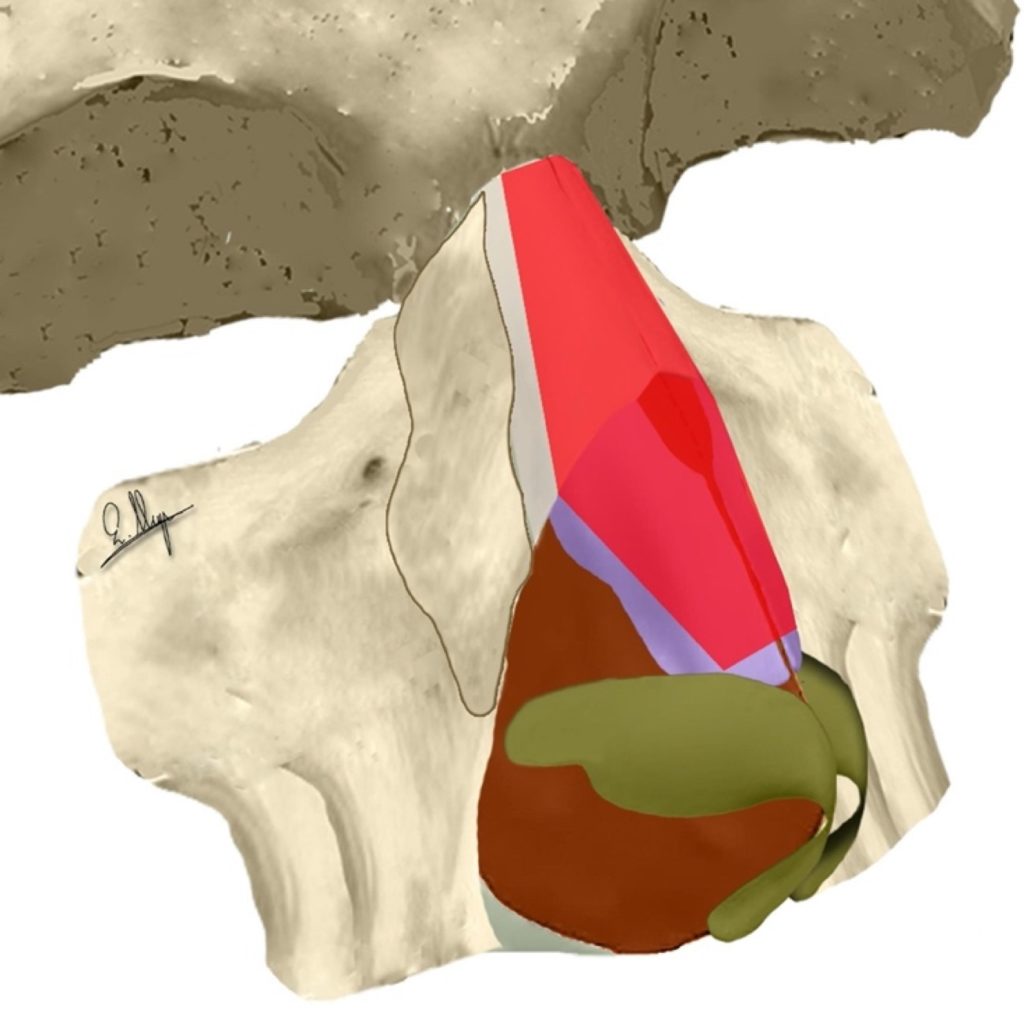
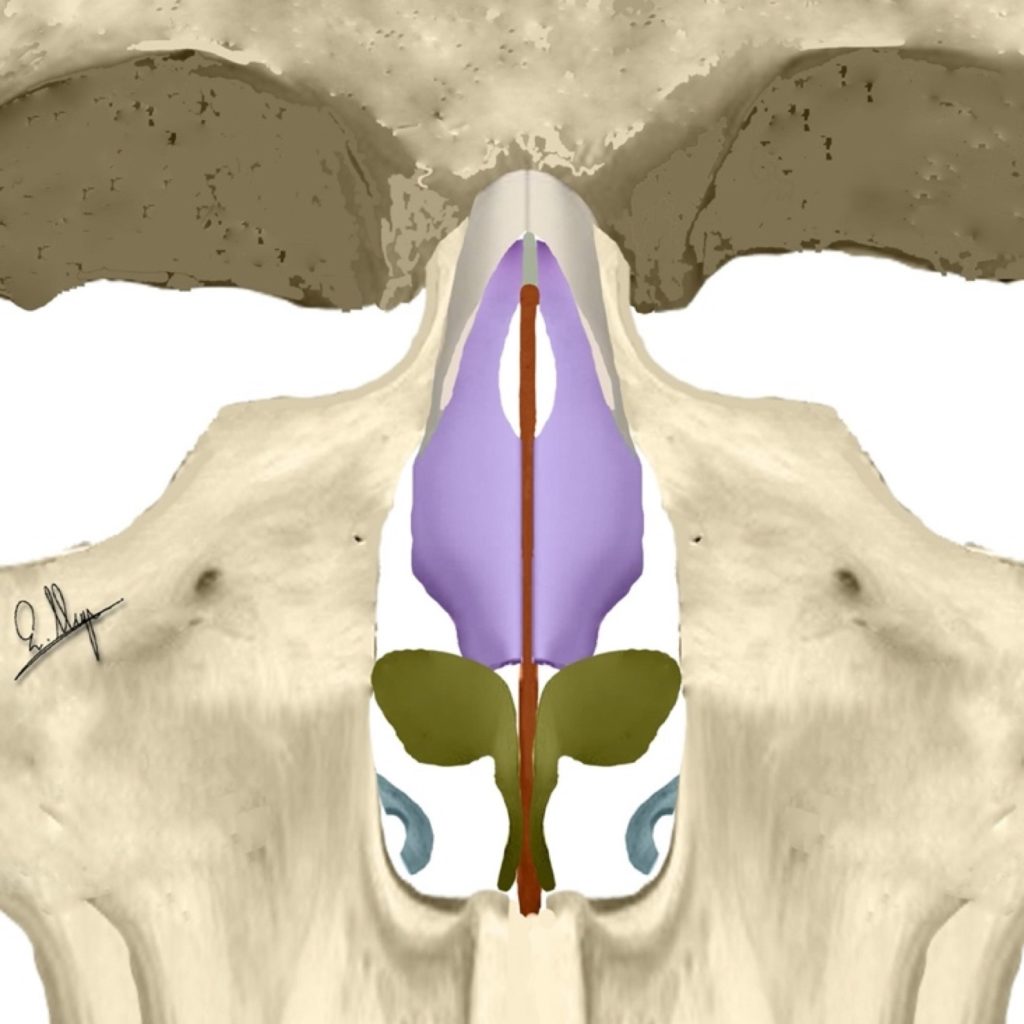
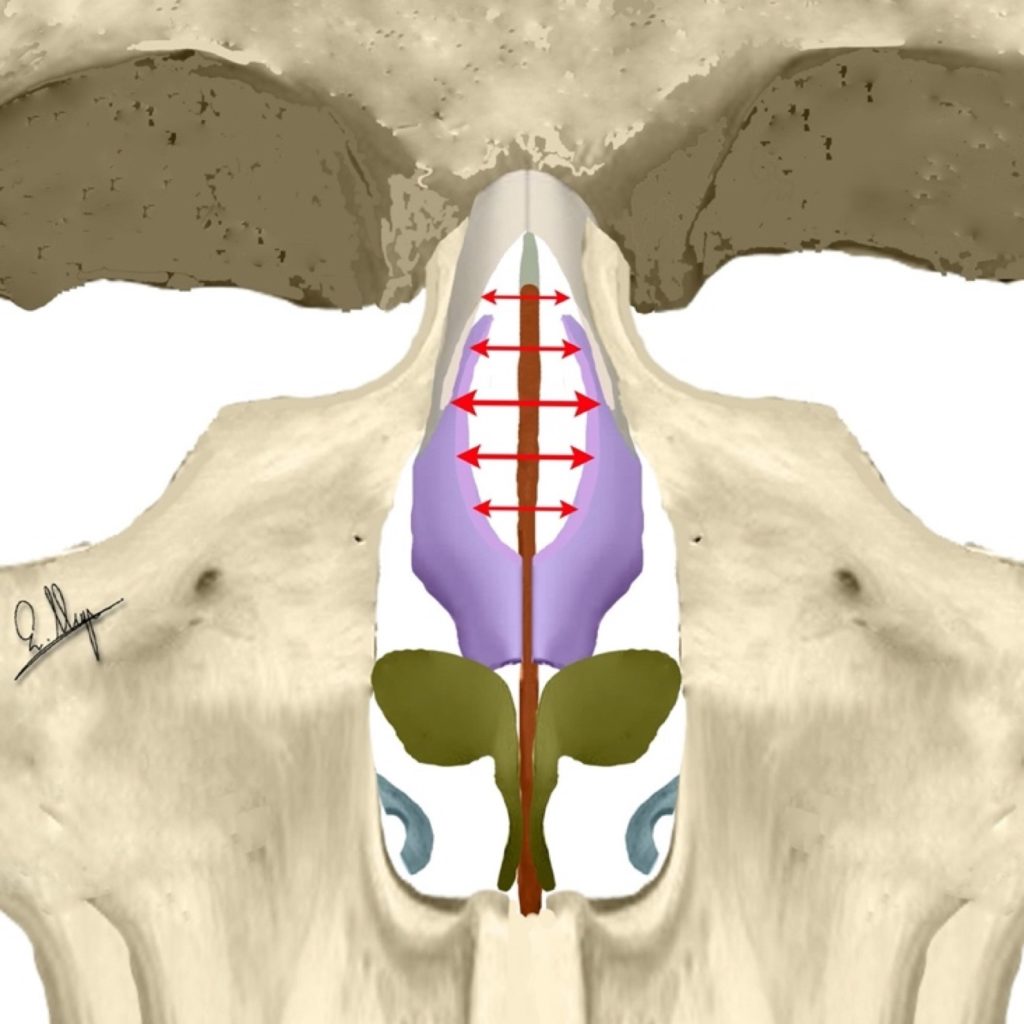
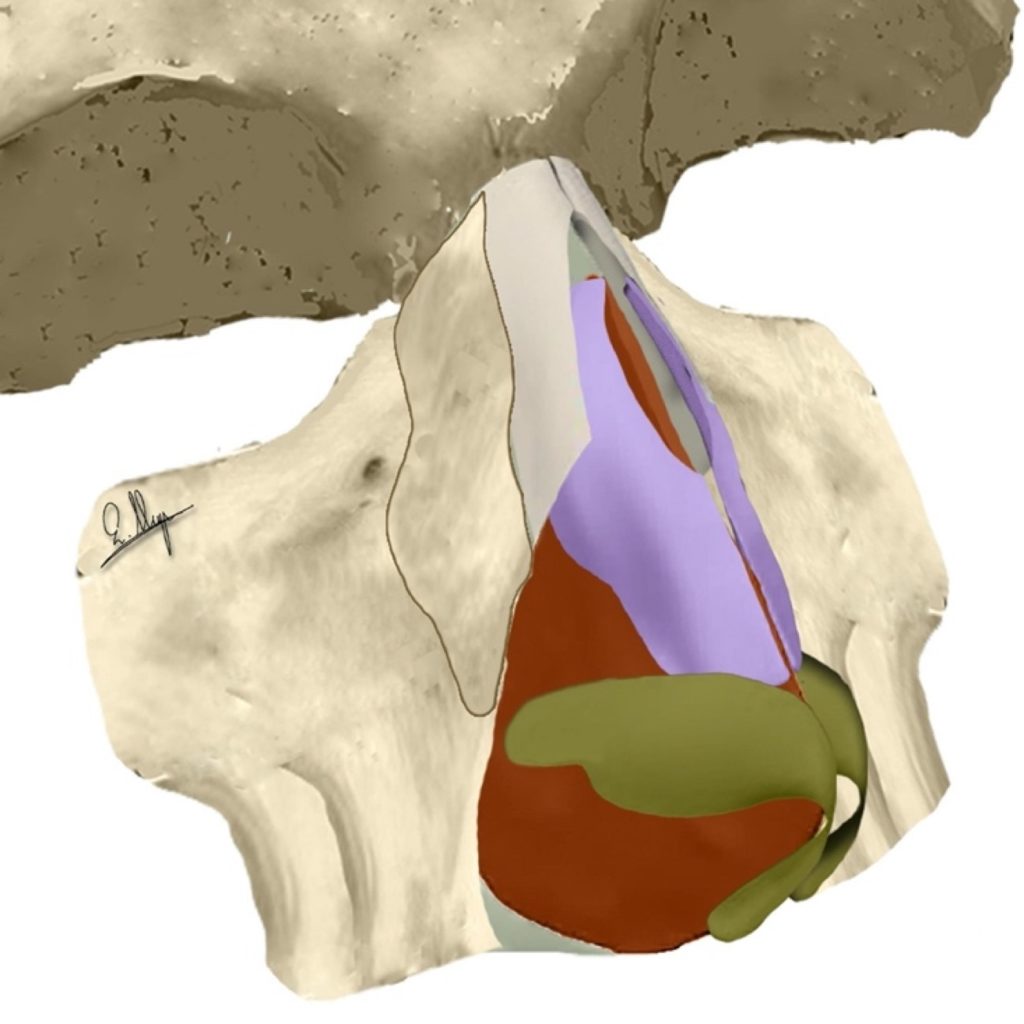
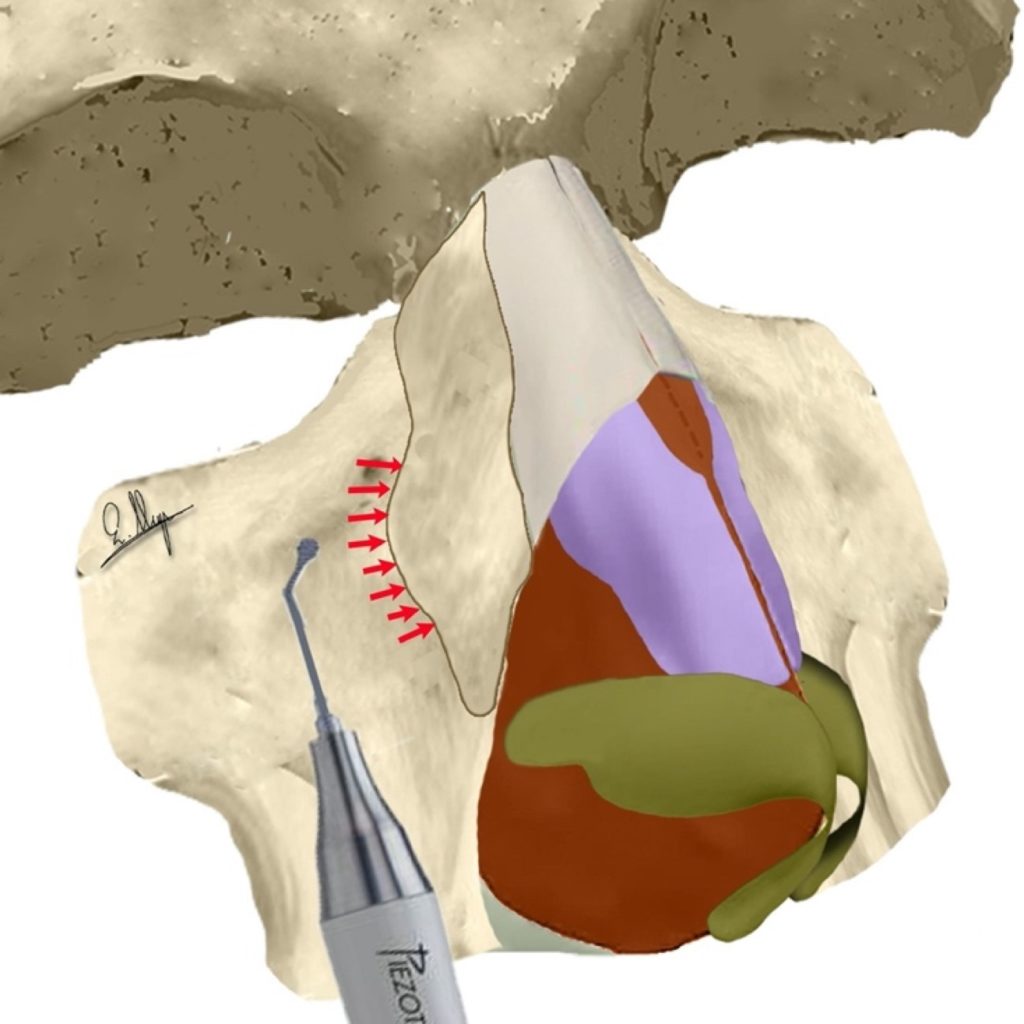
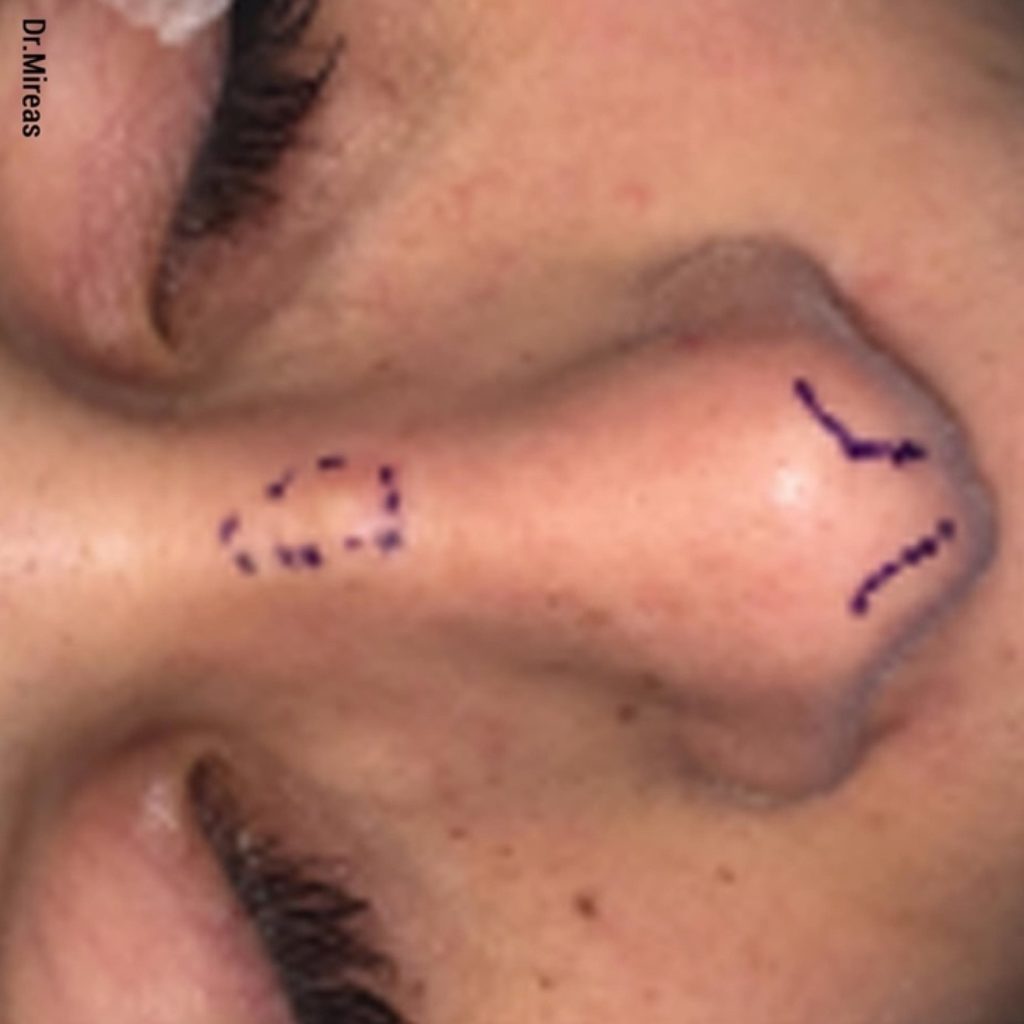
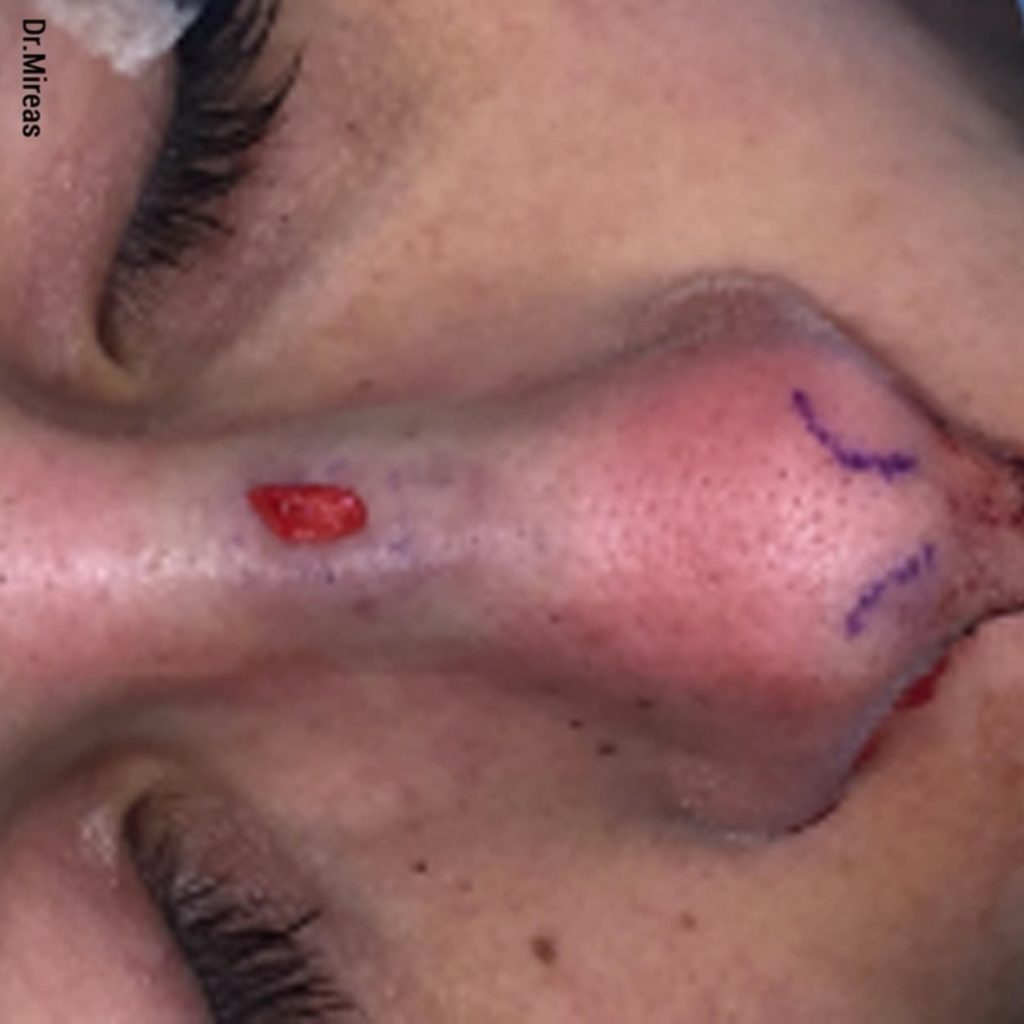
Osseocartilaginous vault dissection & elevation (red) 22
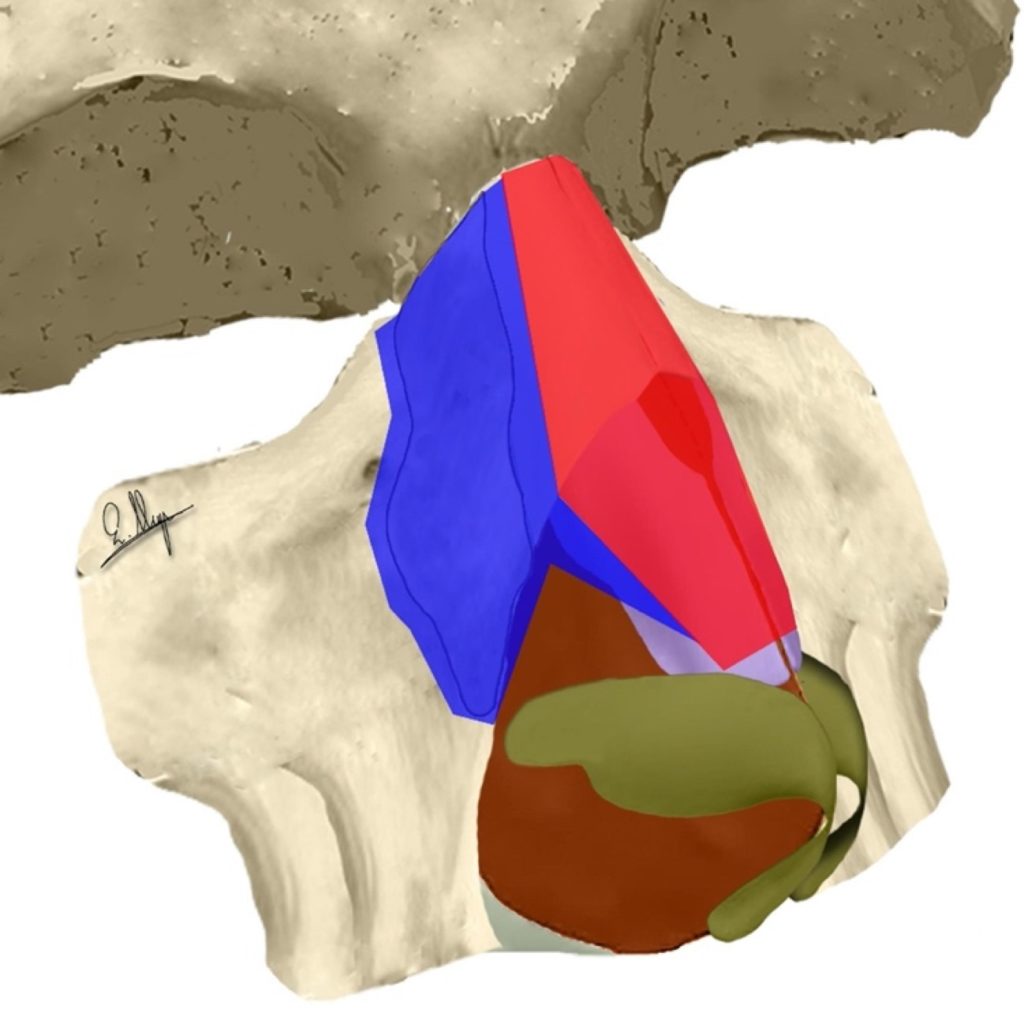
Extended dissection and elevation (red + blue)
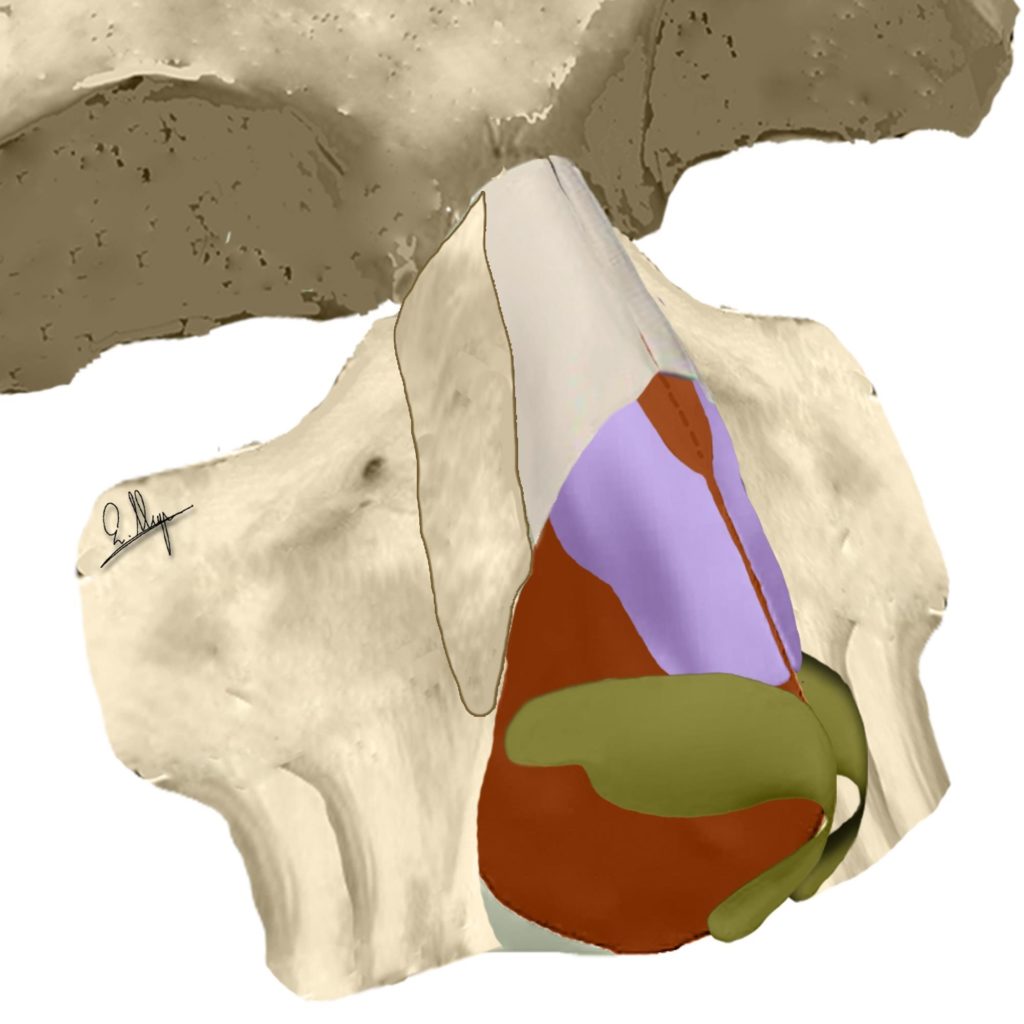
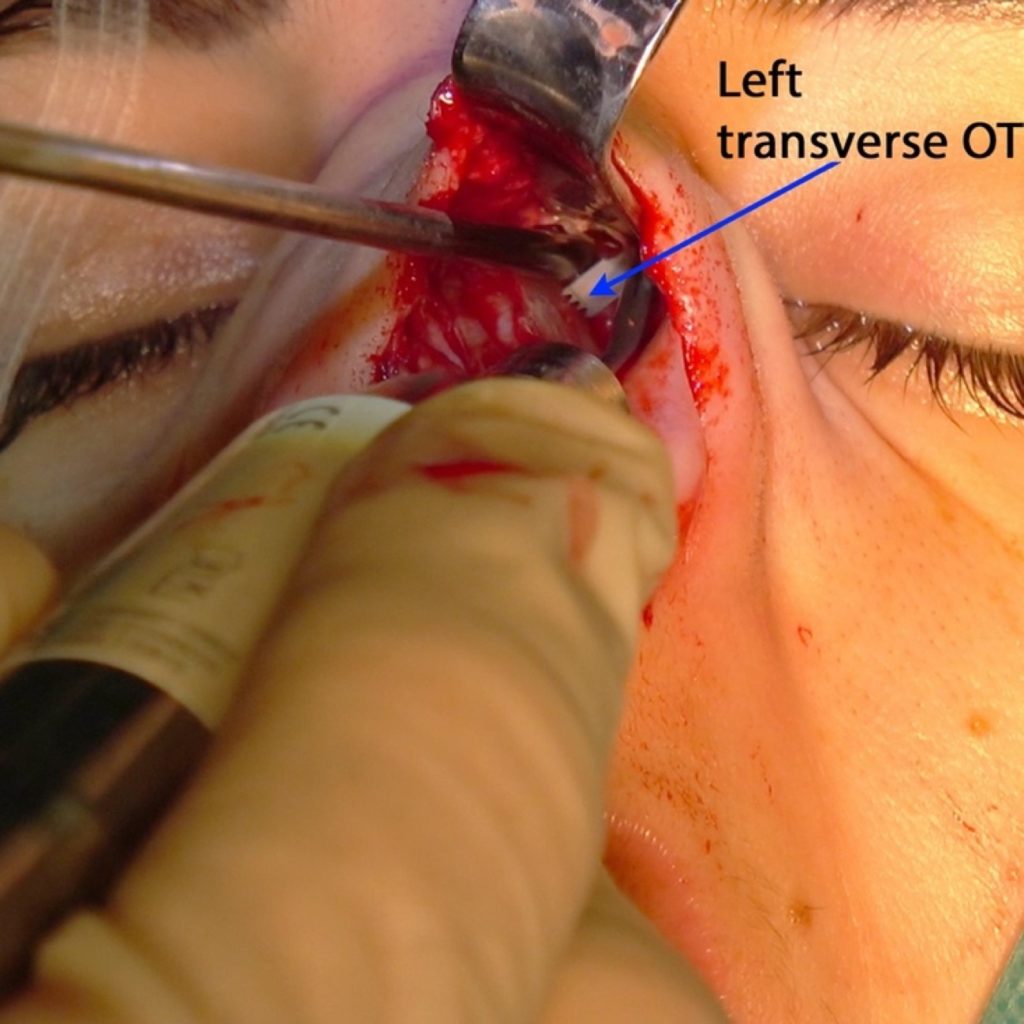
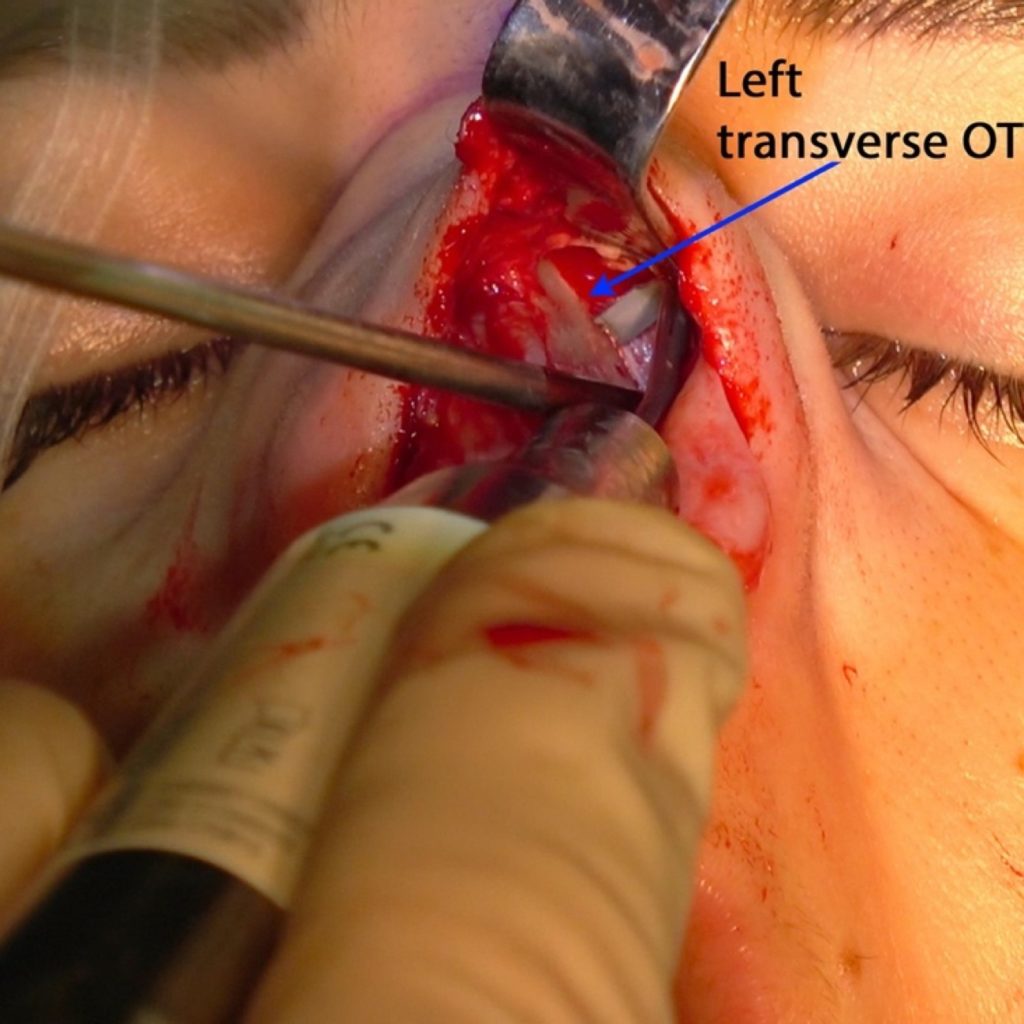
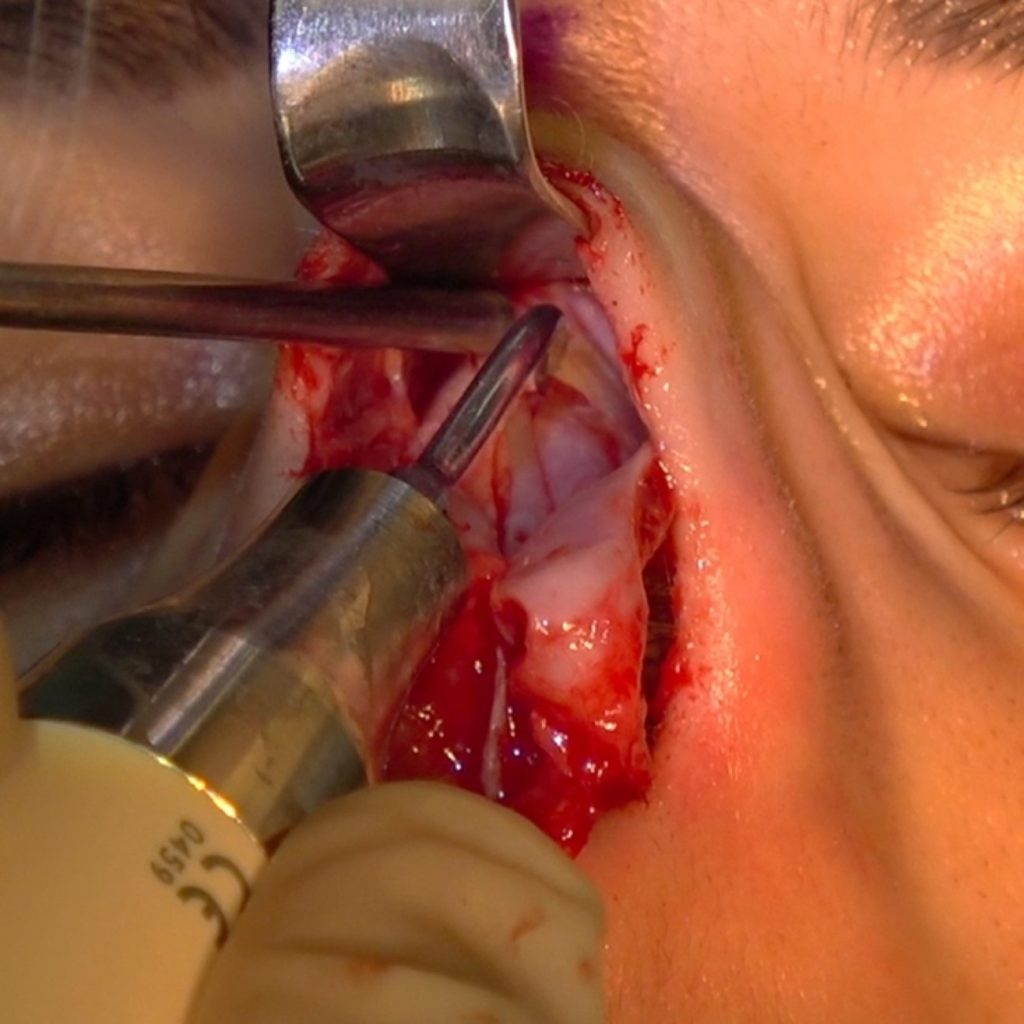
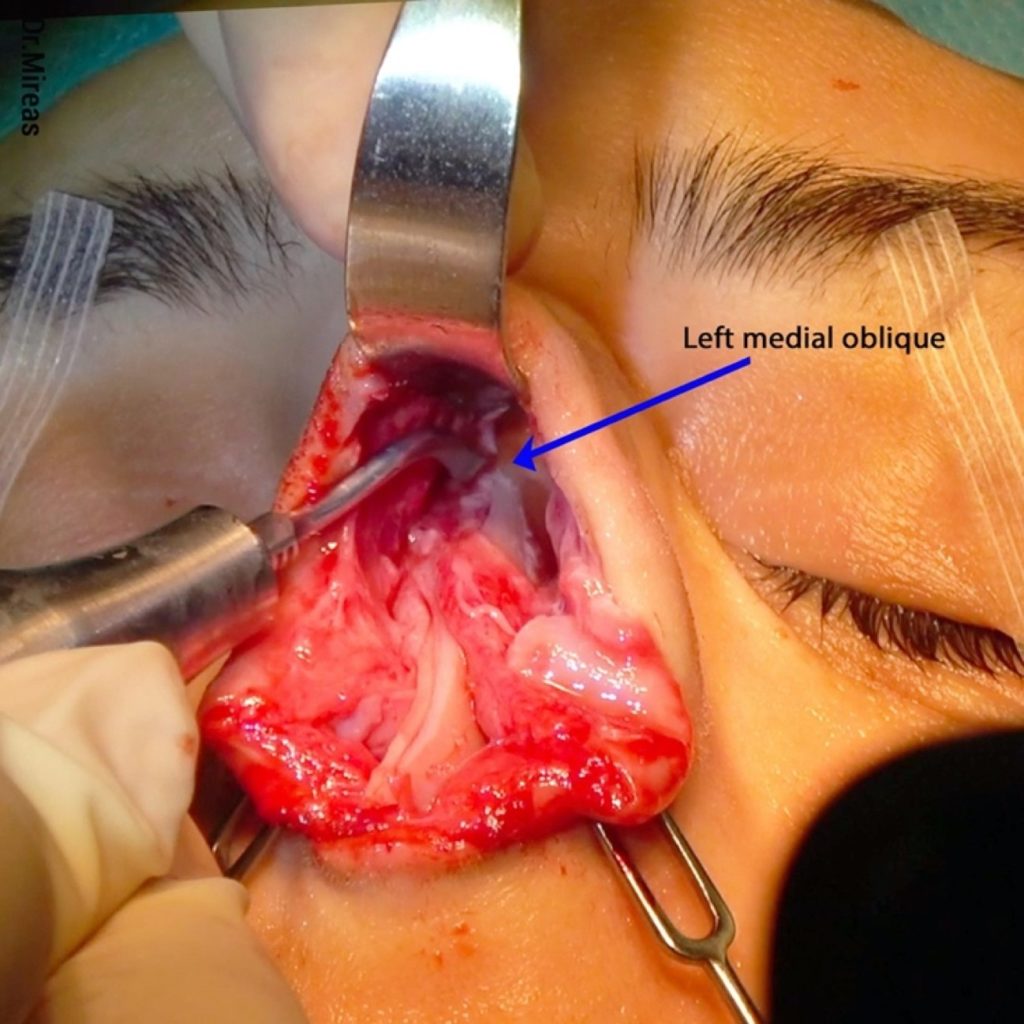
The subperiosteal elevation is wide and it extends cephalically beyond the nasion and laterally about 5-10 mm beyond the nasofacial groove. The lateral dissection is directed upwards to the medial canthal ligament and often above it, and downwards to the pyriform aperture, where a transverse pyriform ligament cut (or elongation) and/or a vertical pyriform ligament cut (or elongation) must often be performed to achieve adequate exposure (Fig. 1-6).15,16
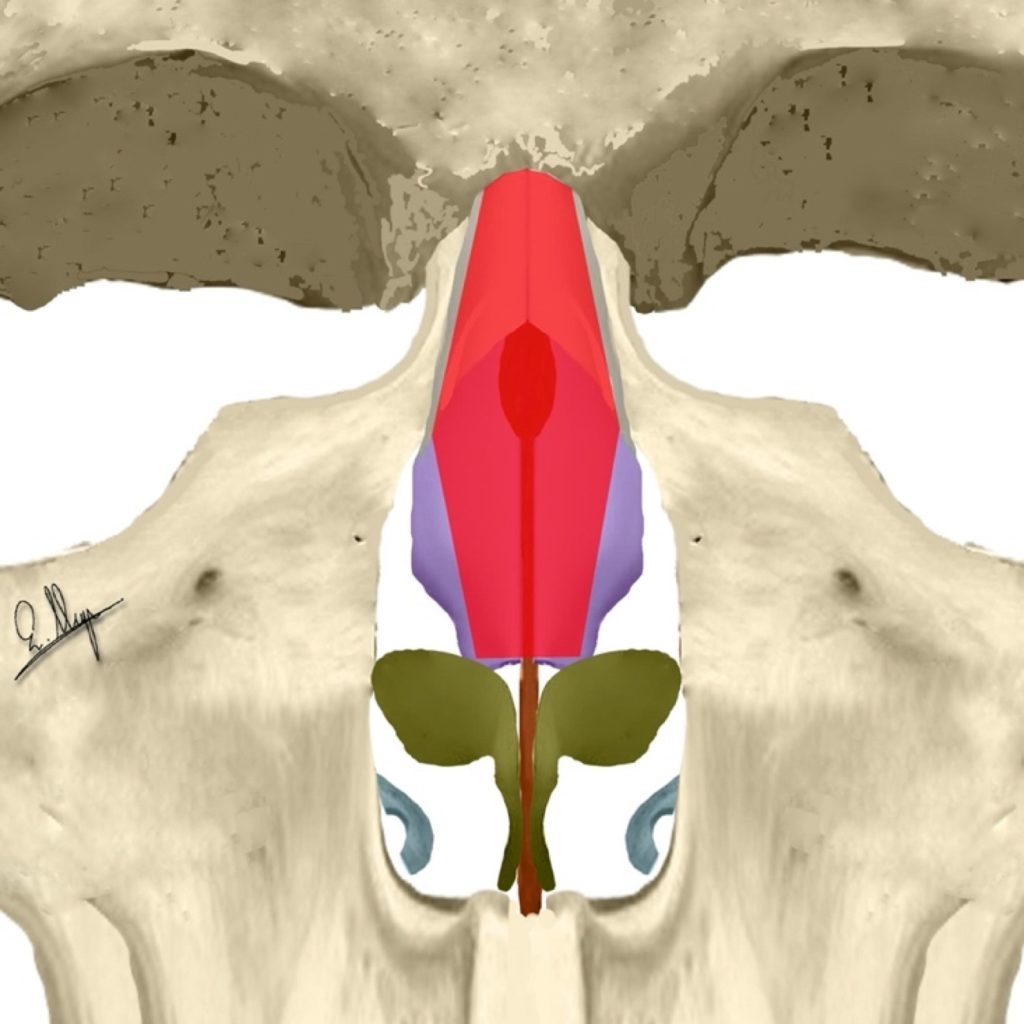
Osseocartilaginous vault dissection & elevation (red)
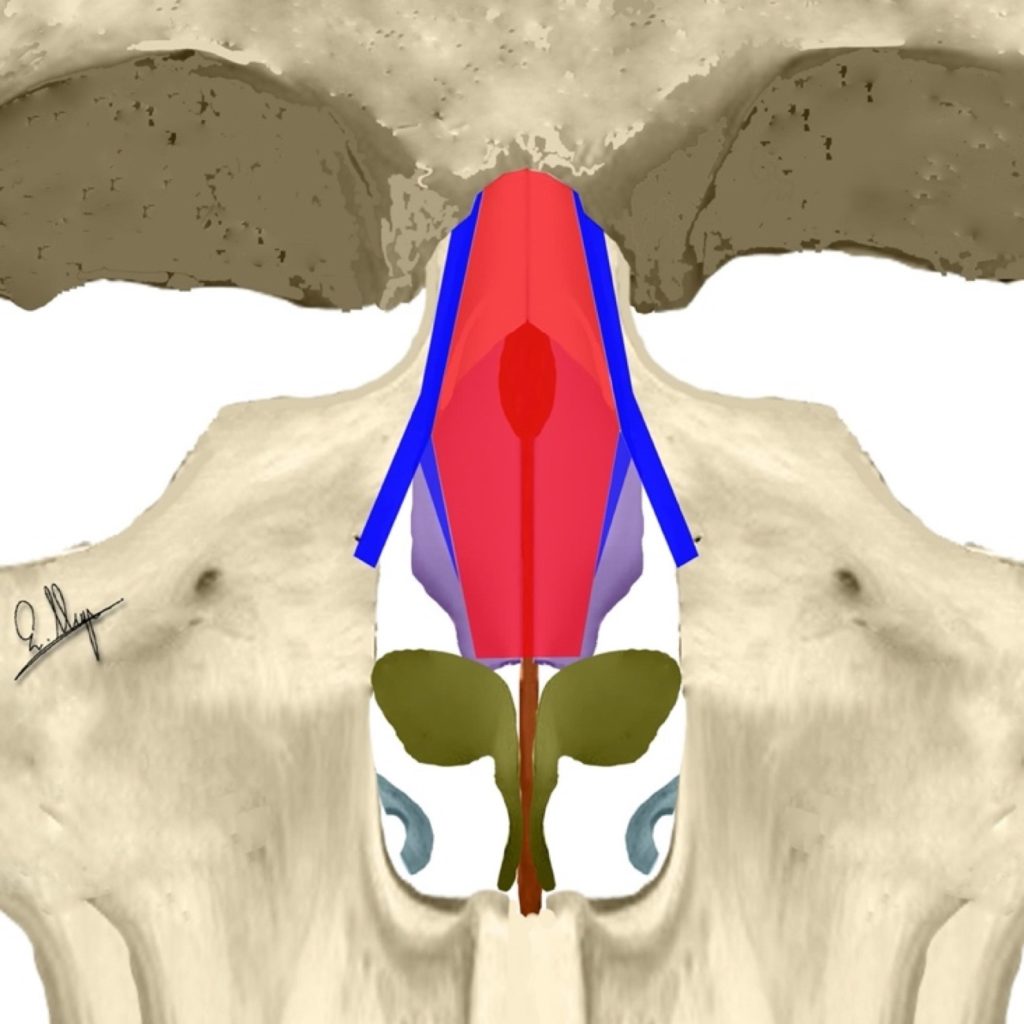
Extended dissection and elevation (red + blue)
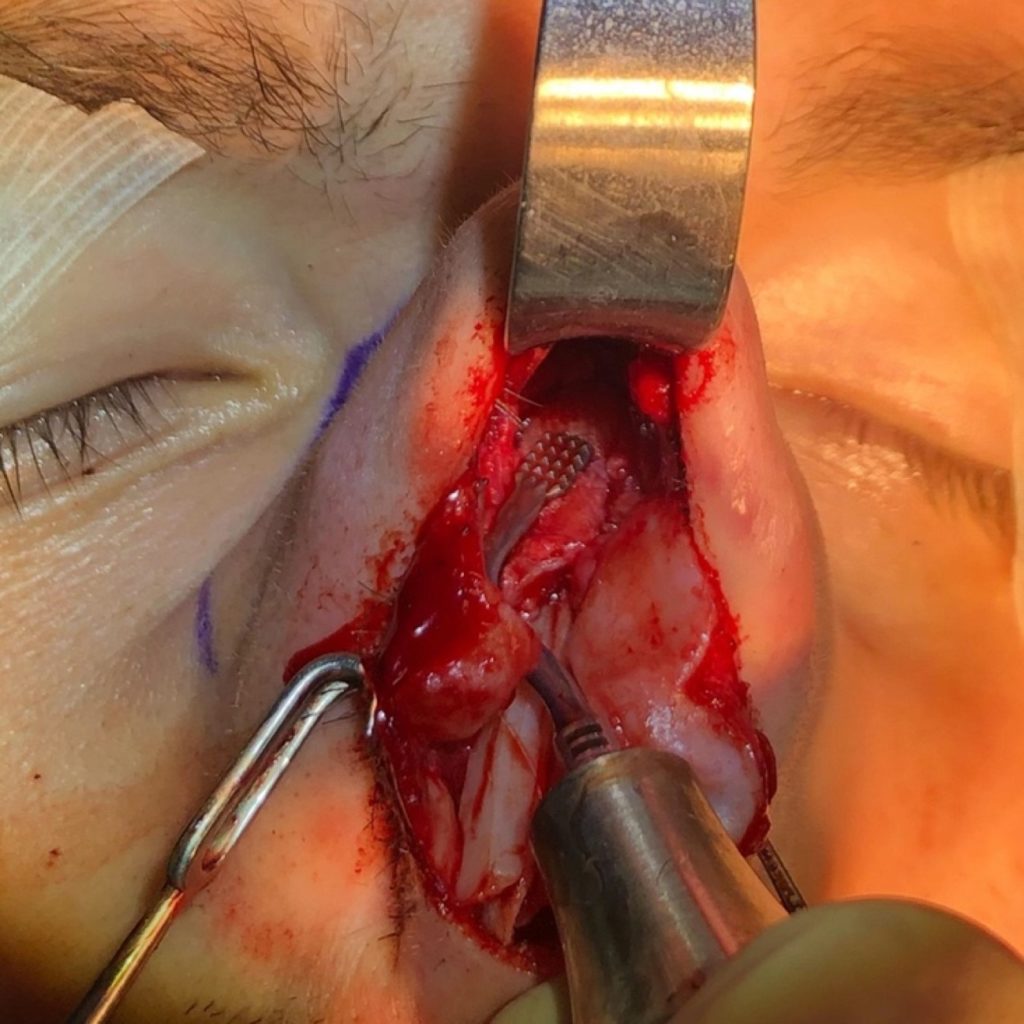
Possible slight hemorrhages that can be seen through small bone foramens are easily tackled with monopolar coagulation by using small slightly curved needles.
The extended elevation allows the surgeon to check the osseocartilaginous bony vault, under direct vision, for any possible deformity and permits the use of the specially designed piezo tips for all surgical maneuvers.3
Ultrasonic Rhinosculpture (URS)
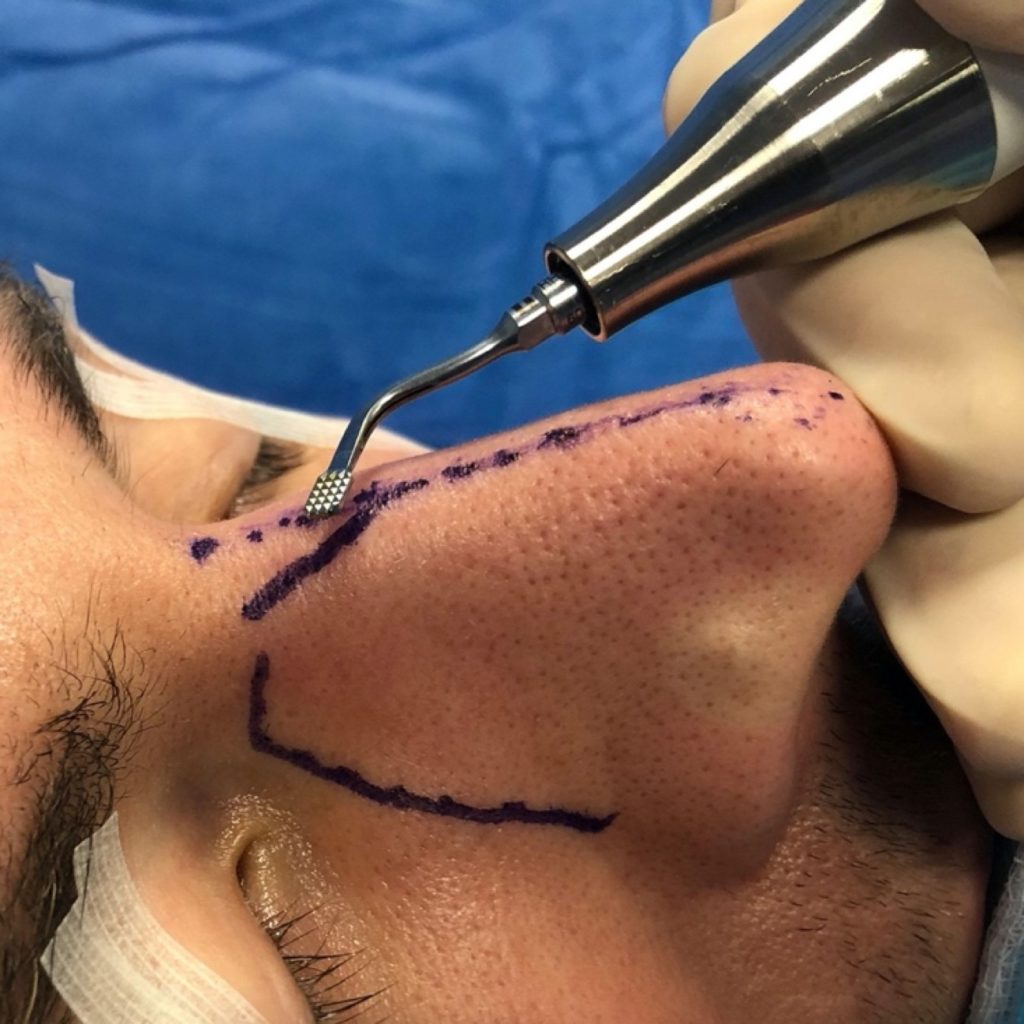
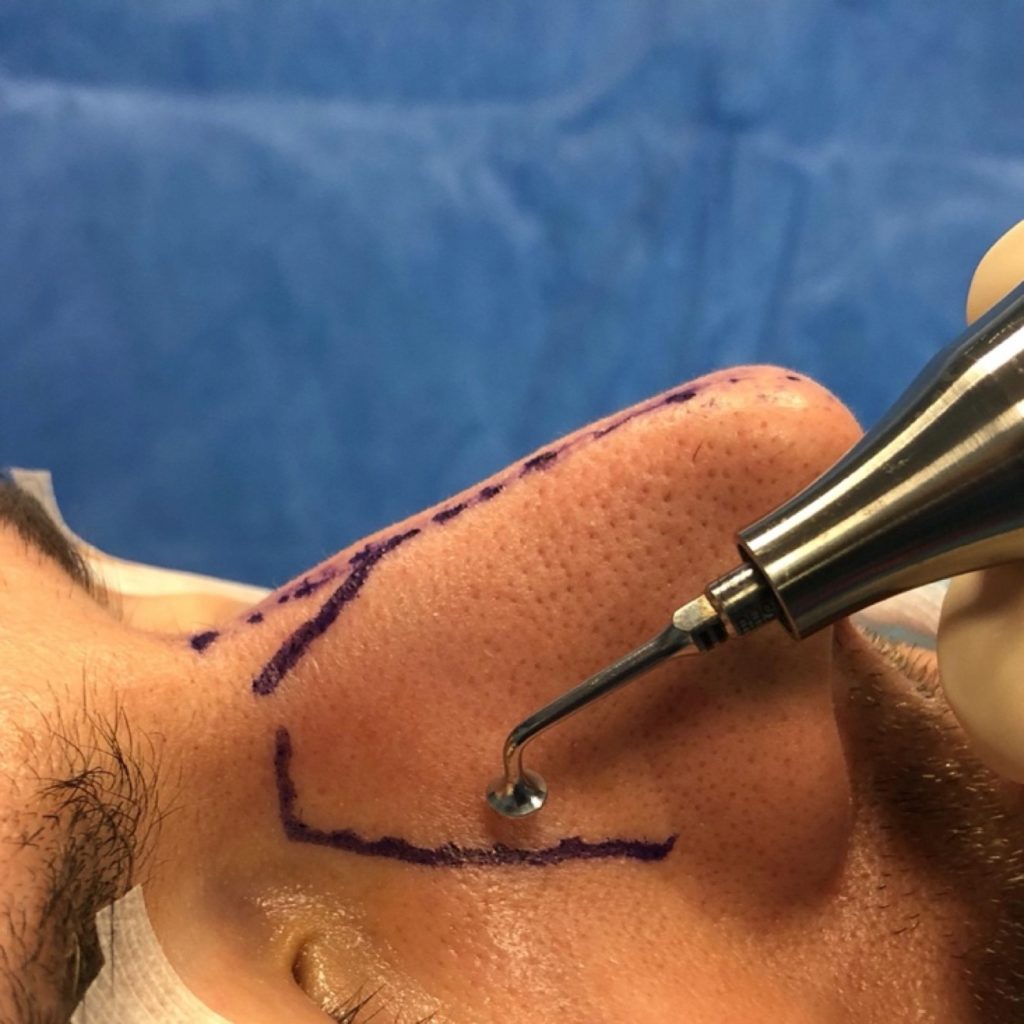
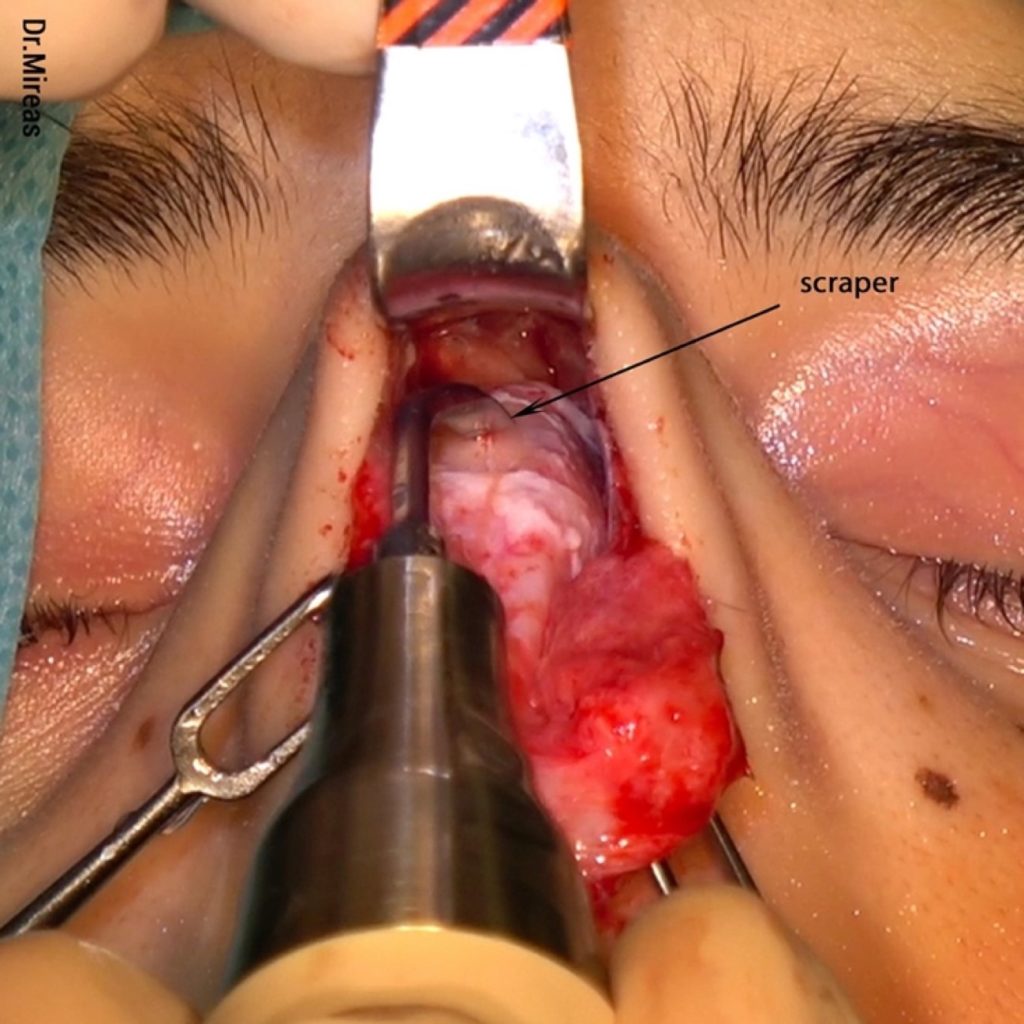
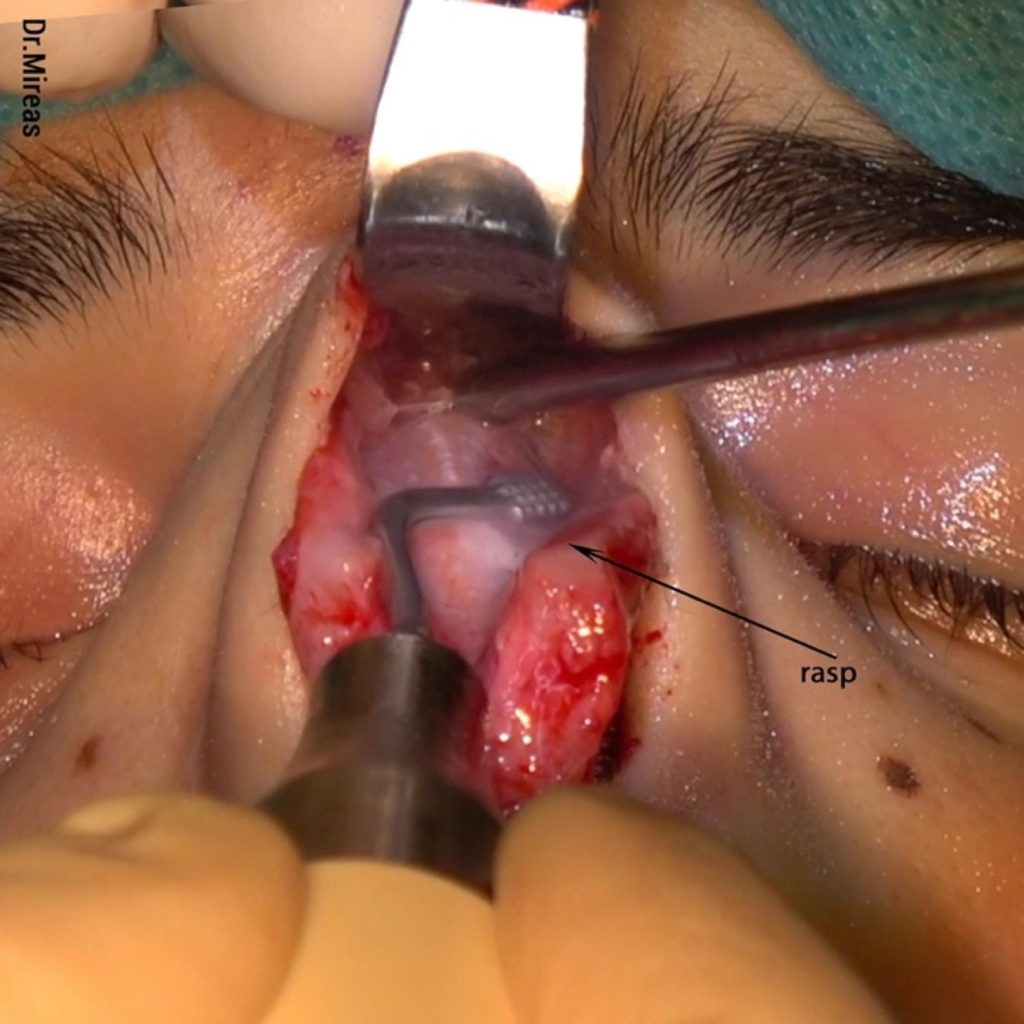
The most important feature of ultrasonic piezo compared to conventional surgery instruments is that by setting the vibration frequency to 25-29 kHz the tip affects only hard tissue (bone and firm cartilage, like rib cartilage), leaving all soft tissue (ULCs, LLCs, septum, skin, muscles, vessels and nerves) totally intact. This allows us to work on the nasal dorsum and the lateral nasal walls by altering their shape, on a smaller or bigger scale. Soft and hard rasps, burrs or scrapers of different angles (Fig. 7-9) can be used to sculpt the nasal bony vault. It is reported that “URS eliminated the need for osteotomies in almost 50% of the cases”.17
A)Nasal Hump
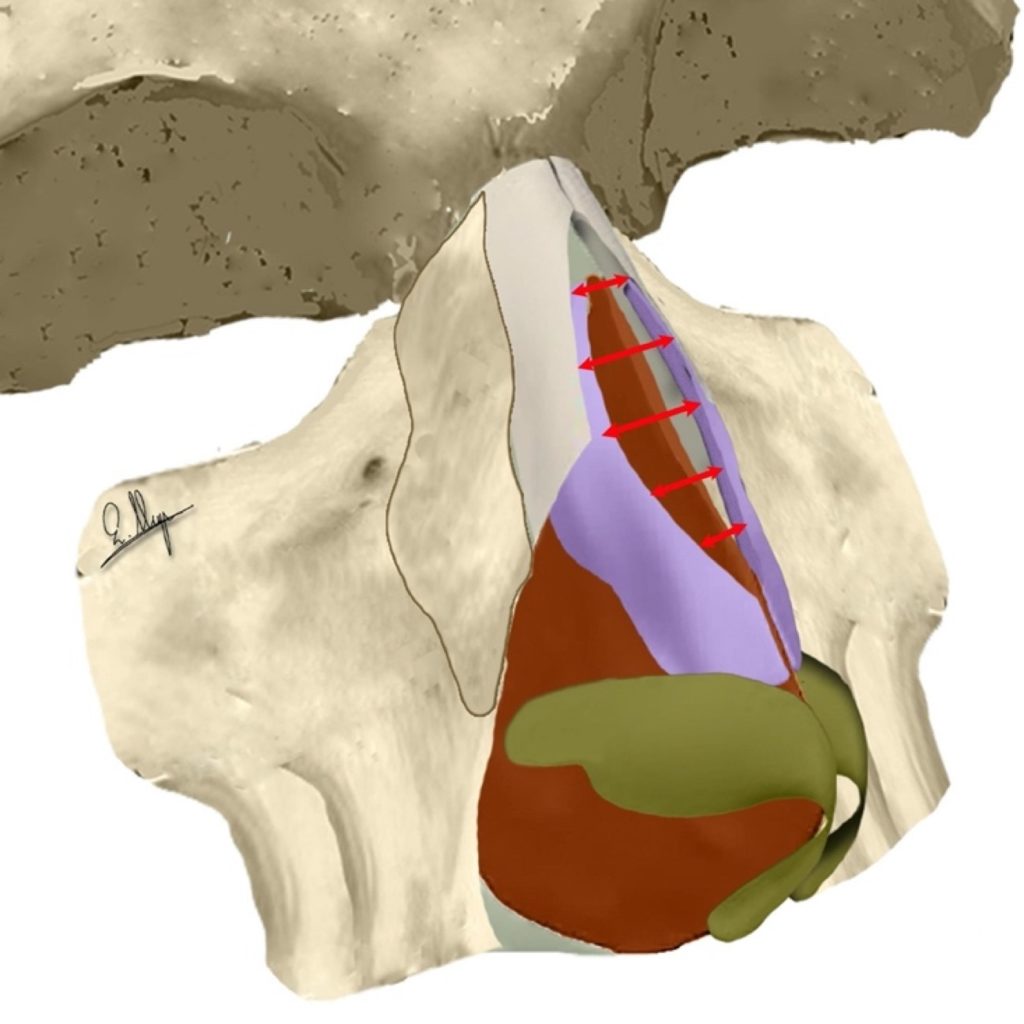
The nasal hump is comprised of two distinct portions.
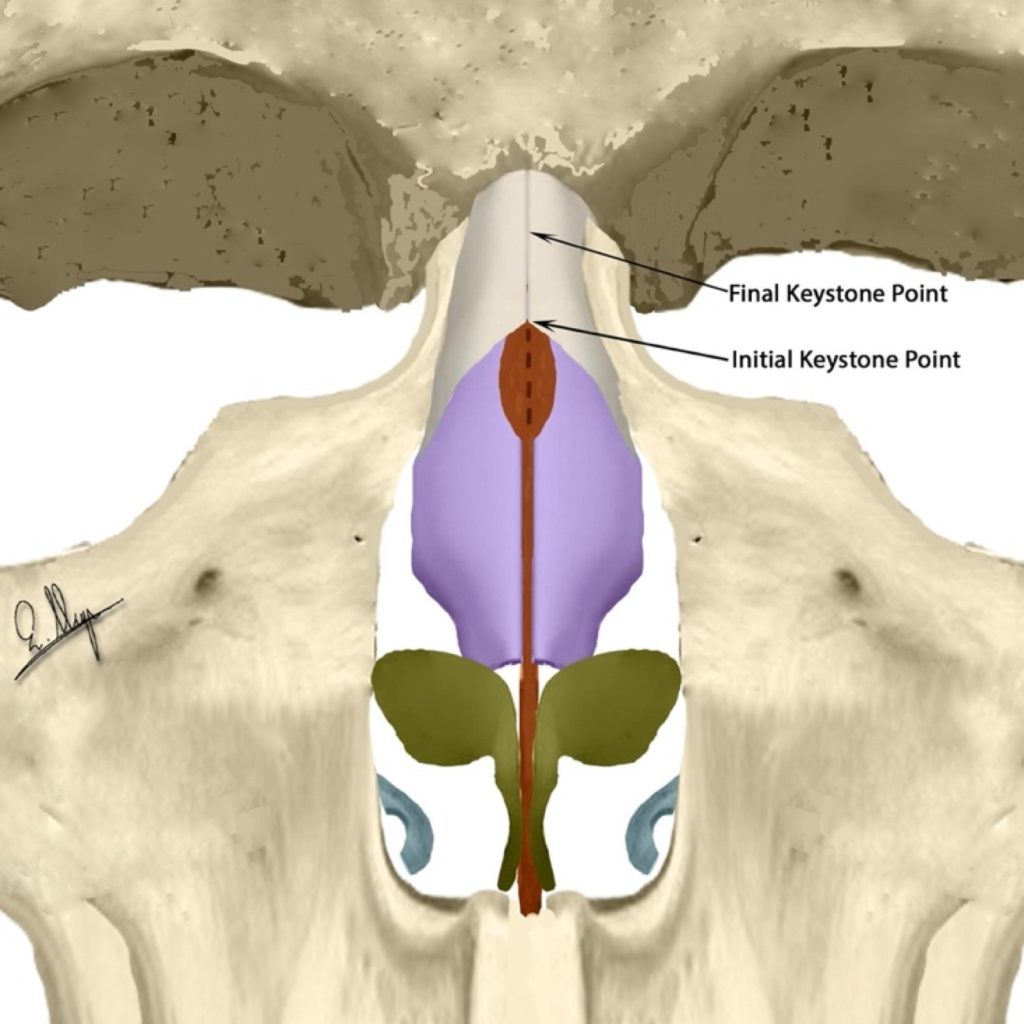
The deepest portion is a cartilaginous hump that contains the dorsal part of the nasal septum medially, and the upper lateral cartilages (ULCs) bilaterally. This cartilaginous structure is responsible for the final shape of the nasal hump and is fully covered by a thin bony cap of 0.7 mm thickness (range 0.5-1 mm) that extends about 10-15 mm cephalically and represents the superficial portion of the nasal hump.18
Removal of the nasal hump starts with bony cap removal, using a scraper or rasps (Fig. 10-11), to reveal the underlying cartilaginous hump3,15 while preserving the ULCs and the dorsal septum (Fig. 12).

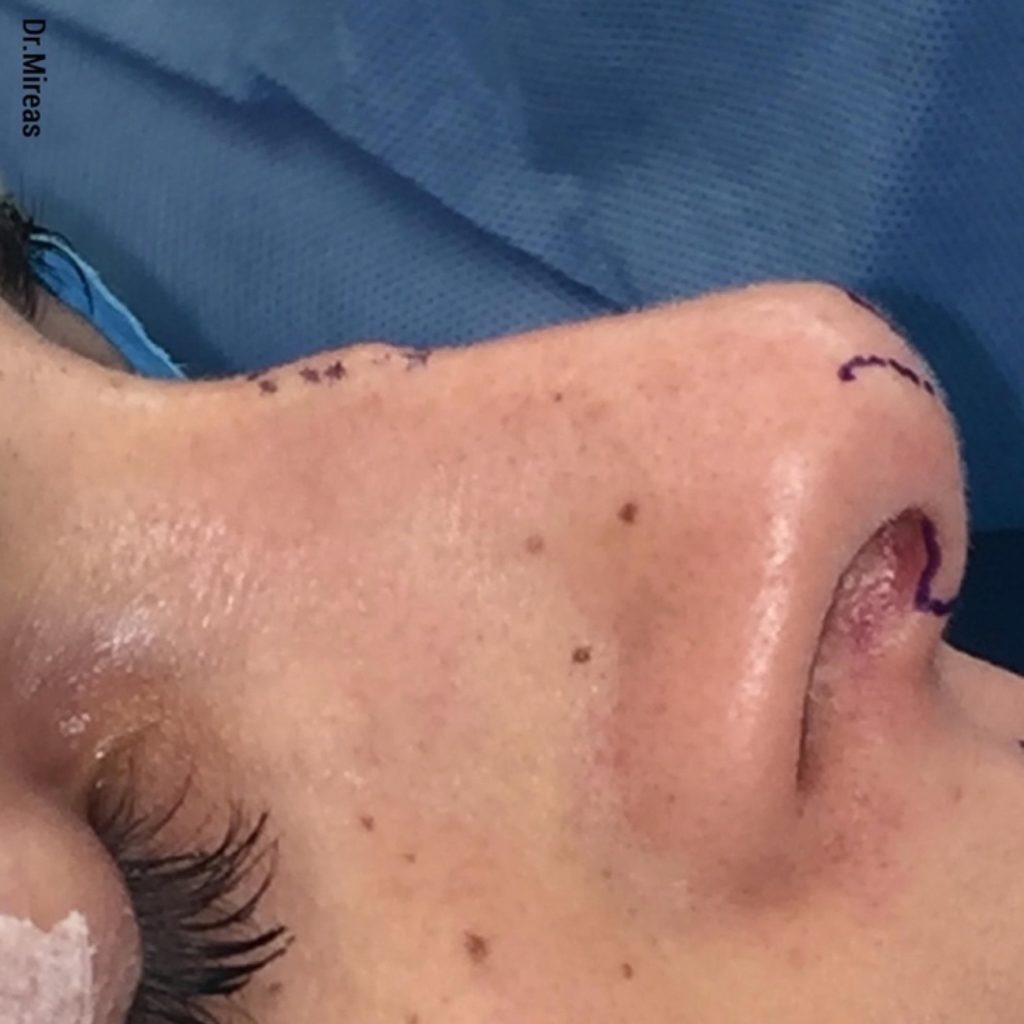
Initial keystone point marked
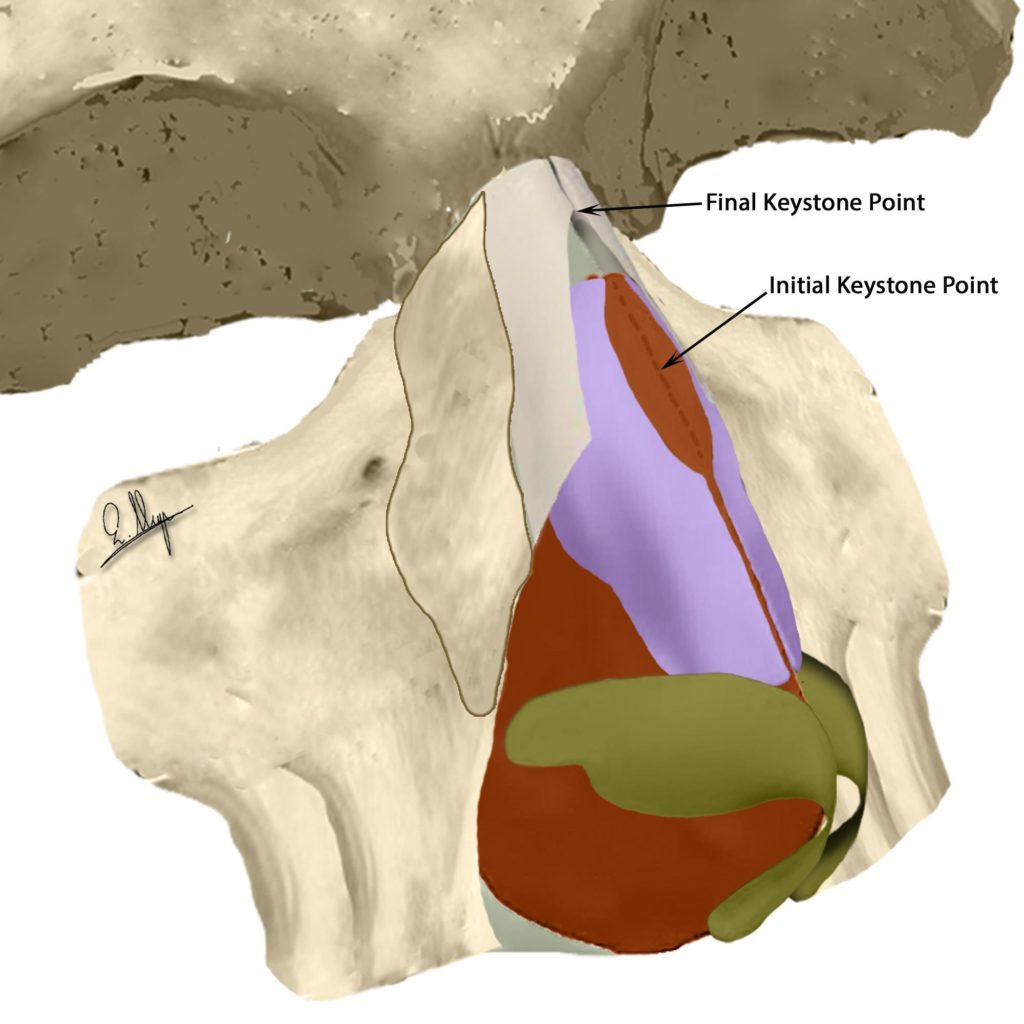
The Keystone point has been relocated cephalically
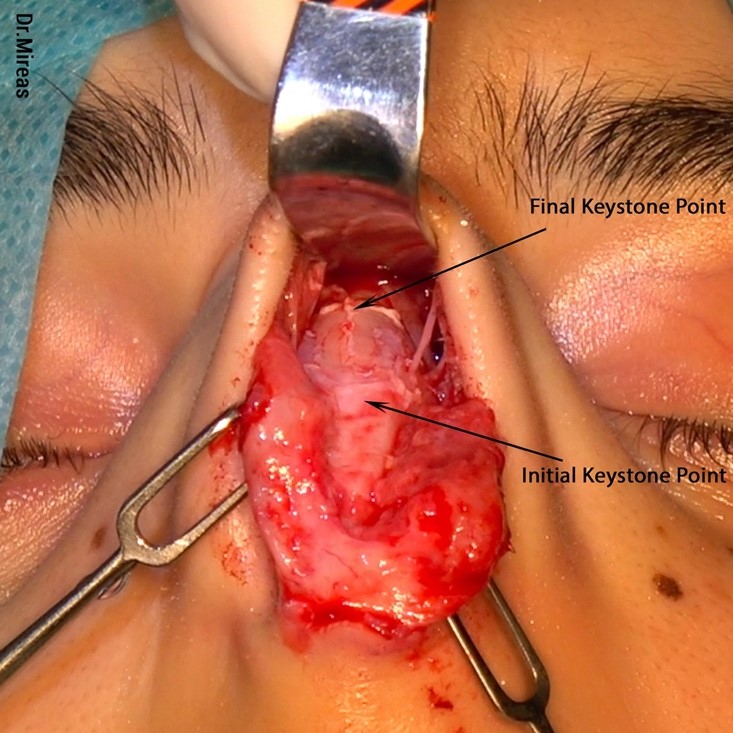
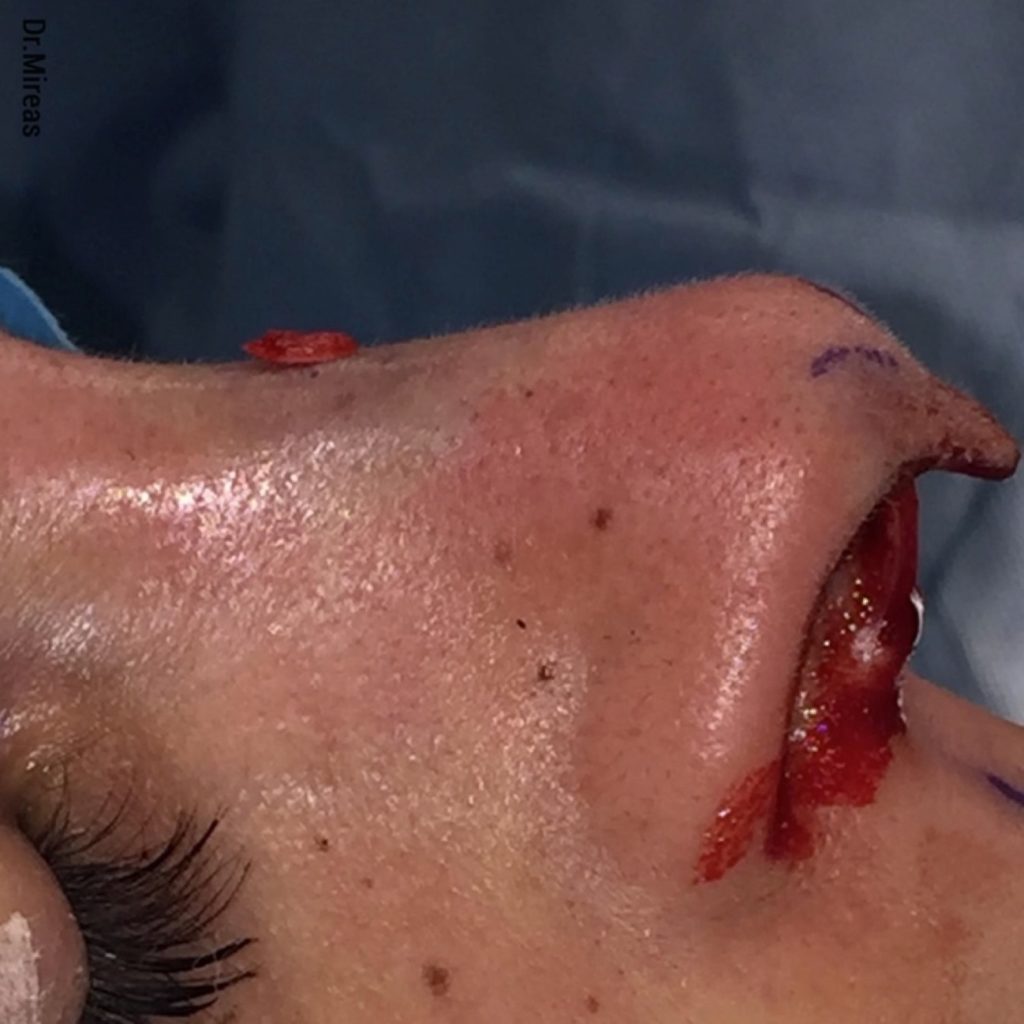
As can be seen in the pictures (Fig. 13-20), after bony cap removal, the keystone point has been relocated cephalically while the caudal ends of the dorsal nasal bones have been separated. More bony cap removal leads to increased distance between them because they are moving more laterally, caudally and at a lower level.18
(Illustration)
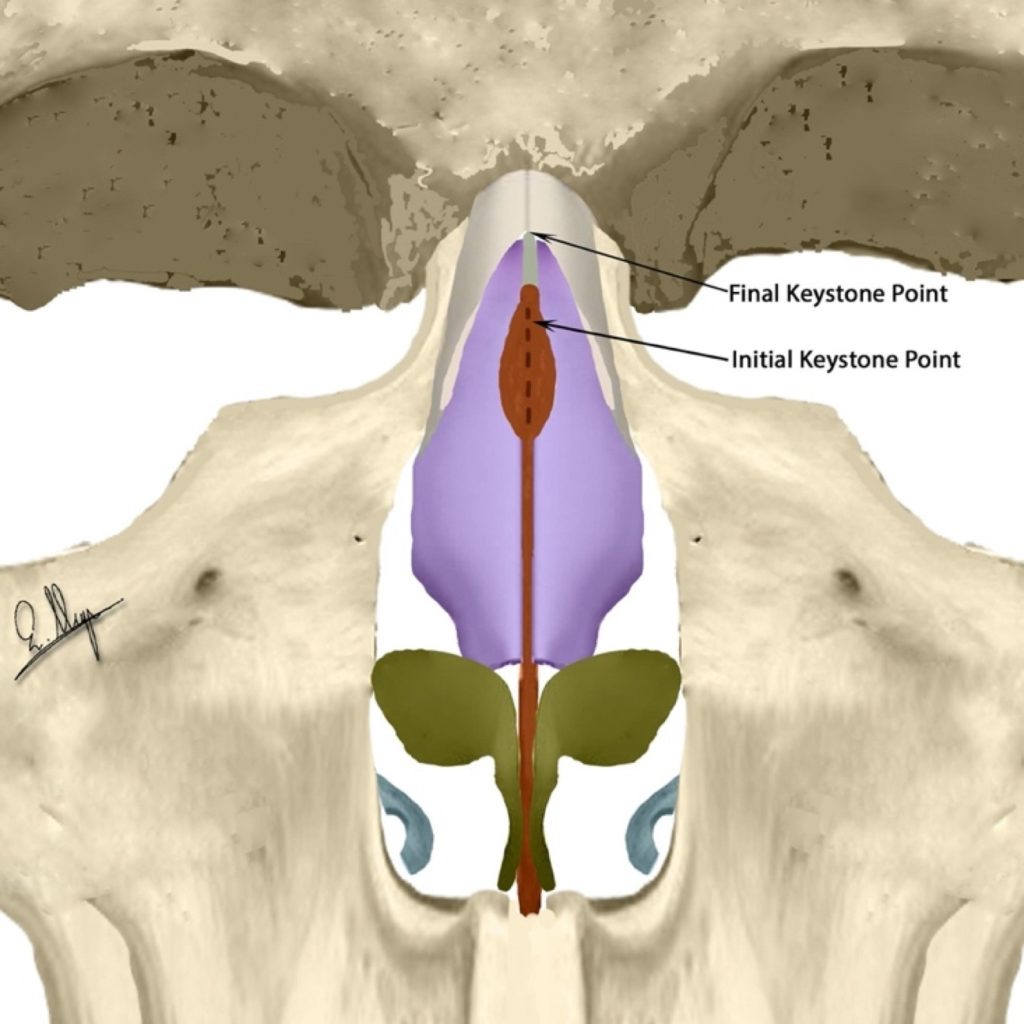
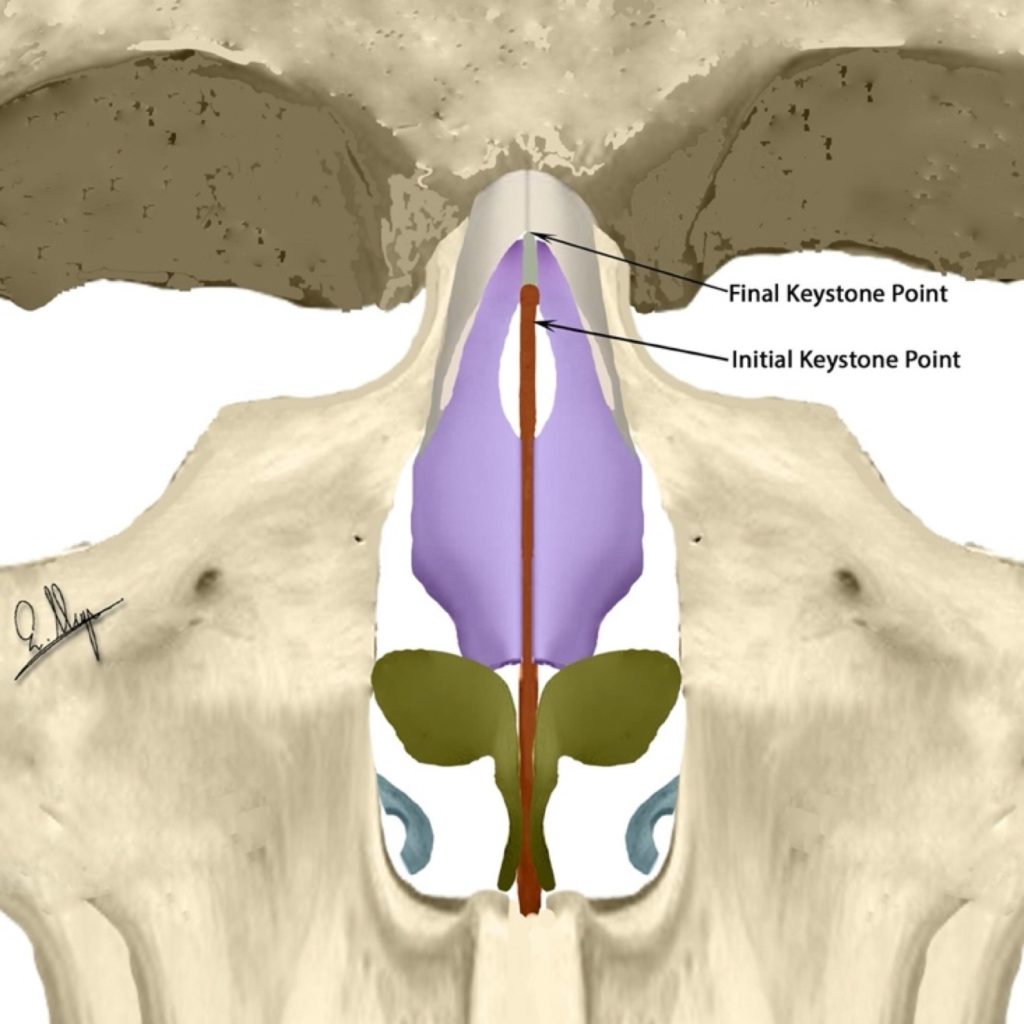
Initial and Final Keystone points shown

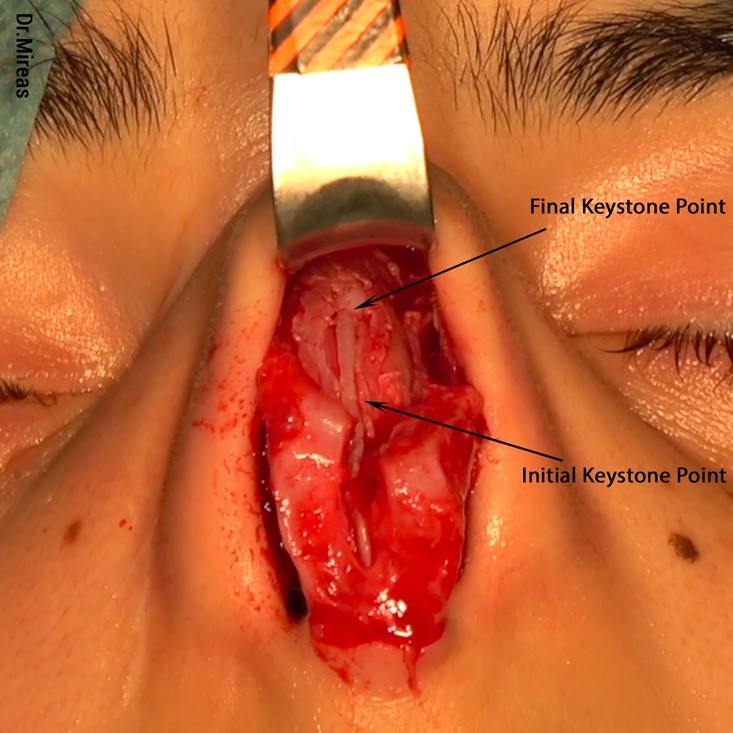
Initial and Final Keystone points shown
After bony cap removal, it is time to deal with the cartilaginous hump.
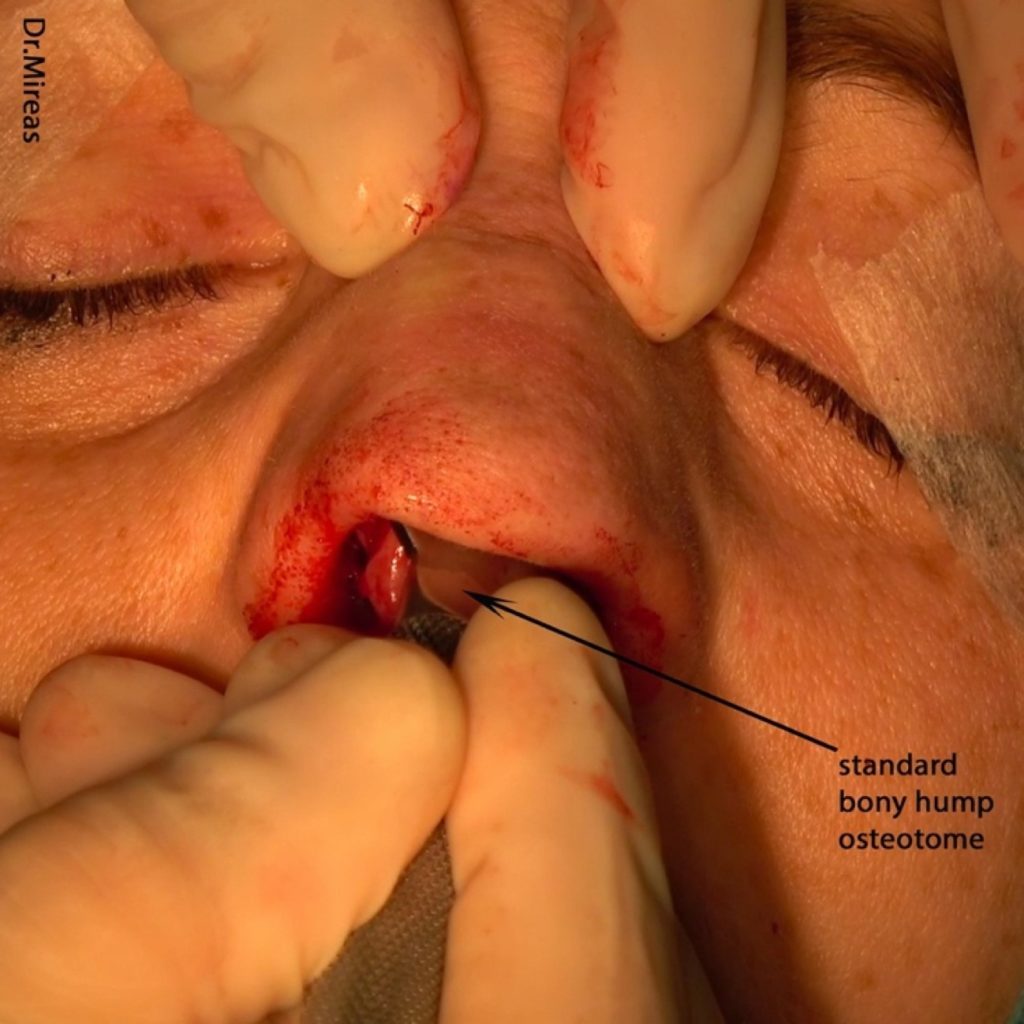
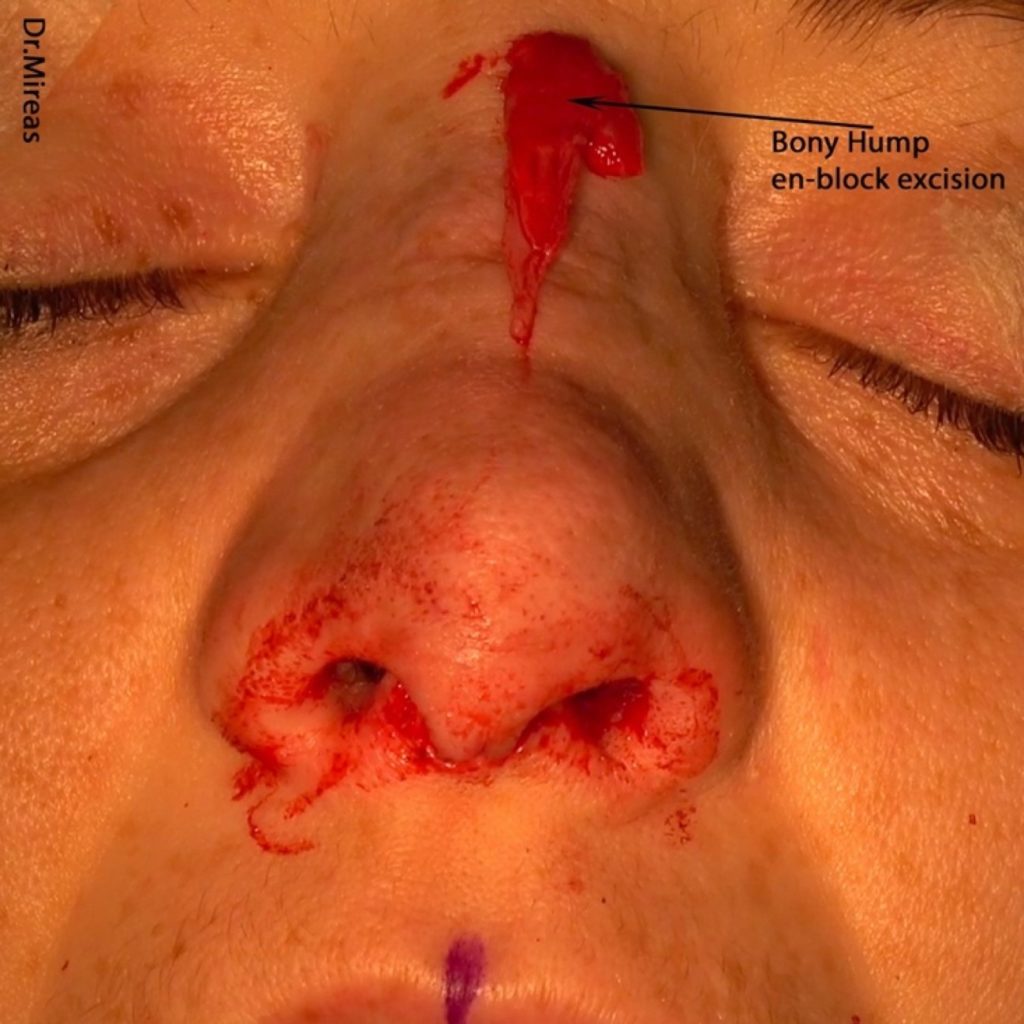
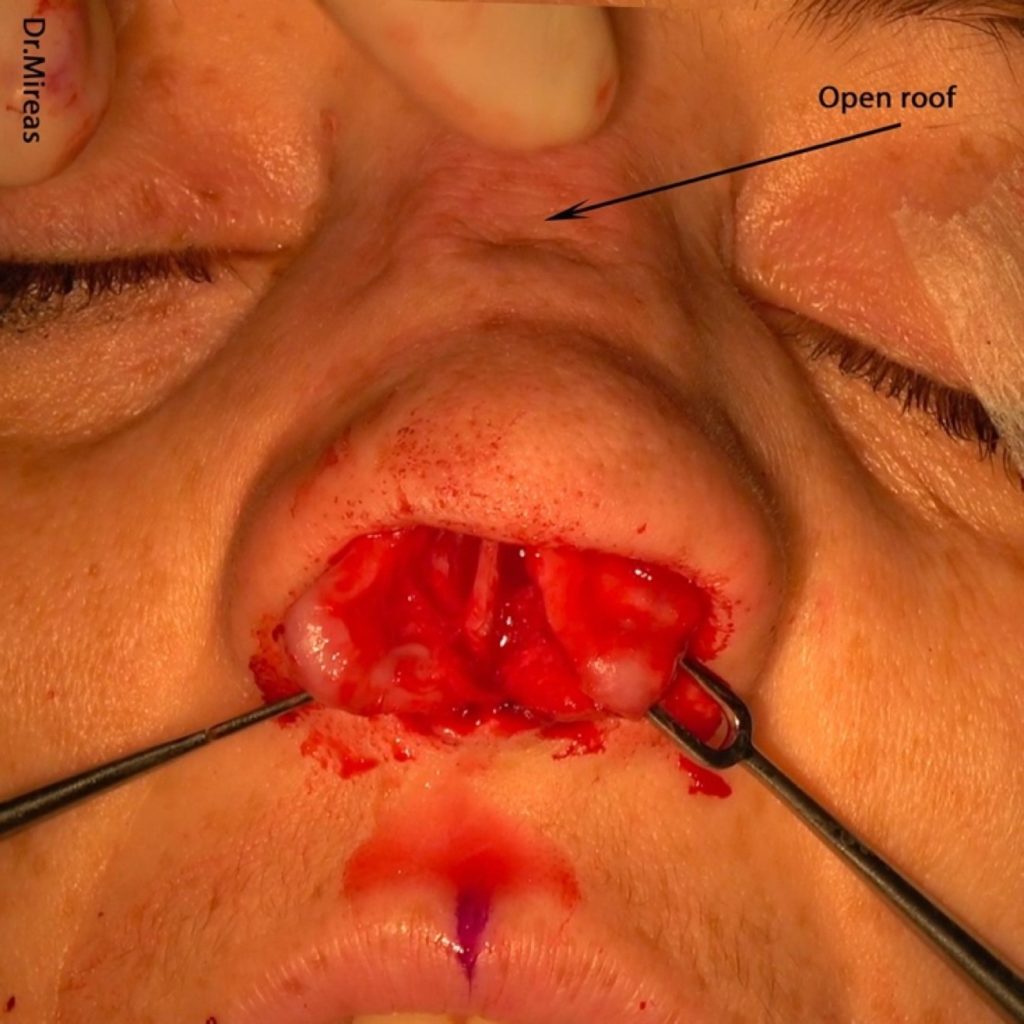
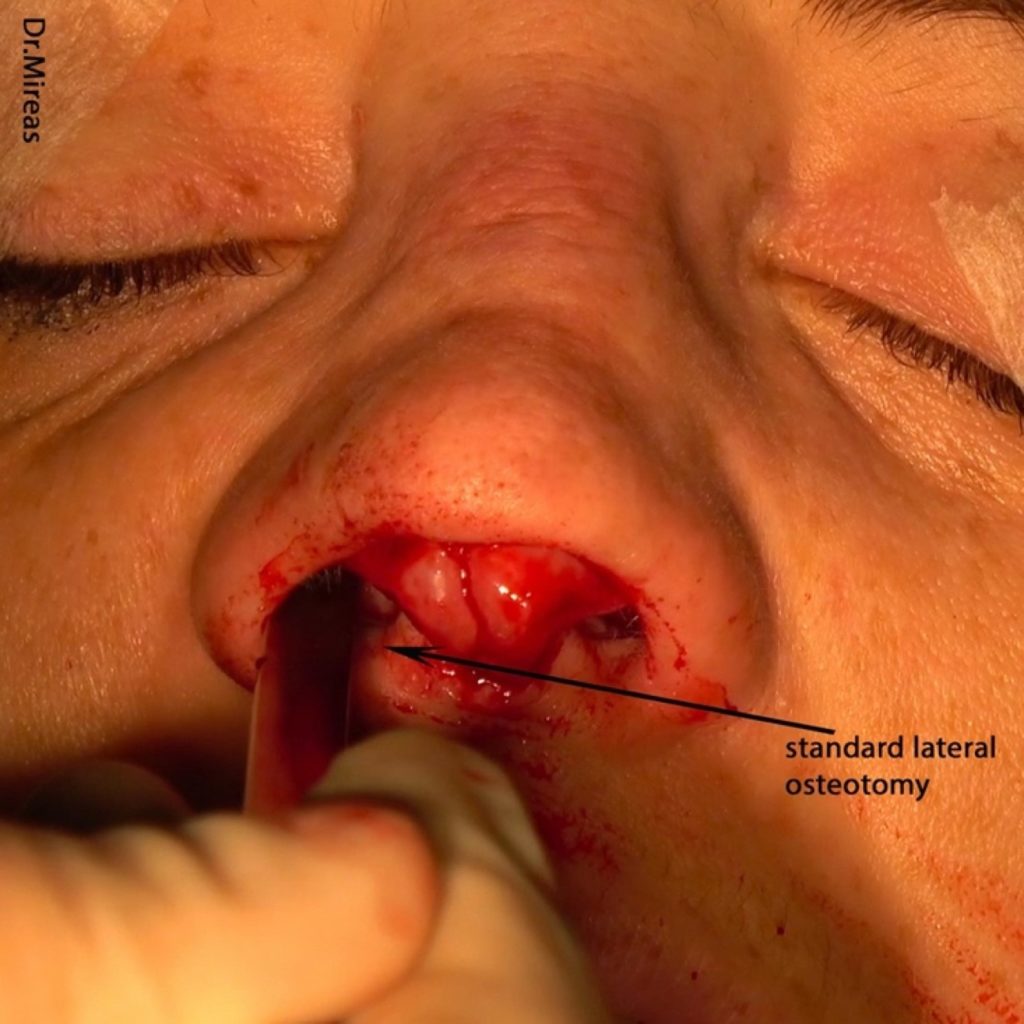
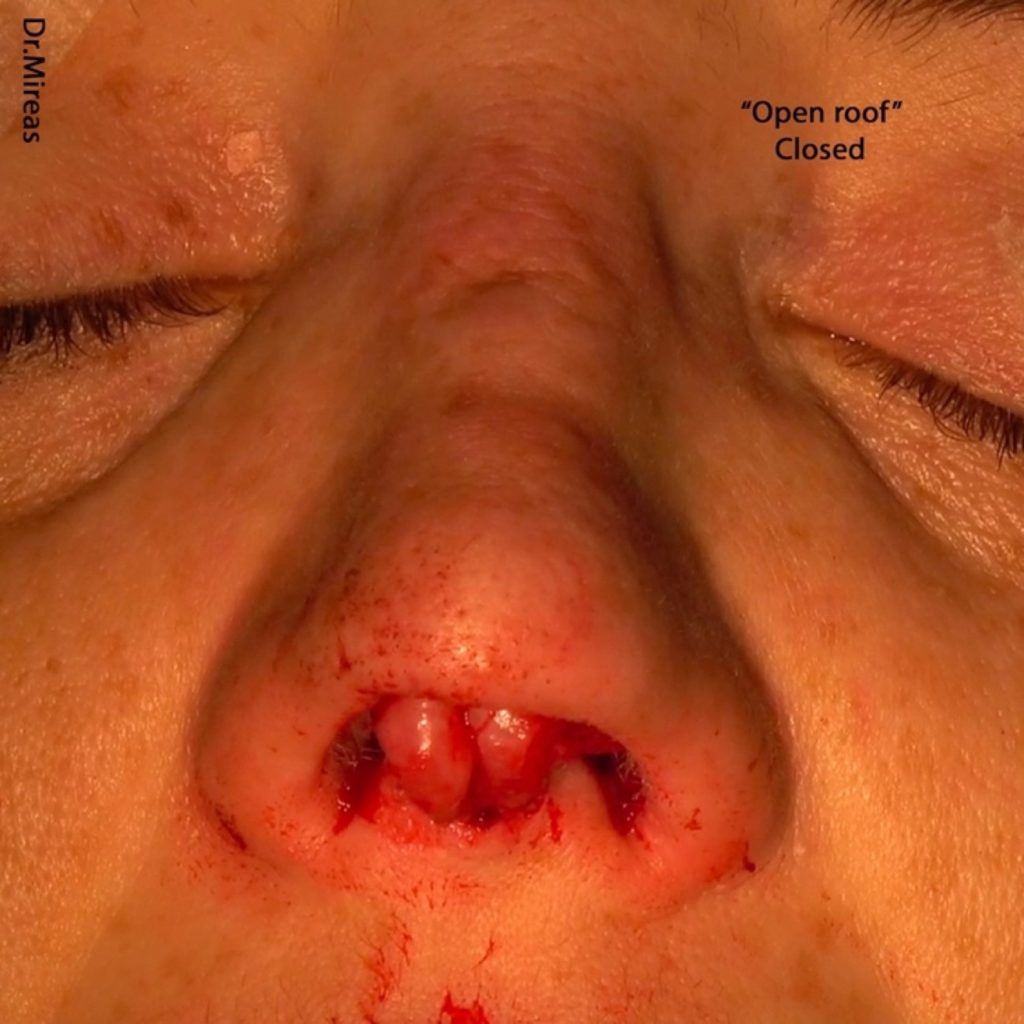
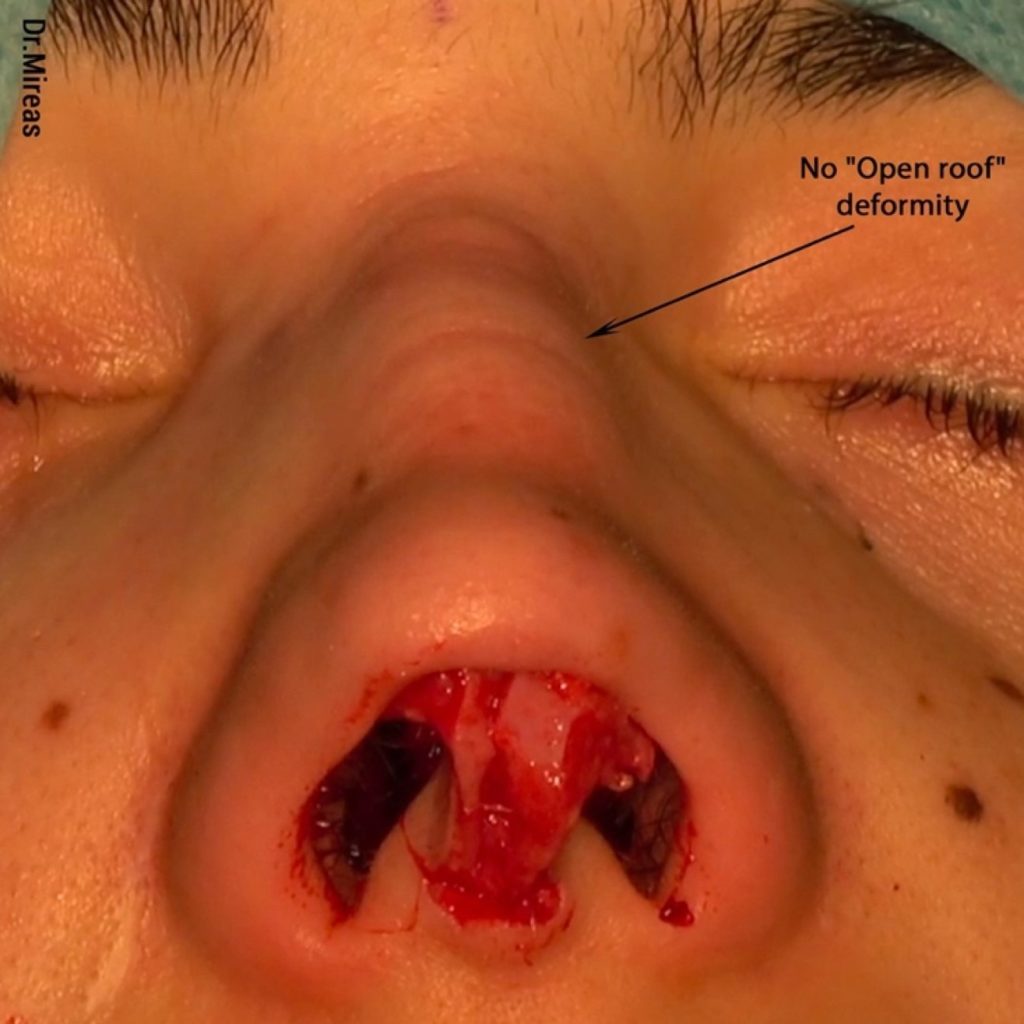
An en-bloc resection of the cartilaginous hump will lead to the exact same situation as the conventional technique (en-bloc osseocartilaginous hump resection with osteotome19) would lead us to, i.e. an open roof (Fig. 21-23). In this case one must use lateral osteotomies (Fig. 24-25), introduced by Joseph (1931),9 combined with medial or paramedial osteotomies (Tardy 1984, Mylard 1996).20,21 A low-to-high (Sheen 1978)22 or low-to-low osteotomy (Tardy 1984)20 in combination with a medial/paramedial osteotomy followed by a transverse greenstick fracture accomplishes the closure of the open roof.
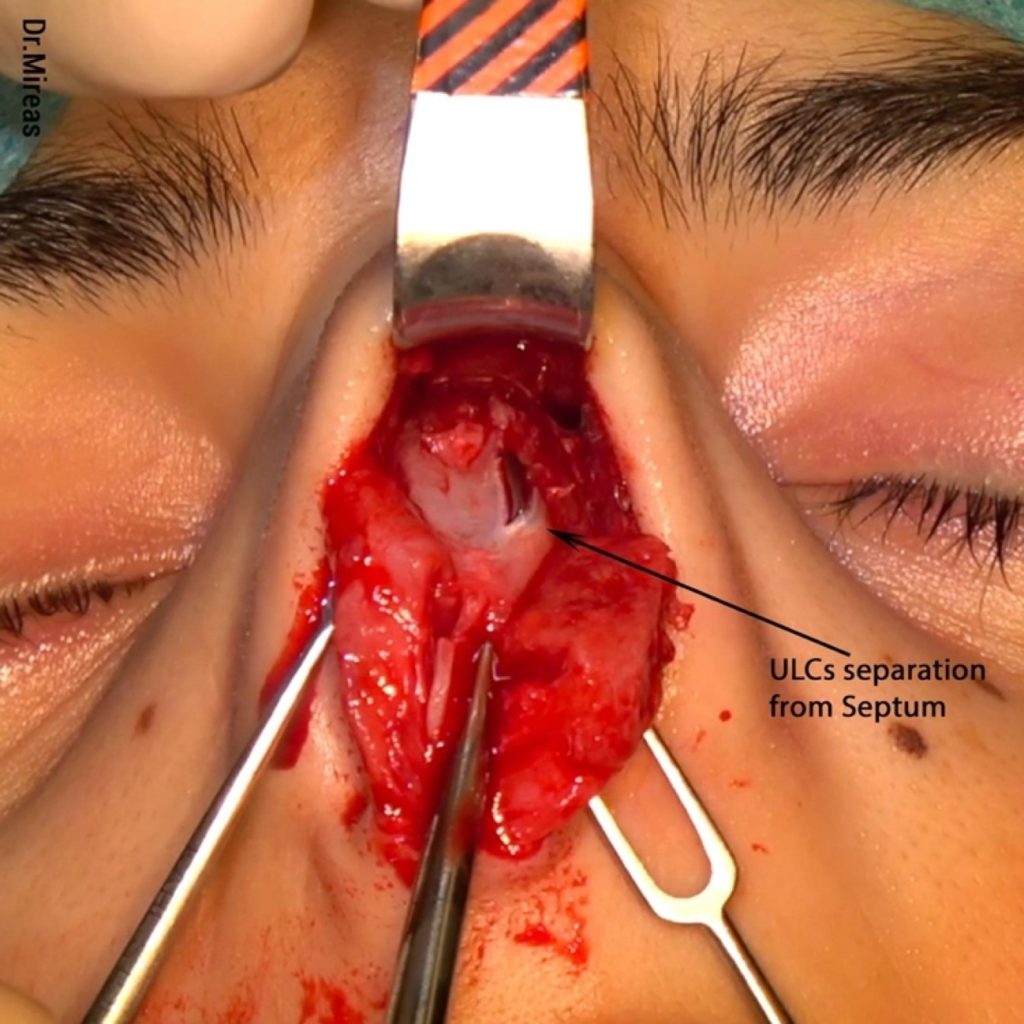
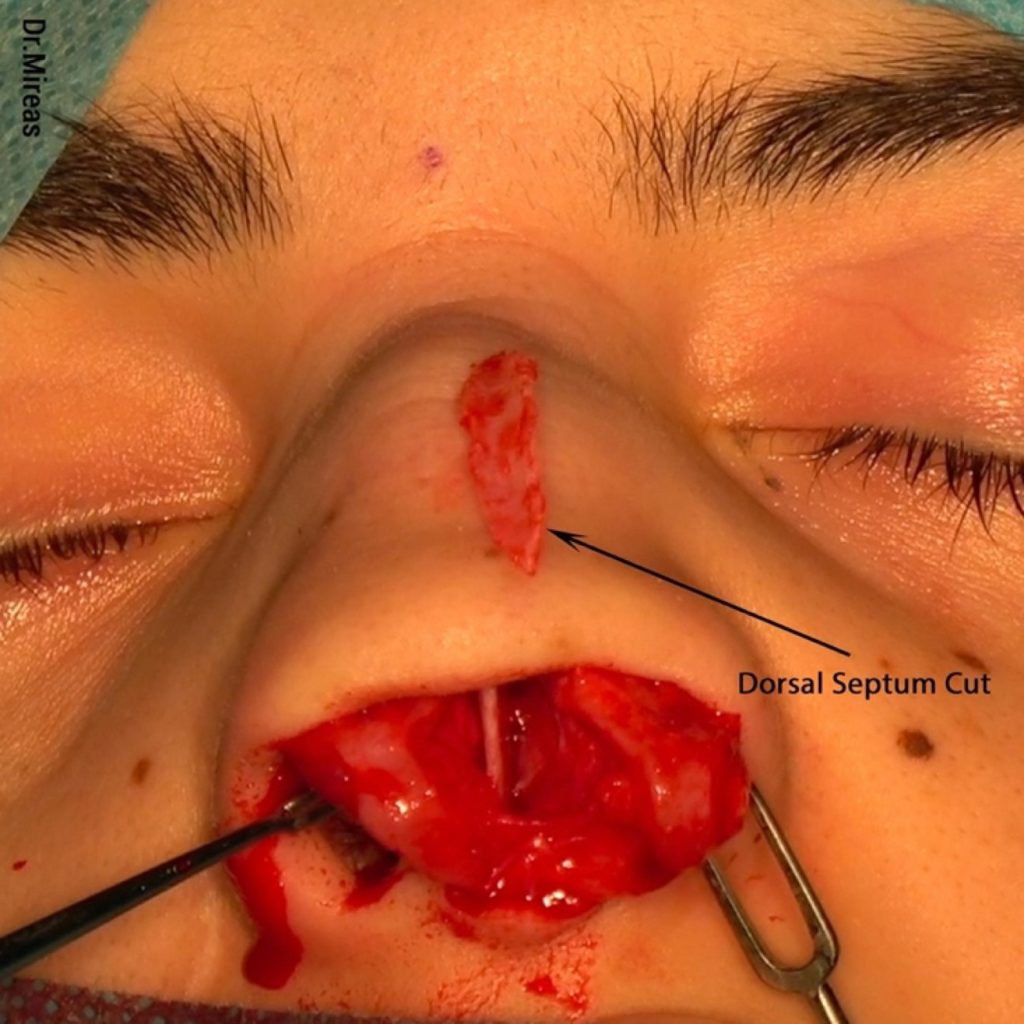
With piezo, we recommend starting by separating the ULCs from the septum (Fig. 26), preferably with an elevator in order to completely preserve both ULCs. Next, we cut the dorsal part of the septum on a level according to the desired new dorsal profile line (Fig. 27-28). It must be underlined that after bony cap removal and separation of the cartilages, access at the dorsal septum is very much improved at about 10-12 mm cephalically compared to the initial access.
In comparison, one can see that with standard procedure we usually get an “open roof” deformity,5 while on the other hand with piezo the cartilaginous vault is preserved, and the particular deformity is avoided (Fig. 29-37).


It is reported that in about 20-30% of patients, no more bony surgery is needed after piezo bony cap removal.24


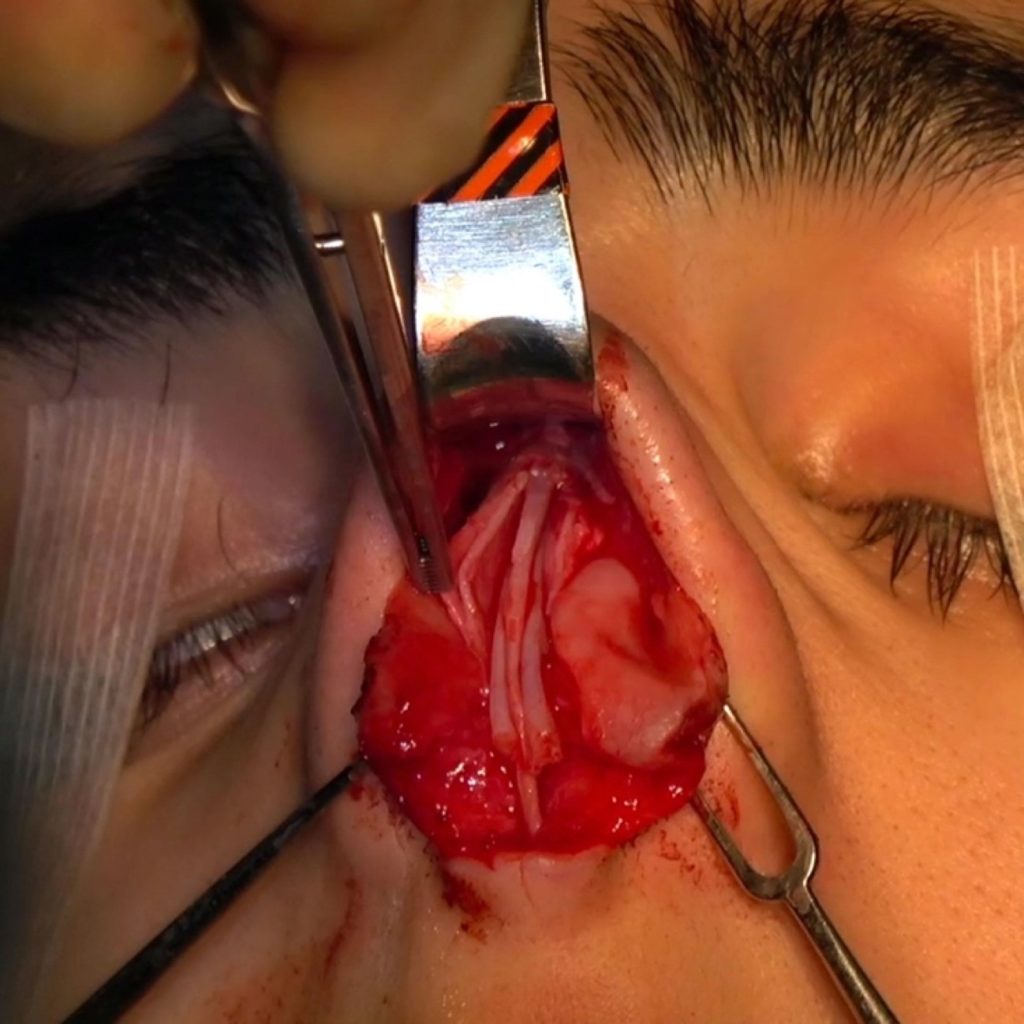
The next step is to deal with the area between the preserved ULCs and the new septum. Depending on the case, there are three possible options: a) to use the intact ULCs as spreader flaps25 (Fig. 38); b) to use spreader grafts26 (Fig. 39), or c) to use a combination of flaps and grafts (Fig. 40). All three options can be performed unilaterally or bilaterally (Fig. 41).


Sometimes a small or large portion of the ULCs has to be removed, while in other cases we proceed with osteotomies in order to deal with a big gap or asymmetry issues (Fig. 42-43).
B)Lateral Nasal Wall
The nasal bony vault can present various configurations in terms of thickness (thin, medium, thick), shape (convex, straight, concave), bony base width (wide, narrow) as well as local deformities.16 Extended elevation in combination with direct vision allows us to easily and meticulously observe the nose regarding all of these.
Taking into consideration our final goal, we can proceed with a real osteoplasty/rhinosculpture and remodeling of the nose. With standard procedure it is sometimes is difficult even to evaluate a deformity because palpation cannot provide us with enough information and a CT scan is not as helpful as direct vision.
If something projects more than desired, piezo helps us to lower it, whether it is a thicker bone, a wider bony base or a local projection, especially in revision surgeries.
B.1)Convexity
Ultrasound rhinosculpture with rasps and/or scraper can reduce the thickness of the nasal wall by 1-3 mm3, and in many cases with little convexity, it leads to a pleasing and controllable bone reshaping (Fig. 44-47).
Especially in cases of severe asymmetry, URS can achieve a significant improvement and leads to a much better balance compared to conventional instruments.
If the convexity is excessive, various combinations of horizontal, vertical, angulated or criss-cross3,15 osteotomies must be performed and these will sometimes follow an initial bone thinning with URS.
B.2)Wide Bony Vault Base
A common issue a surgeon has to deal with during a rhinoplasty is the wide base of the nasal bony vault, unilaterally or bilaterally.
We can narrow the bony base externally by reducing the actual thickness of the nasal walls with a rasp or/and scraper, in an equal or different manner on each side (Fig. 47-49).15,24
If more narrowing is needed, we can continue with lateral osteotomies as described in the relevant paragraphs.

c)Local Deformities
Local deformities usually develop after a previous surgery or facial injury.
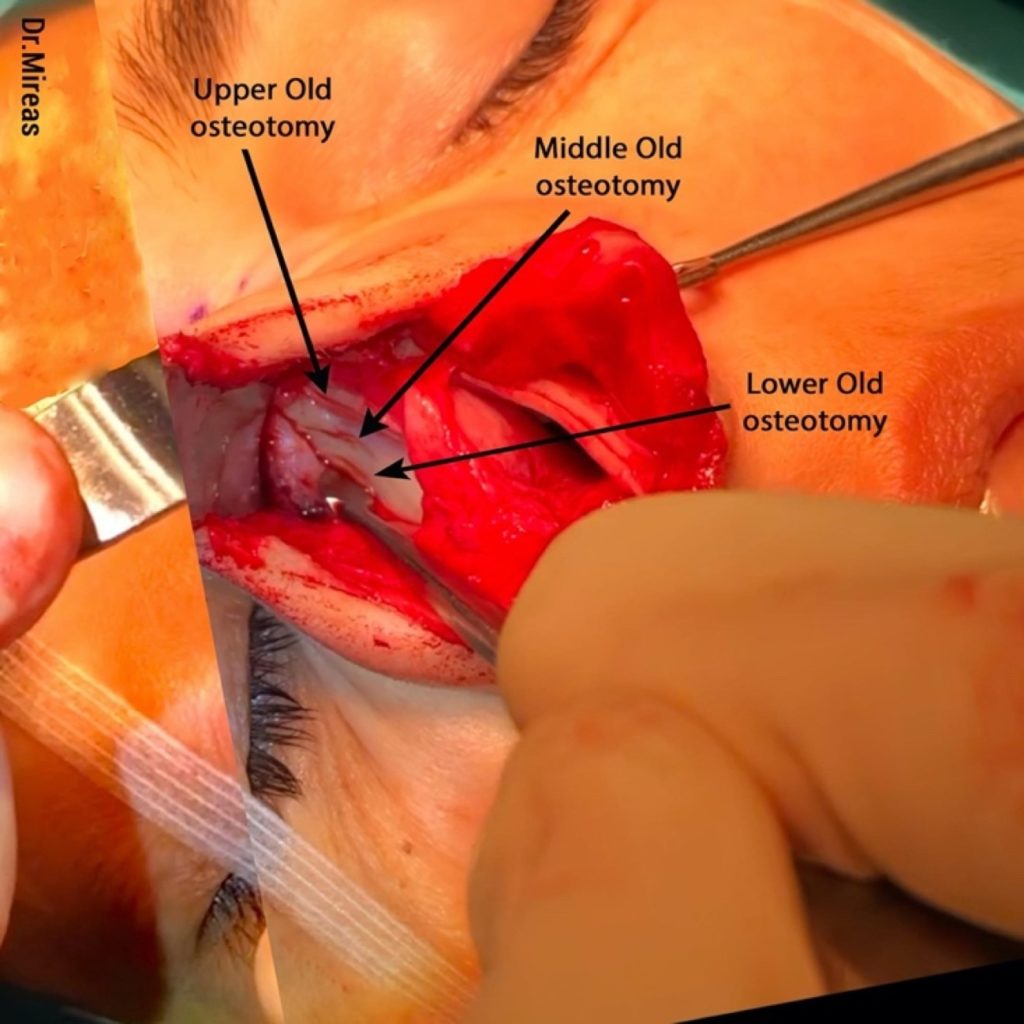
In post-traumatic cases the deformities are usually small or big bone projections along the fracture lines of the injury, while in post-operative cases they can be located either at the dorsal or the lateral portion of the nose. In the dorsal area, issues can be observed at the new dorsal bone limit as modified with conventional rasps or osteotomes, while on the lateral bony wall they can usually be detected along the osteotomy lines created during a previous surgery or surgeries.
Extended elevation and direct vision permit an excellent evaluation of the current situation, as well as better surgery planning.
In cases of local surface bone deformities, we often use rasps and/or scrapers to eliminate the problem promptly and effectively, while sometimes we prefer to excise the deformity in one piece (Fig. 50-55).

If there is a slight bone projection along the old osteotomy lines, we also use scraper and/or rasps to easily lower the projection and make the surface smoother.
In cases of insufficient mobilization during the previous surgery we can either use URS in minor issues or perform a new osteotomy to deal with bigger problems where more mobilization is needed.
When the mobilization during the previous operation is greater than needed, a classic “step deformity” might develop, in which there is a noticeable distance between the levels of the two bones created by the osteotomy line. A step deformity can be dealt with in two different ways.
In many cases we have to relocate the outer bone medially in order to “meet” the deeper one. This relocation can often be done by making a new osteotomy at a lower level compared to the old one which was created higher than desired. In some cases, a medial/paramedial oblique osteotomy is added to achieve better approximation. In cases of excessive narrowing of the bony vault and verticalization of the lateral walls, we try to relocate the deeper bone laterally by using an out-fracture followed by stabilization with sutures that pass through the bones and “lift” the deeper bone to its new position, close to the outer bone.
In cases of slight step deformities, we can use cartilage (diced, morselized etc), fascia or other “camouflage methods” to cover them.
Moreover, in some cases where the aforementioned relocations are not sufficient, they can be combined with camouflage to achieve the appropriate solution.
D)Final Contouring
At the end of a rhinoplasty surgery, after all the osteotomies and rasping of the initial planning have been performed, the surgeon may sometimes notice bone deformity, such as a small bone projection at the caudal end of the dorsal edge, or even worse, a noticeable difference between the two sides of the nose concerning the height of the dorsal borders of the nasal walls.
One can see the spreader grafts in place
One can see the spreader grafts in place
During a standard, non-piezo rhinoplasty, the surgeon’s main concern in a situation like this is that it is difficult to rasp a mobile bone27 because of its very movement, and also dangerous because of the possibility of partially or even complete destabilization of a well-modified -until this particular moment- bony vault. Unfortunately, this kind of last-minute attempt at improvement has often proven to be disastrous.
With piezo, the surgeon can cut or rasp even mobile bones easily and safely because the stability of the whole structure is internal and remains uncompromised while the pressure from the tiny piezo tips is very slight and the bone does not actually move or can be held steady with forceps (Fig. 56-57).15
Osteotomies (OT)
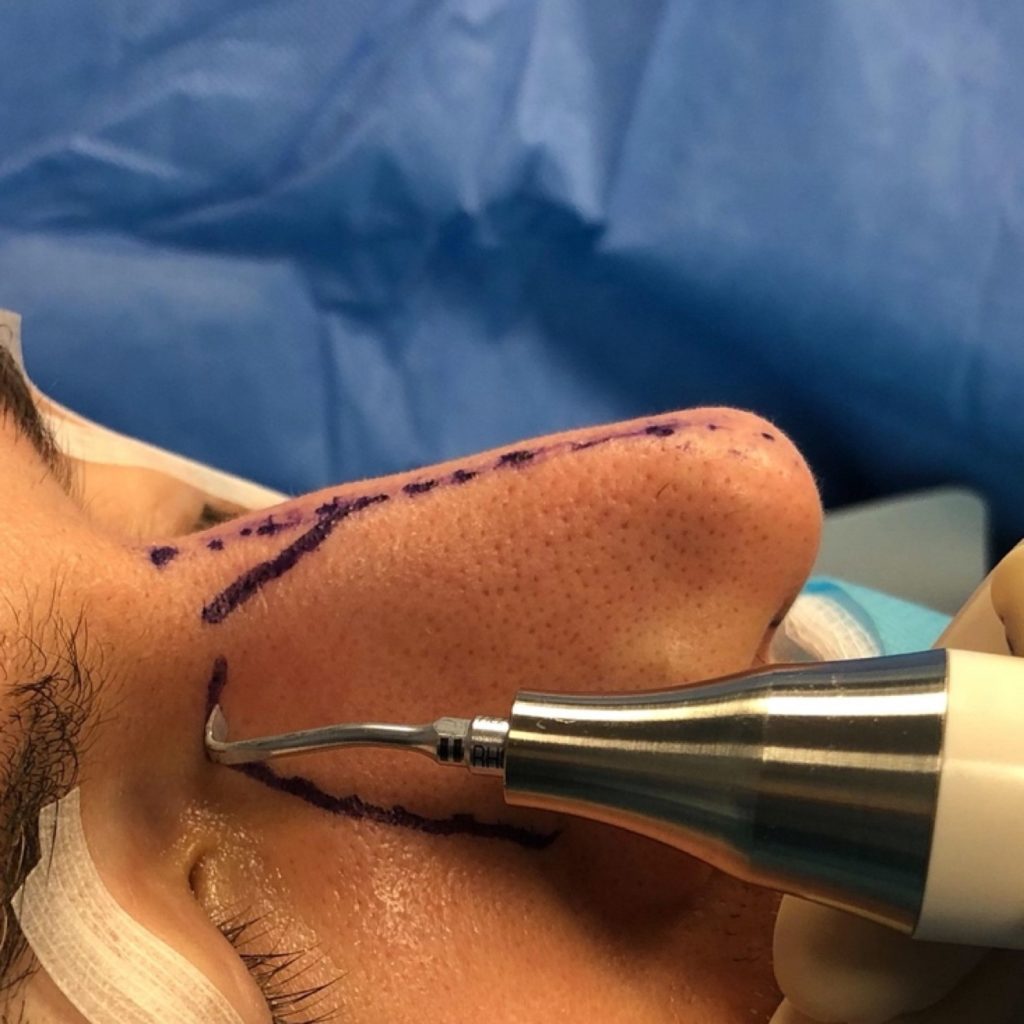
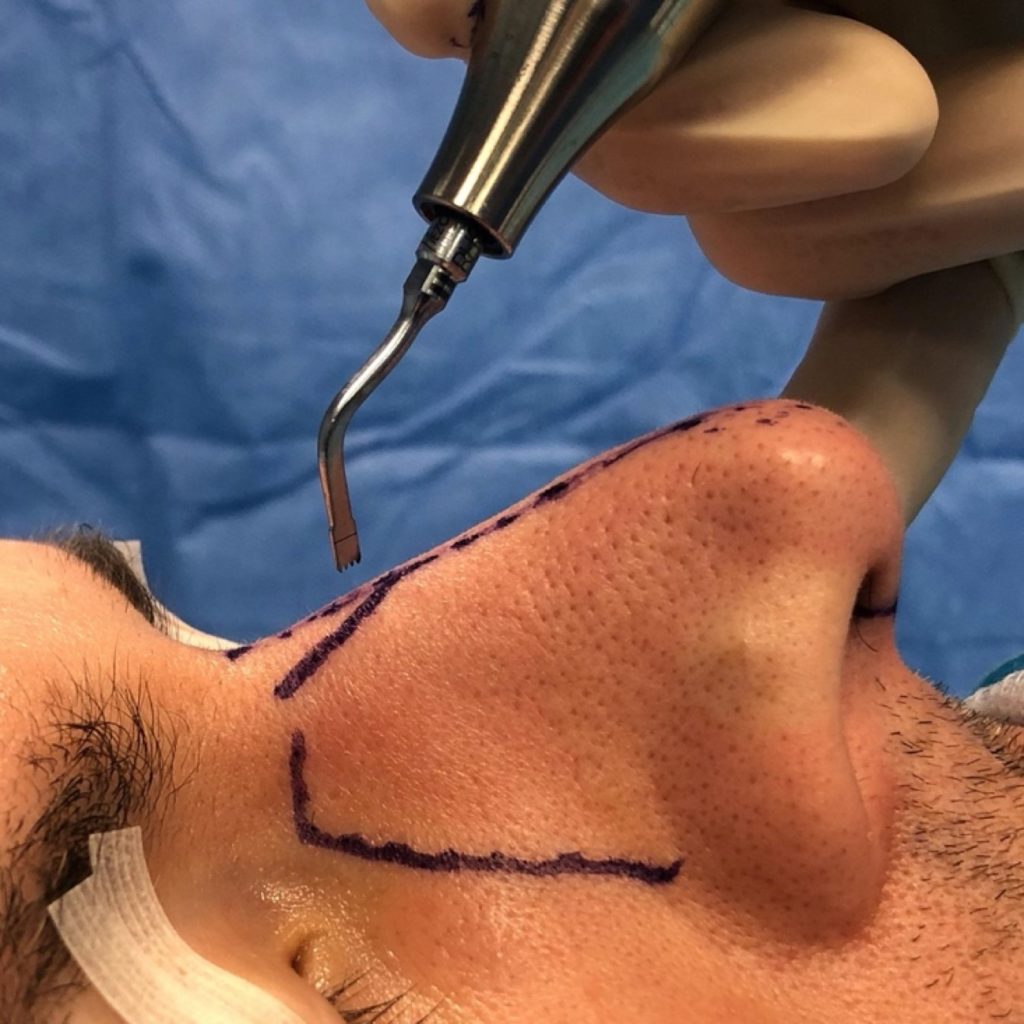
Osteotomies with piezo are always performed under direct vision whether they concern the dorsum or the lateral nasal wall. There are various tips of different shapes, angulation, width and sharpness in order that they can be used in different areas and situations. The pressure needed during an osteotomy is slight and we try to cut without any pushing. Sometimes a slight superficial cut is performed prior to osteotomy in order to facilitate it (used as a guide). Osteotomies are easily performed on mobile bones too, e.g. just after a serious facial injury or at the end of a rhinoplasty.
A)Lateral Osteotomies (L-OT)
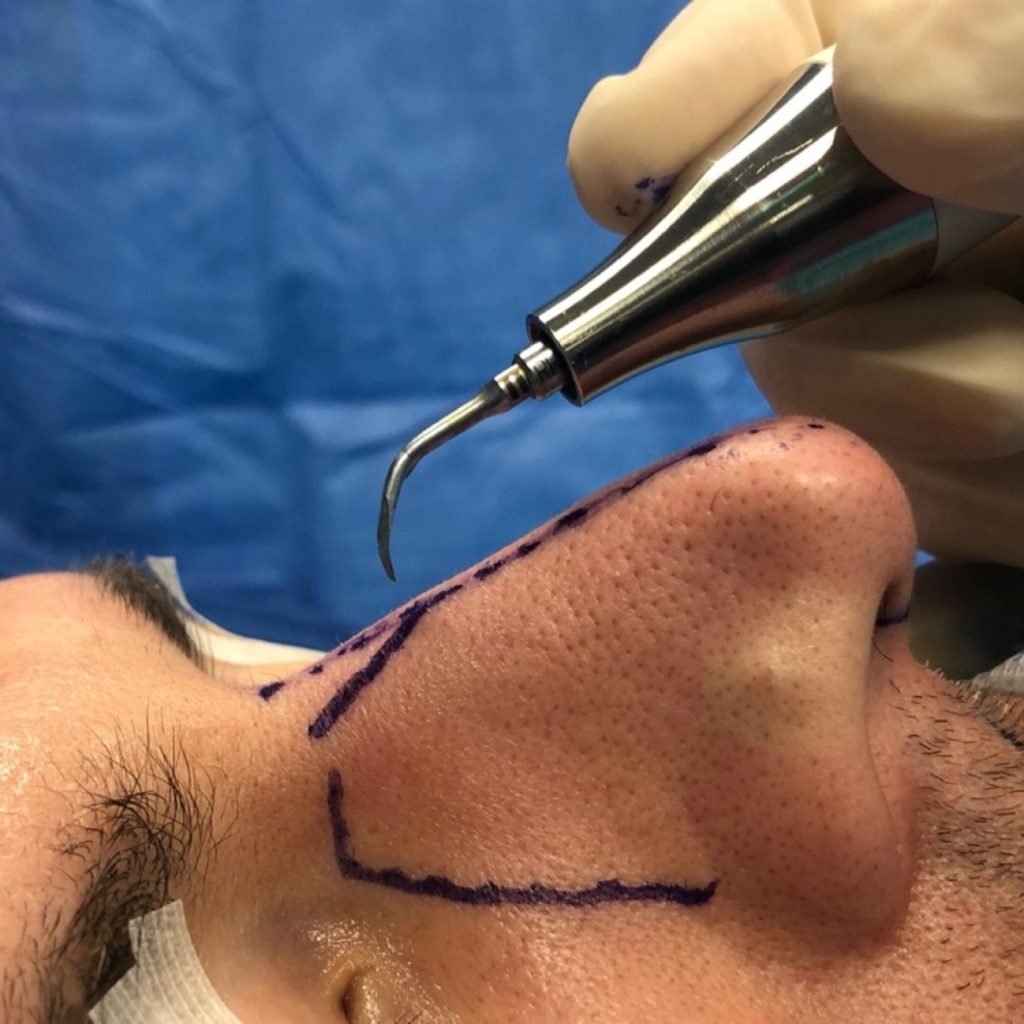
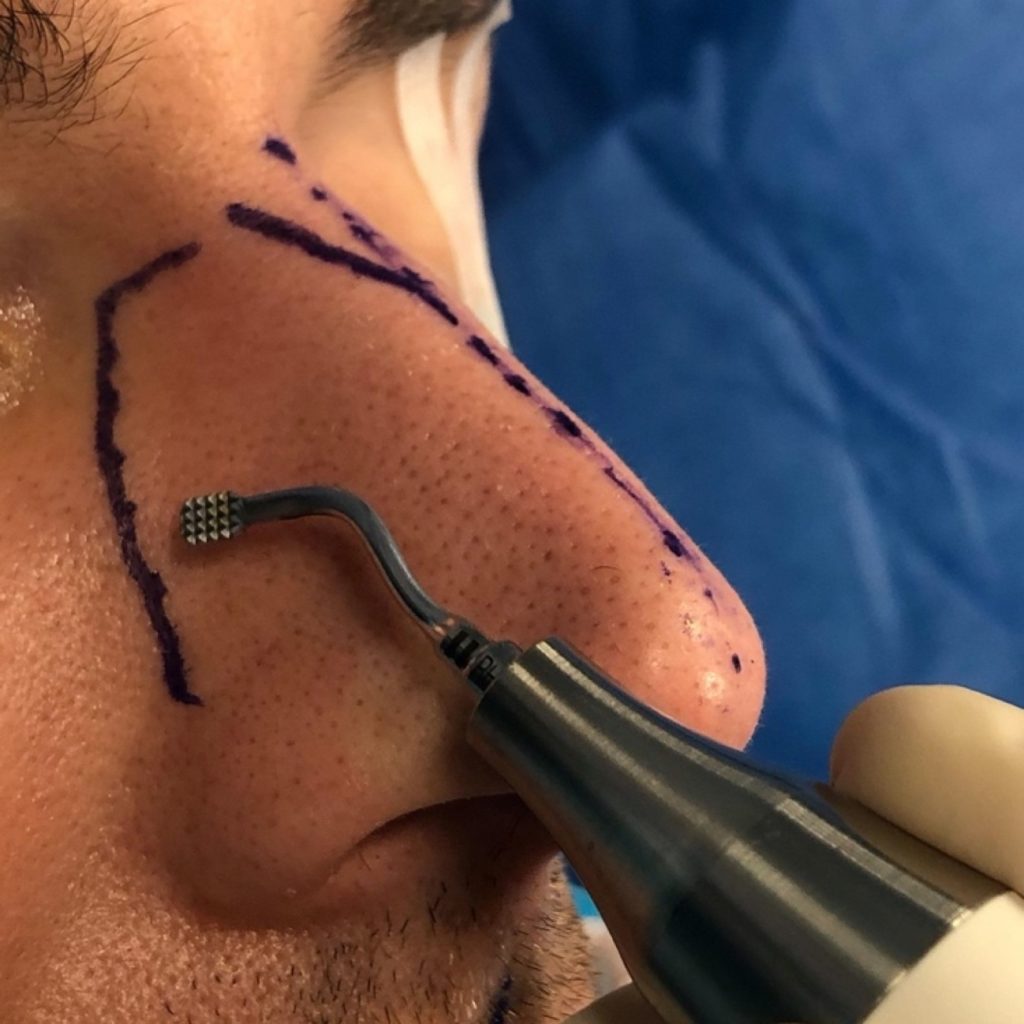
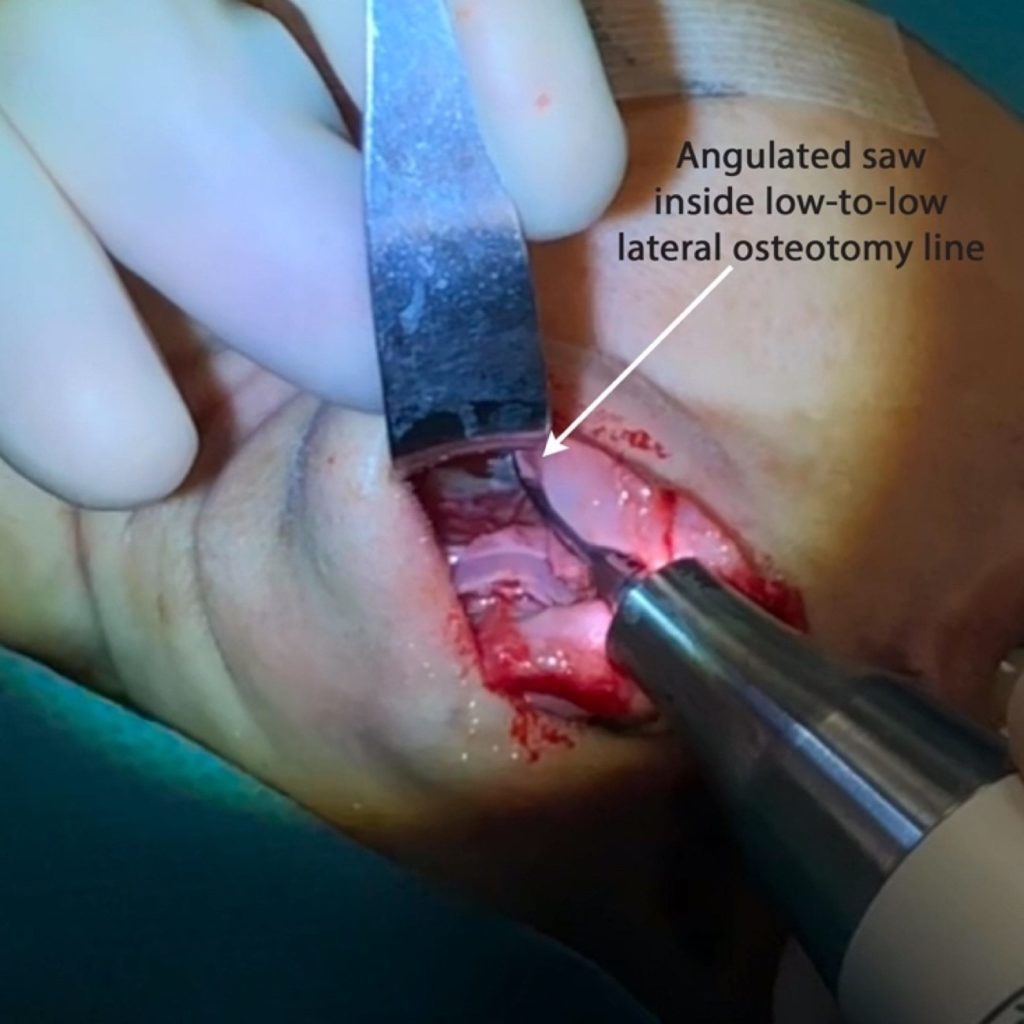
For lateral osteotomies, angulated tips are used to prevent increased pressure on the handle (Fig. 58).
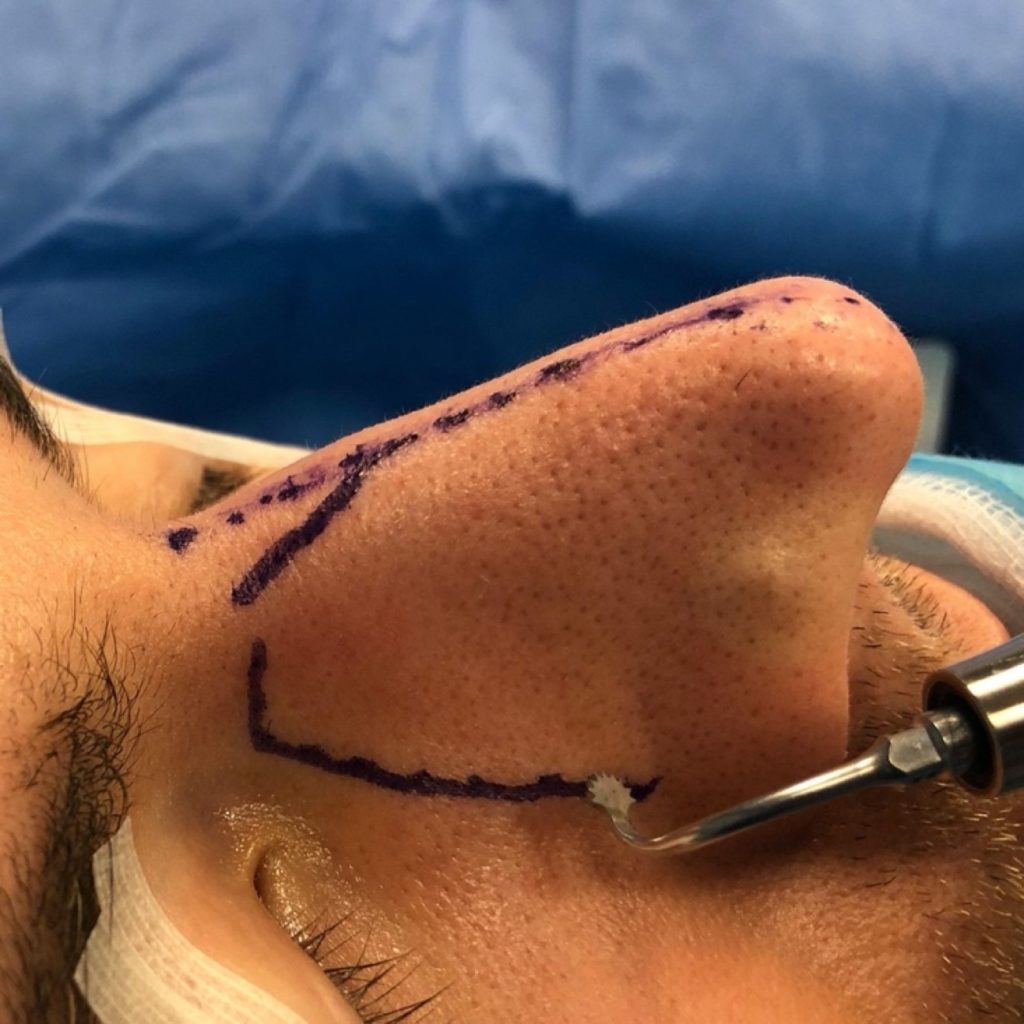
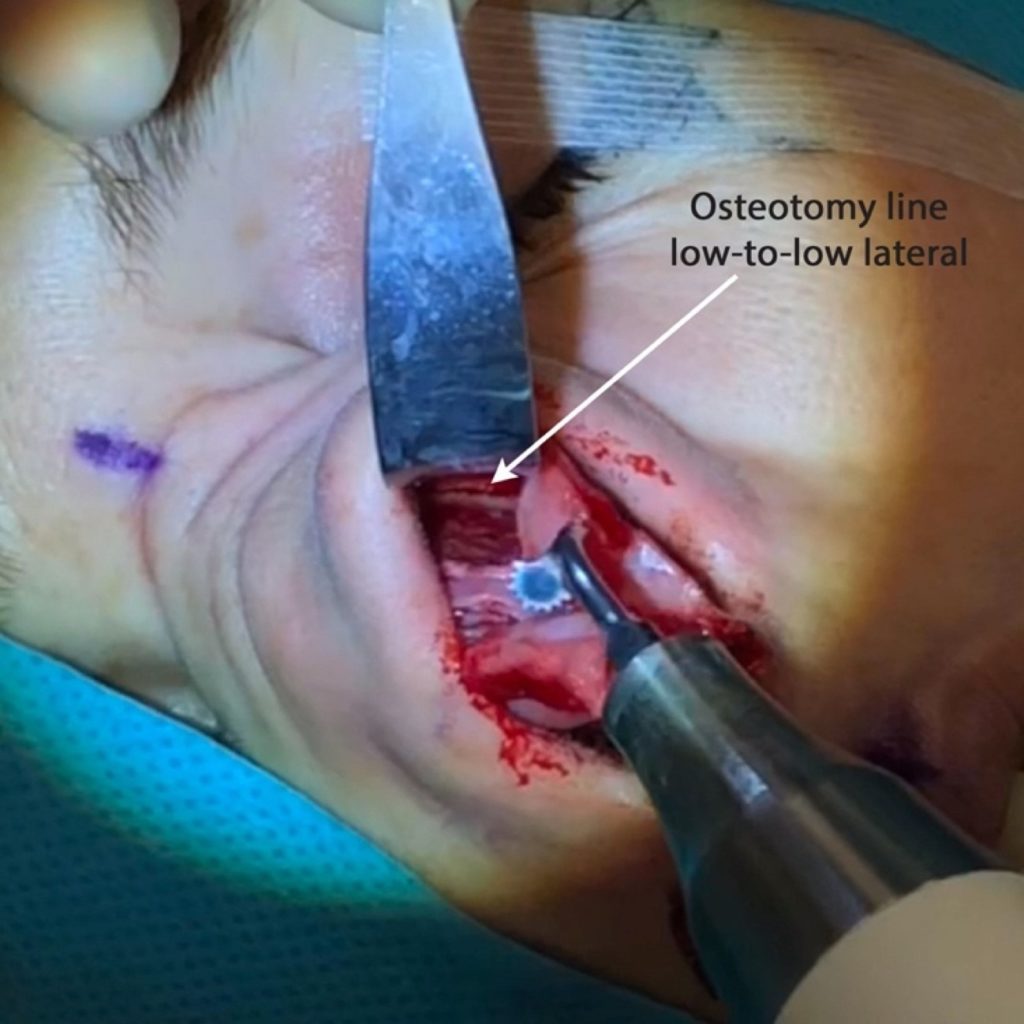
A low-to-low lateral OT starts as low as possible, at the pyriform aperture, and extends upwards following the nasofacial groove, along the frontal access of the maxilla and nasal bones (Fig. 59).3,15,24
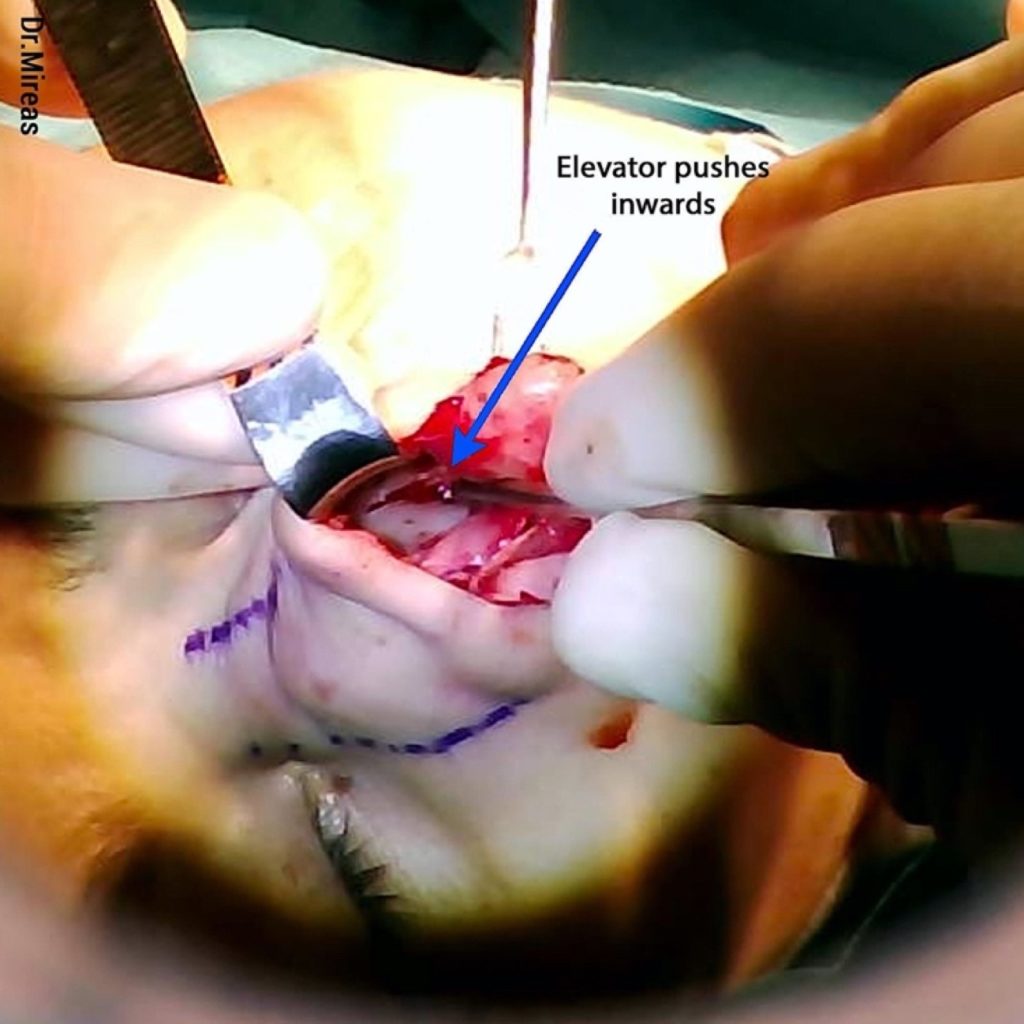
Webster’s triangle preservation28 is not recommended because it can lead to an aesthetic deformity15, whereas no post-op complications caused by its sacrifice are reported. During upward elongation of the osteotomy, one can observe the caudal part of the nasal wall moving medially, like a swinging door with the upper point of the osteotomy as a hinge (Fig. 60). The movement is controlled by an elevator and the procedure is performed step-by-step until satisfactory inward movement is achieved (Fig. 61).

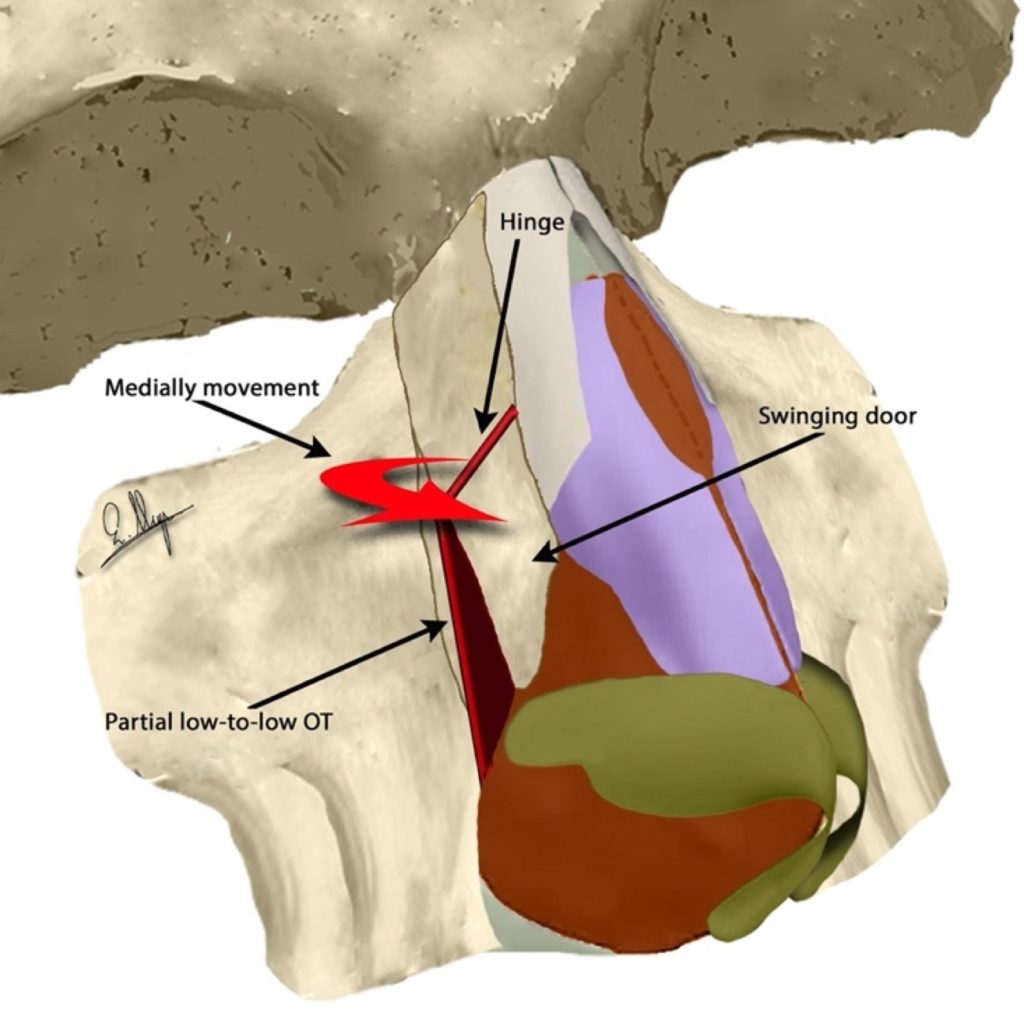
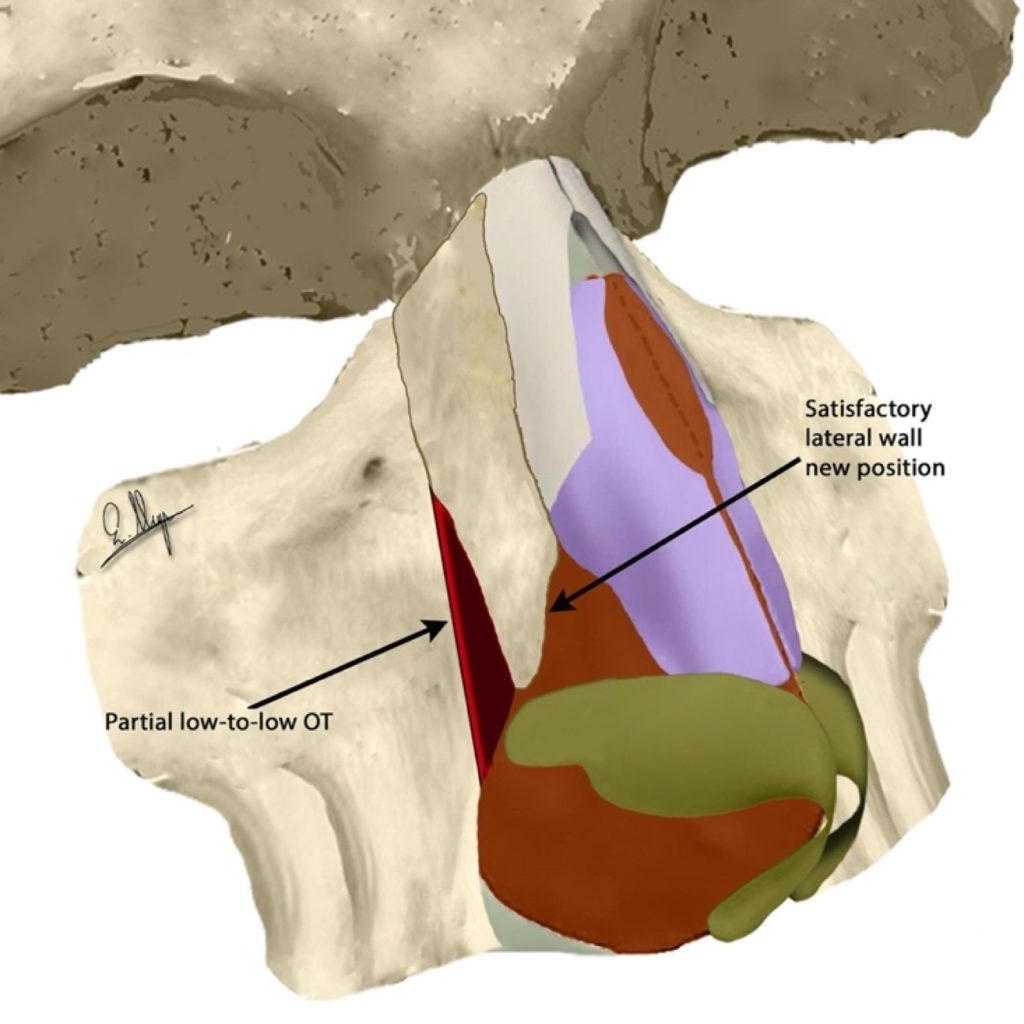
In cases of a relatively narrow bony vault base, the osteotomy stops at the level of the medial canthal ligament, while on a wider bony vault base it extends above it and becomes a complete low-to-low OT.

The inward movement can reach 5 mm on the horizontal axis and the narrowing on the base is often enough. If we need more narrowing, we continue with transverse osteotomy, while in the case of an opening at the dorsal part we proceed with a medial or paramedial oblique OT.
After each step we check the new position and either we stop, or we continue accordingly. In Fig. 62-64 one can see the angulated saw positioning and the low-to-low osteotomy line.
B)Transverse Osteotomy (T-OT)
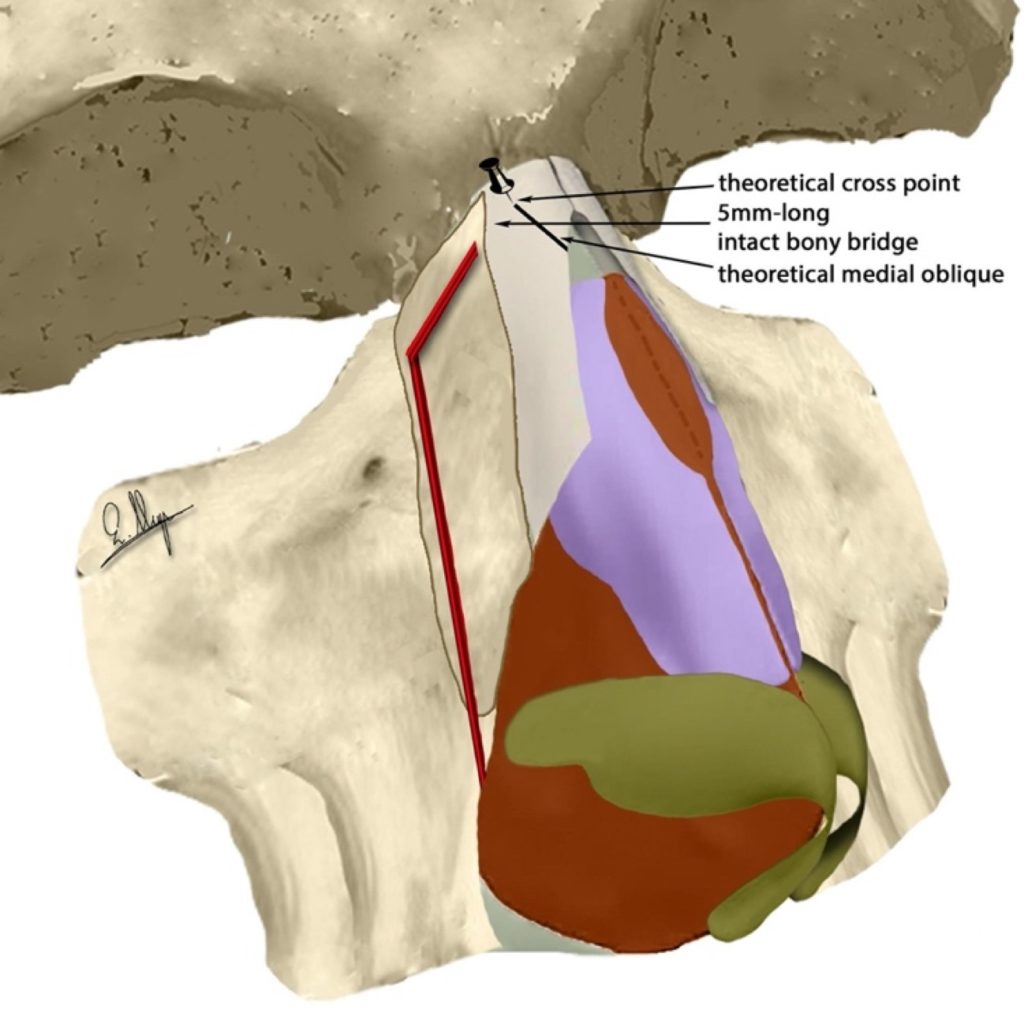
A transverse osteotomy starts at the highest point of a lateral osteotomy and follows a horizontal direction towards a theoretical cross point with a medial oblique OT even if the latter OT is not going to be delivered.3,15,24
Transverse osteotomy is partially performed and a bony bridge of at least 5 mm is preserved from the meeting point with the medial oblique OT (Fig. 65-69). If the new position is satisfactory dorsally and laterally the procedure is stopped, while if more improvement is needed, we proceed with various combinations of complete transverse, medial or paramedial oblique and superior lateral (satellite) osteotomies.

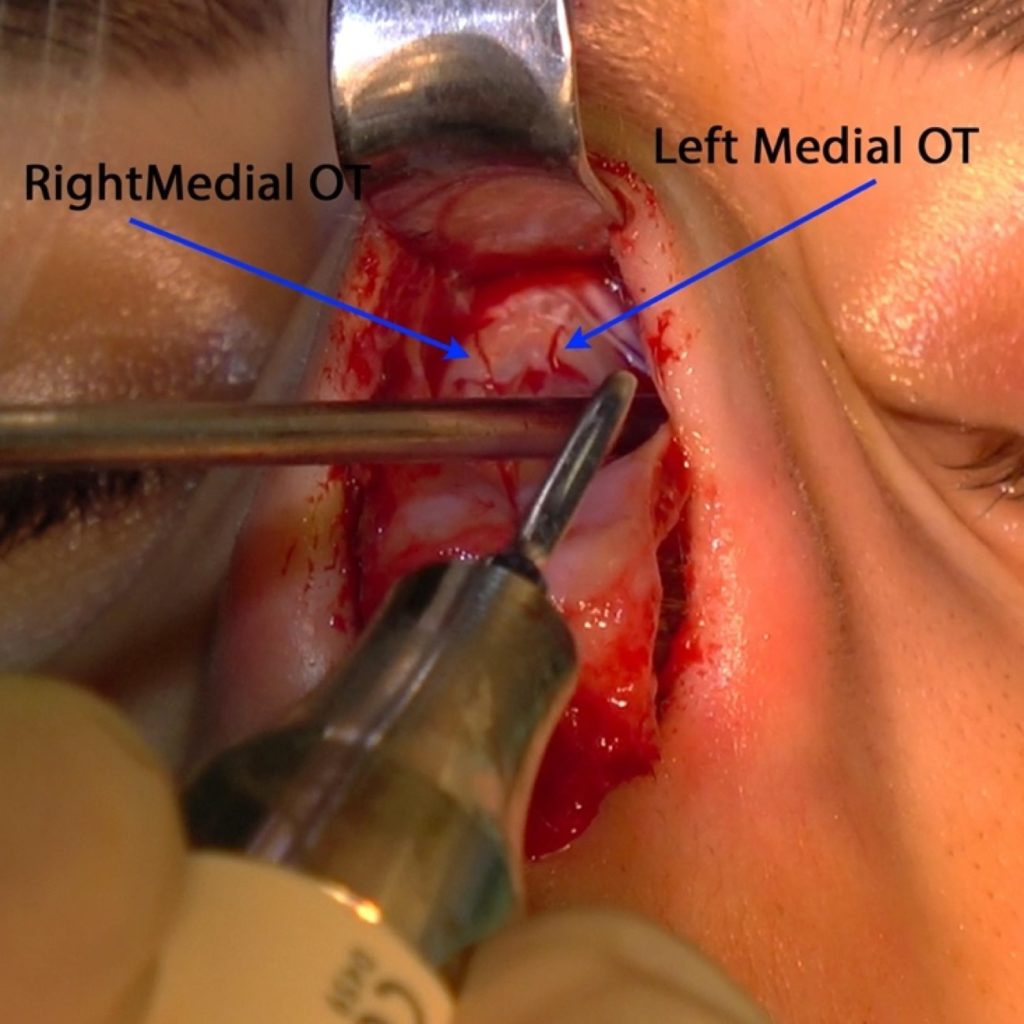
C)Medial and Paramedial Oblique Osteotomy (MO-OT and PMO-OT)
These osteotomies are performed with thin tips and start at a point which a theoretical ideal aesthetic line should pass through, and continue following it towards the medial eyebrow (Fig. 70-74).3,15,24 After bony cap removal, we can sometimes see that the new dorsal aesthetic lines have a bigger distance than desired. This is the main use of these osteotomies, to close this particular gap between the two lines. MO-OT and PMO-OT can be combined with a low-to-low or a low-to-high lateral OT.


D)U-Shape & V-Shape OT (US-OT & VS-OT)
A V-shaped osteotomy is composed of a low-to-high lateral OT and a medial/paramedial oblique OT (Fig. 75). A small transverse OT -that follows a horizontal direction towards a theoretical cross point with a medial oblique OT- can often be added, while preserving a 5 mm-long bony part as an intact bony hinge (Fig. 76).15,24
A VS-OT targets an inward turn of the bony wall by decreasing angulation (Fig. 77) and is mostly used in cases where we want a verticalization of the nasal wall, especially when we have to deal with wide and flattened ethnic noses.


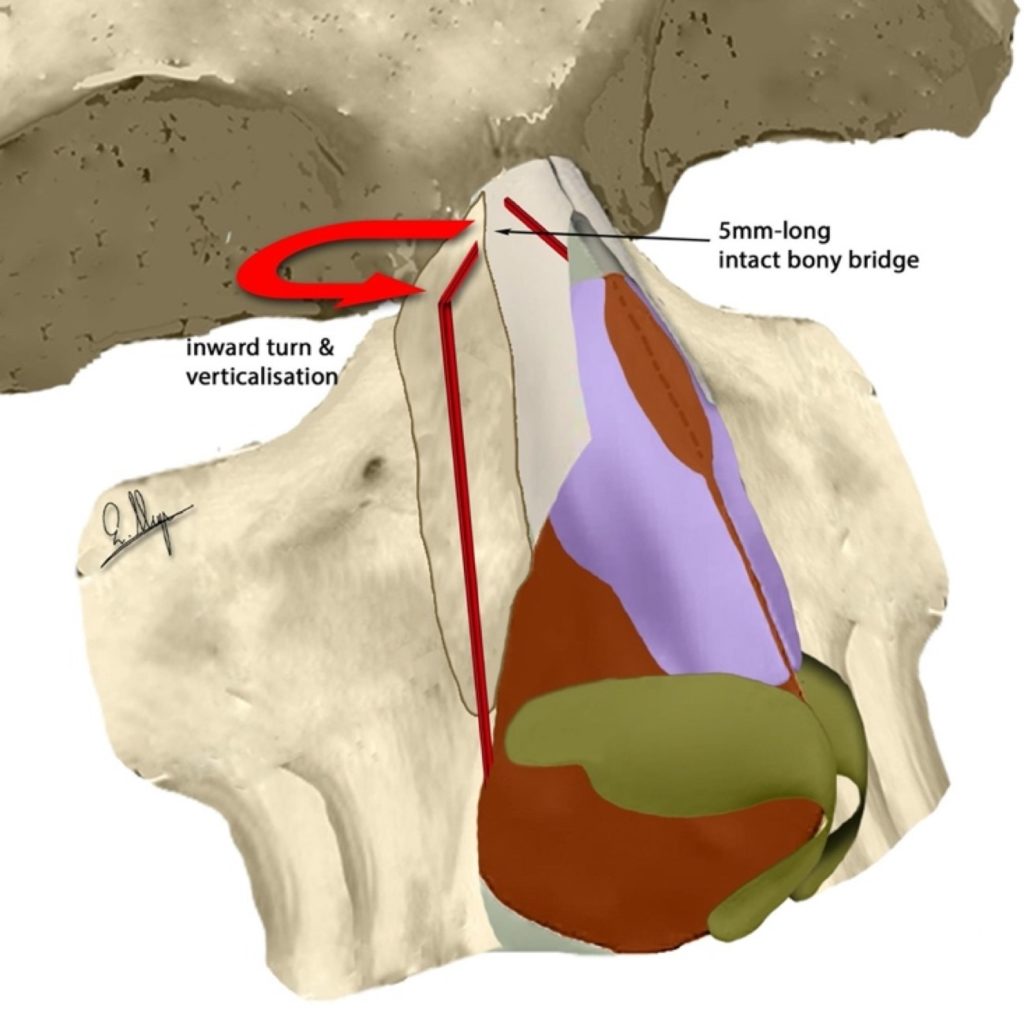
The inward turn and the 5mm-long bone bridge are shown
A U-shaped osteotomy is composed of a low-to-low lateral OT, a medial/paramedial oblique OT and a transverse OT (Fig. 77). In the majority of cases, we preserve the above-mentioned 5 mm-long intact bony bridge for improved stability but sometimes it is necessary to complete the transverse OT and unify the three osteotomies (Fig. 79).15,24


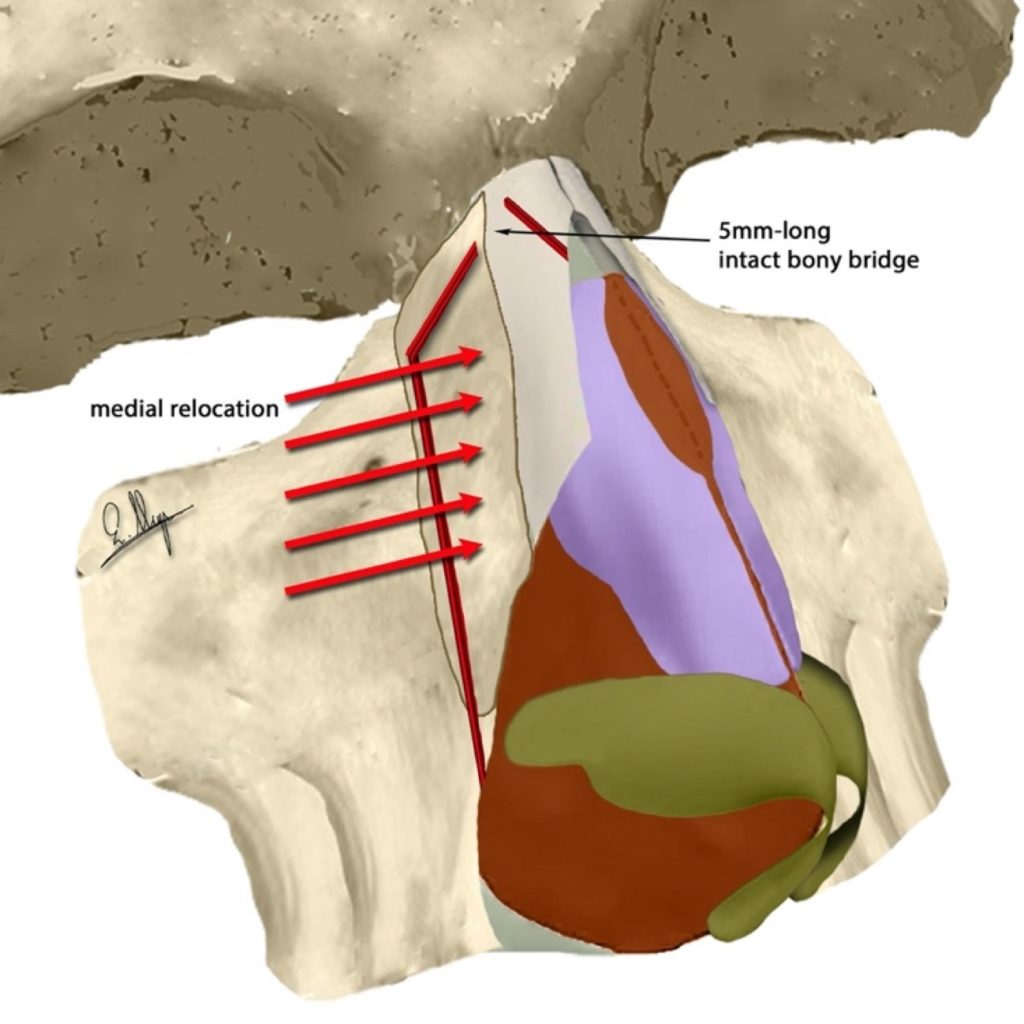
The medial relocation and the 5mm-long bone bridge are shown
A U-shaped OT mainly targets a medial relocation of the bony wall (Fig. 80) with a movement to a new position parallel to the old one rather than to a verticalization or turn.
After completing any OT we use fine rasps or burrs to smooth the osteotomy line.
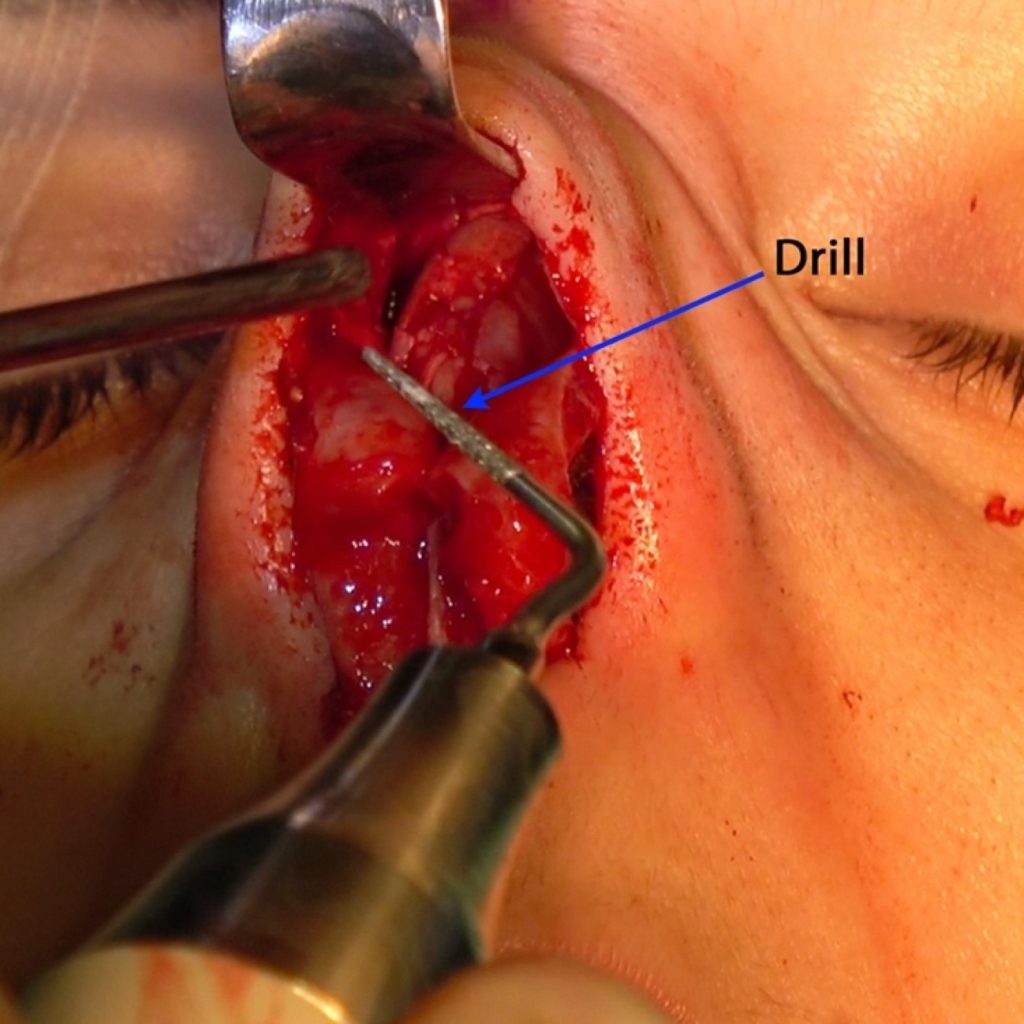
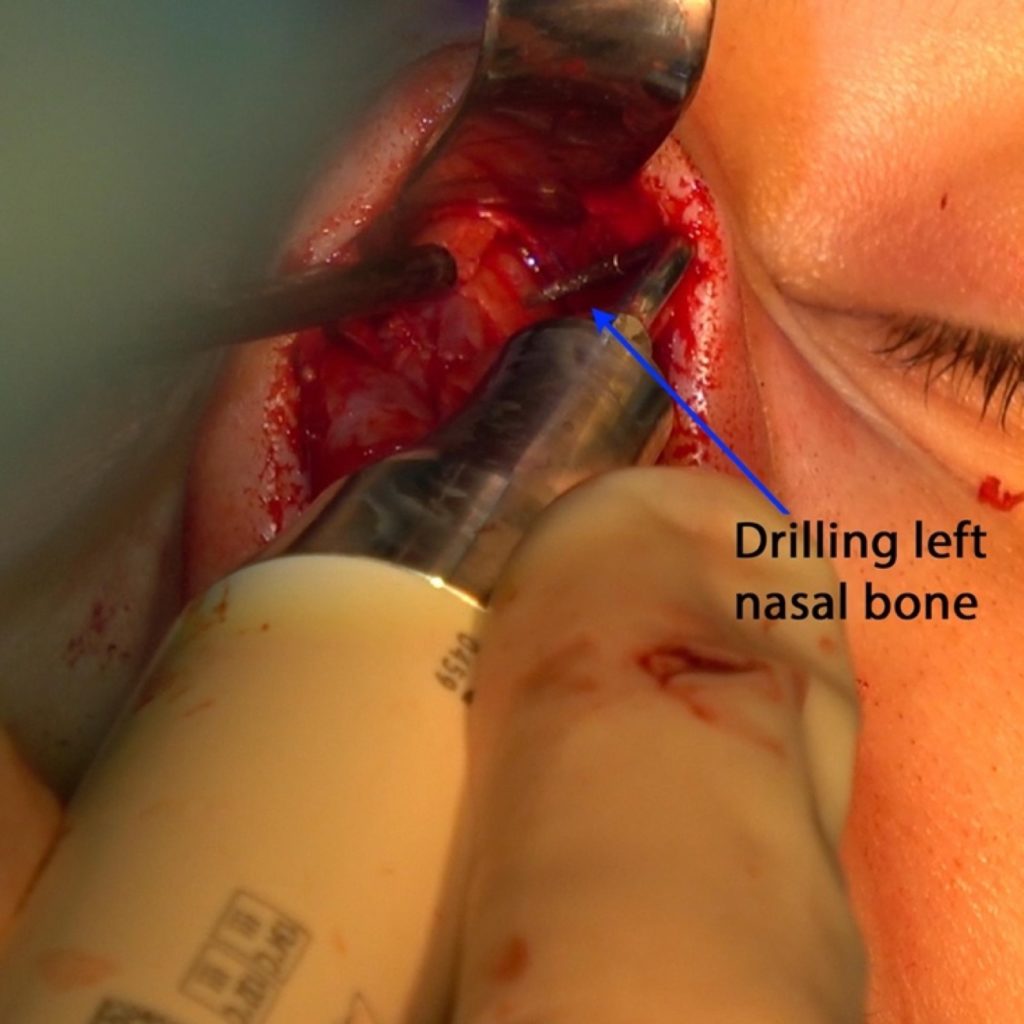
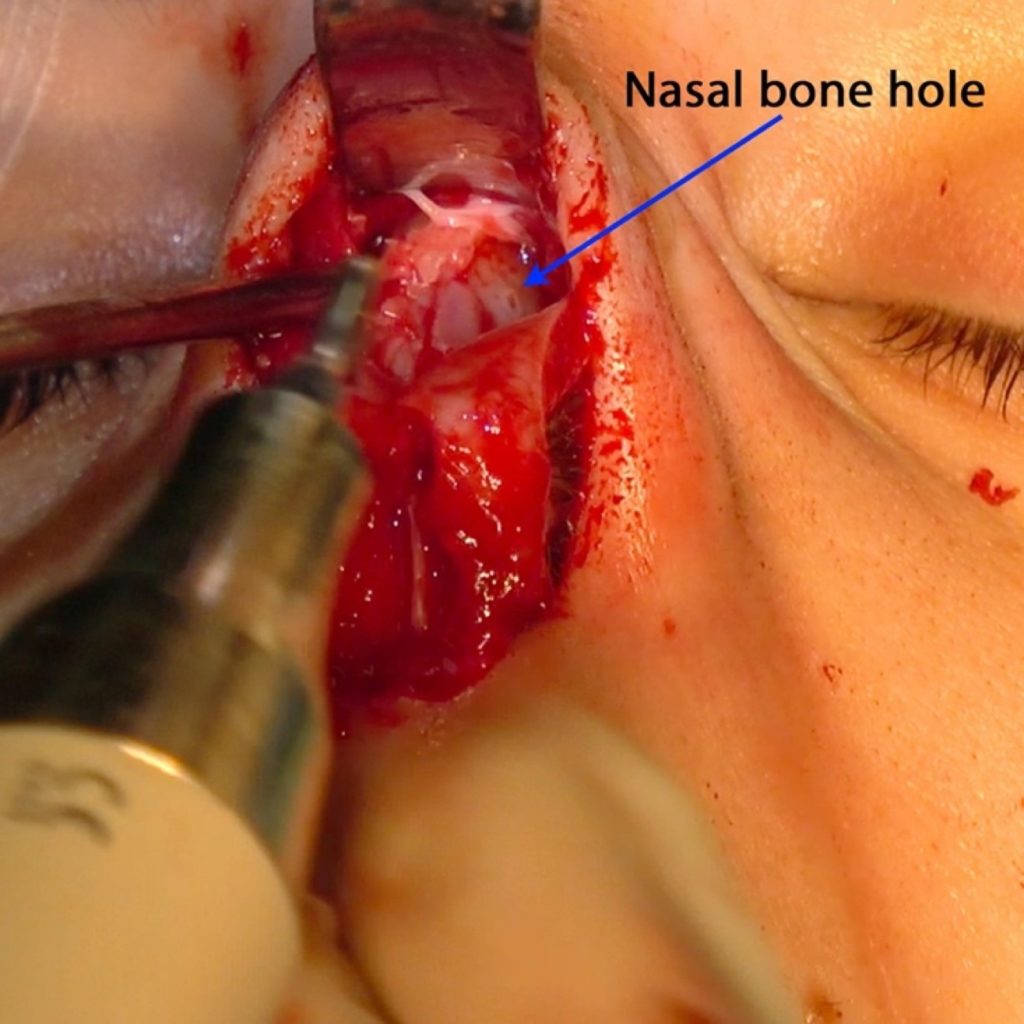
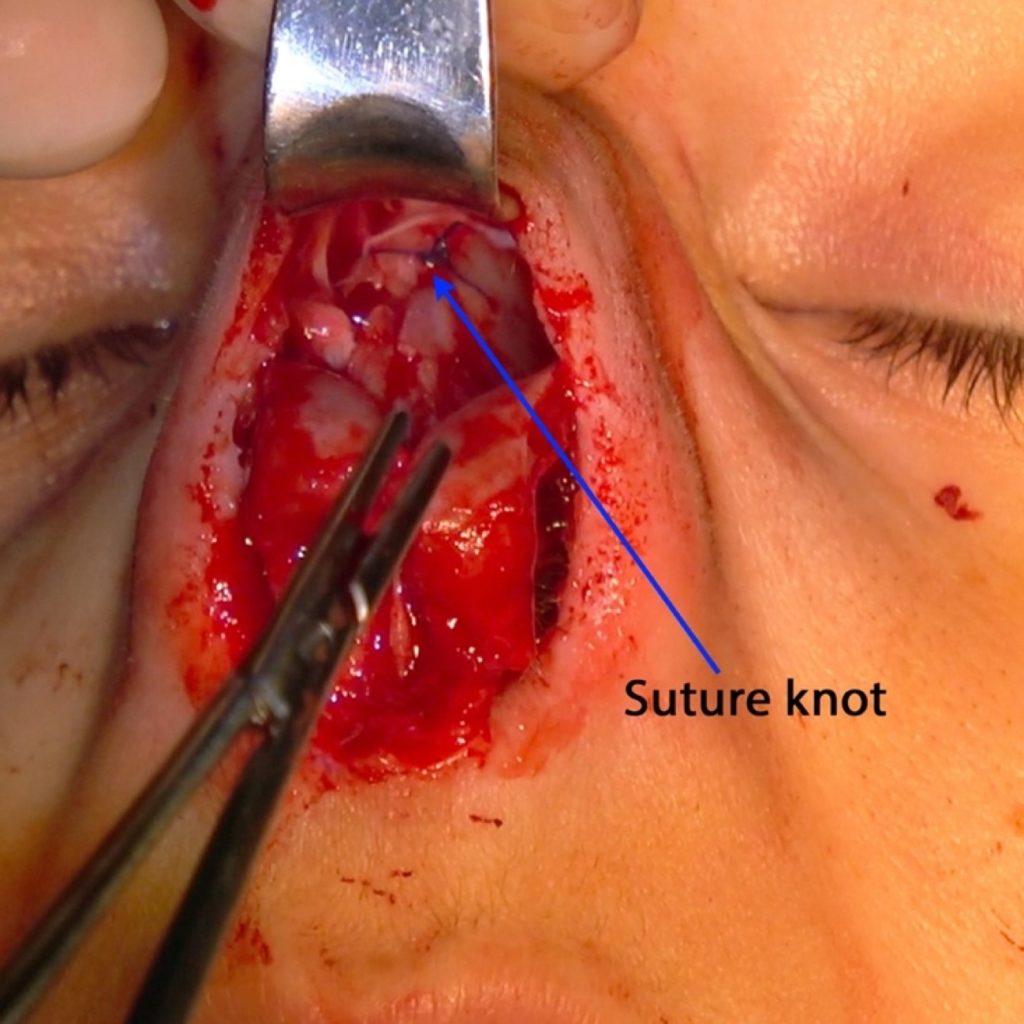
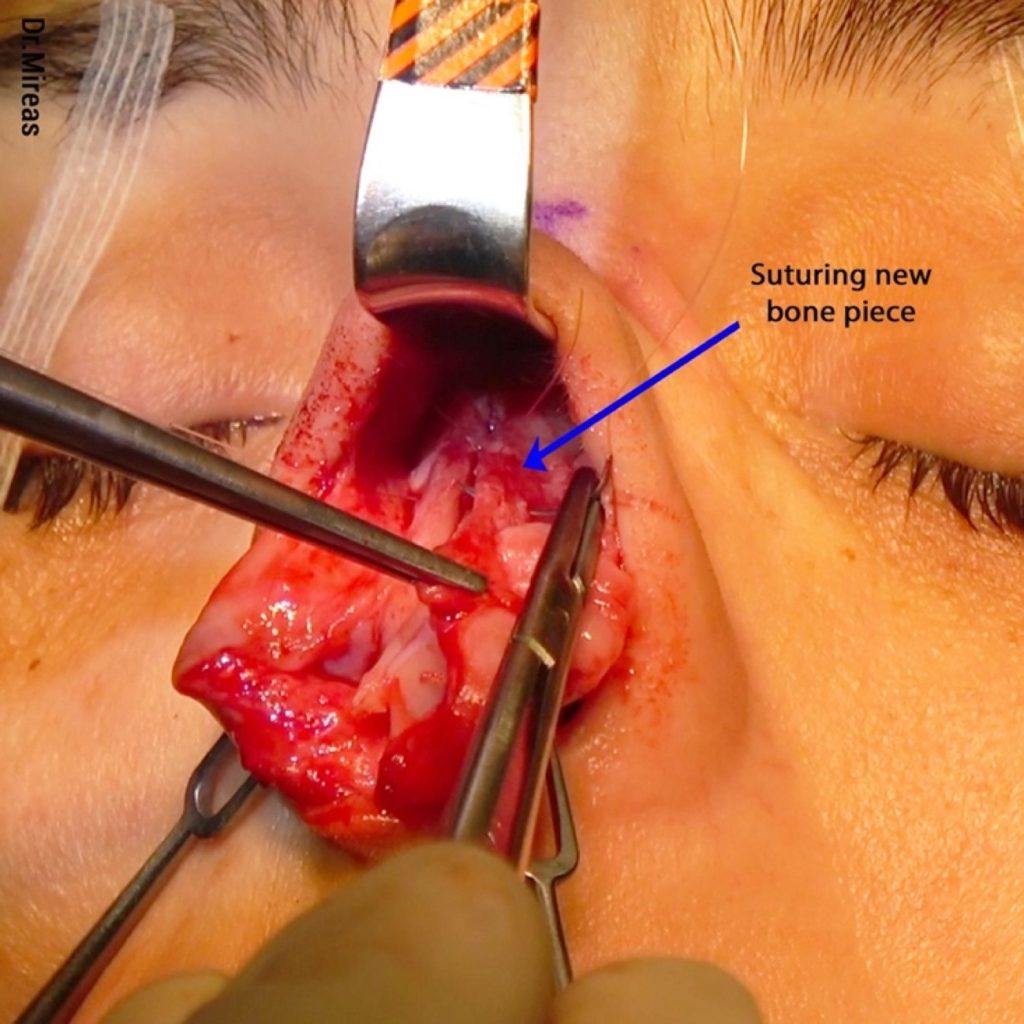
In some cases of extreme mobilization and/or instability, as well as in cases where we want stabilization in a specific position, we can use sutures, absorbable or not (PDS, Nylon or Vicryl 5.0, 4.0 or 3.0). With piezo drill-tips we can easily drill holes in the bones and pass the sutures through them (Fig. 81-85).3,15,24

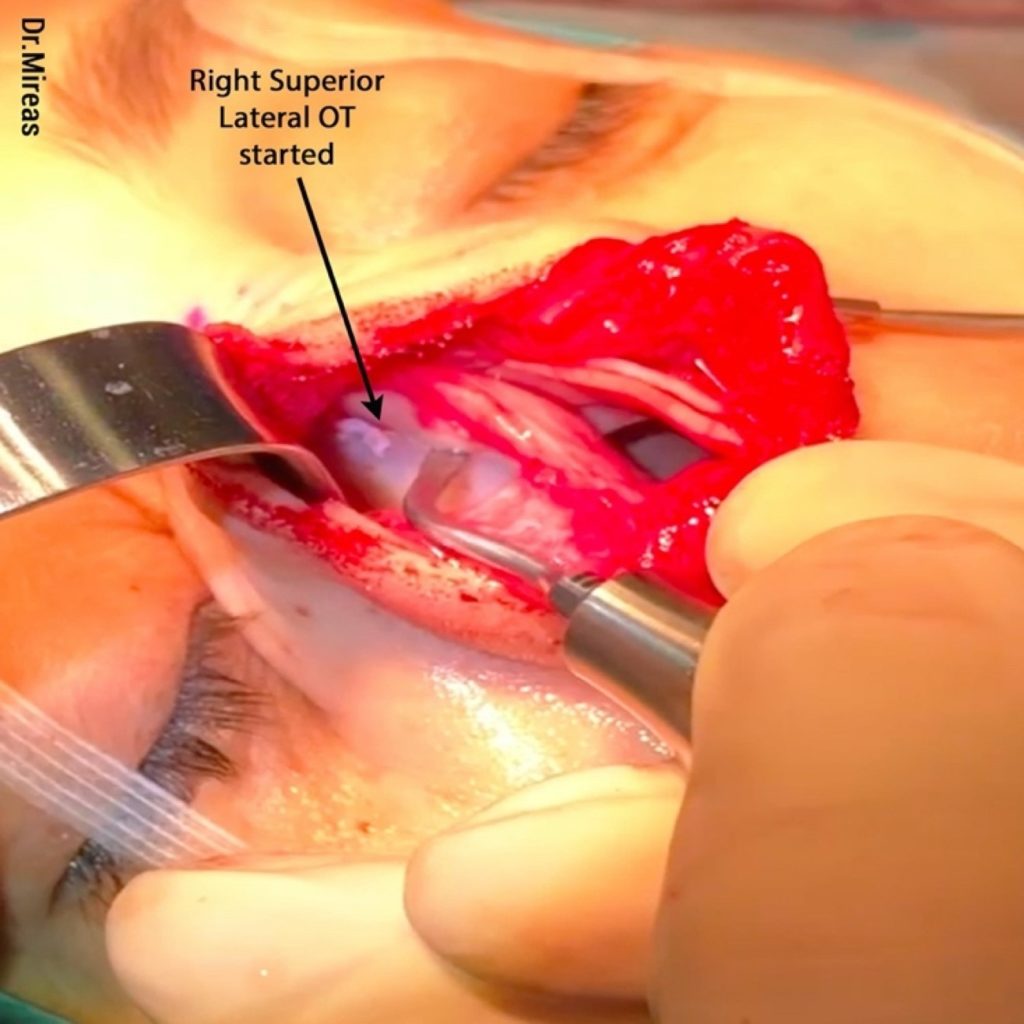
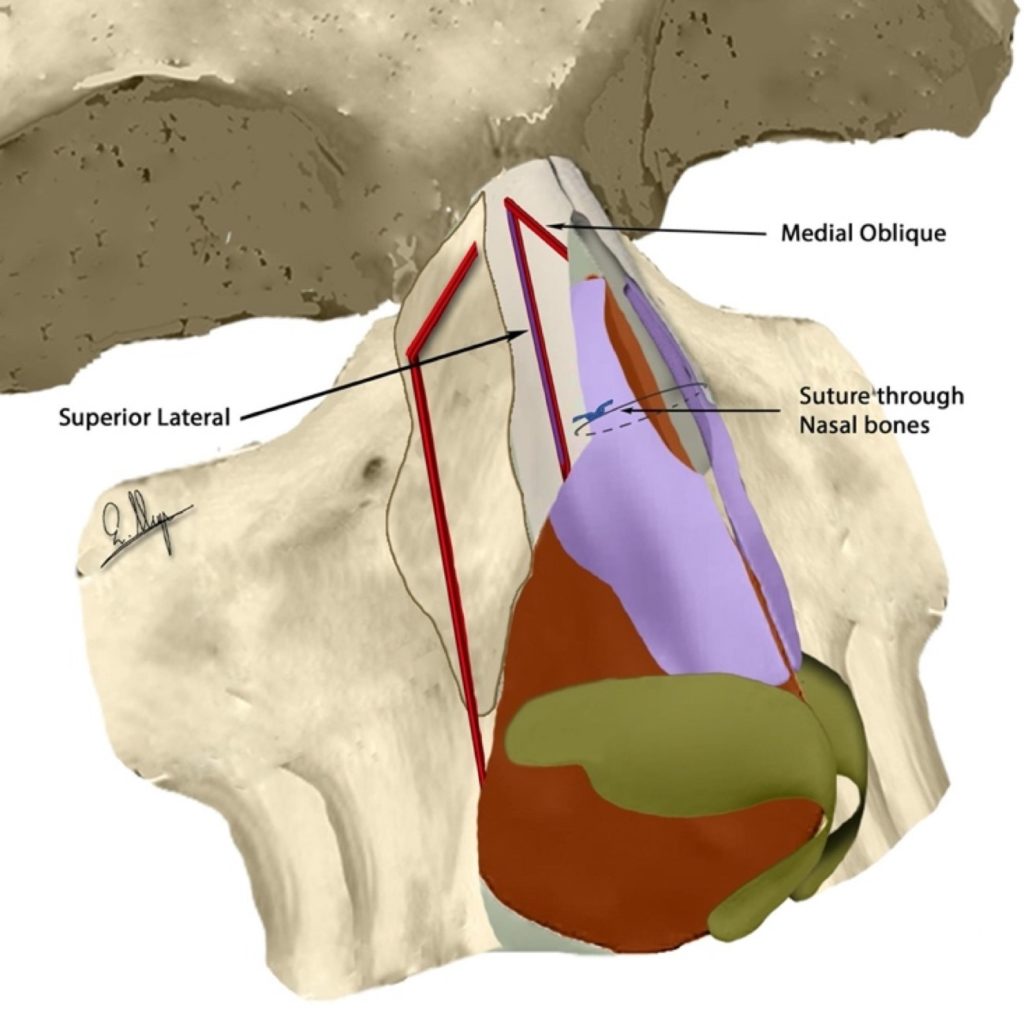
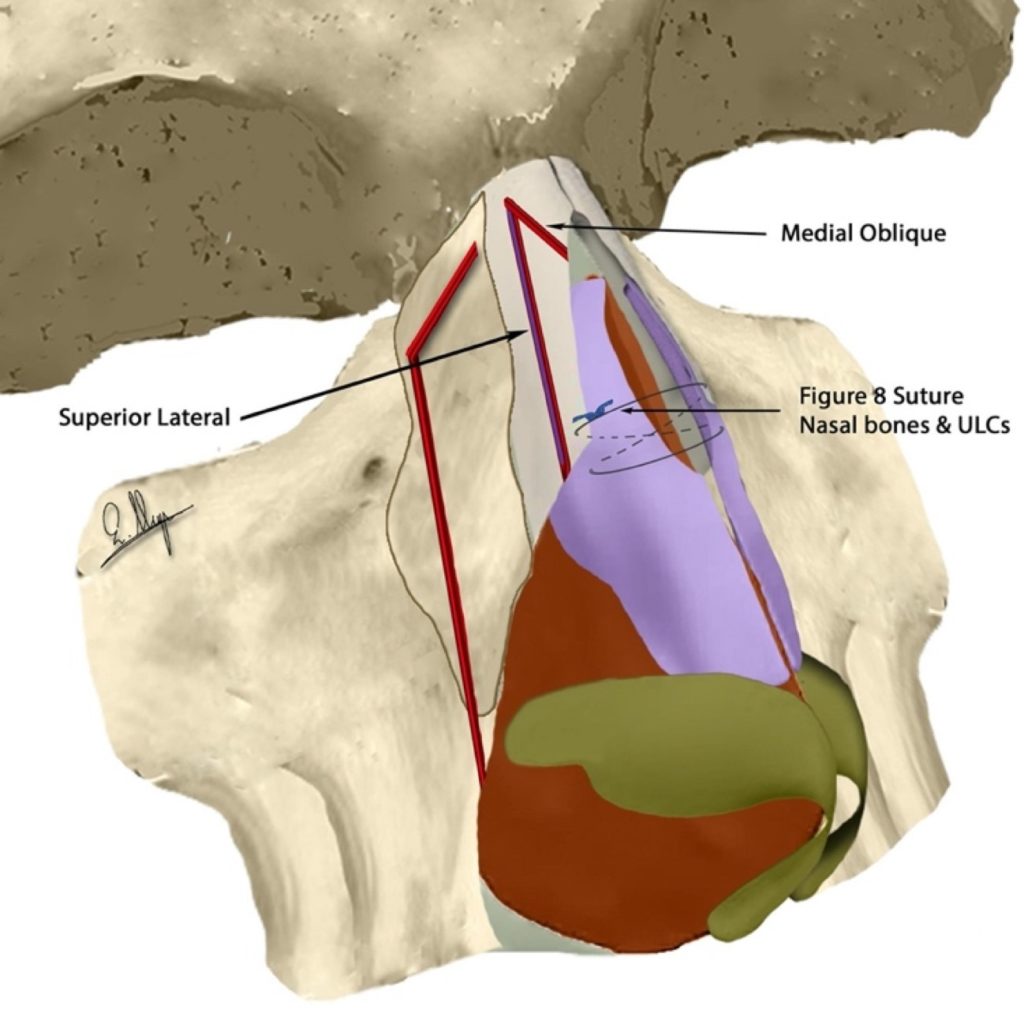
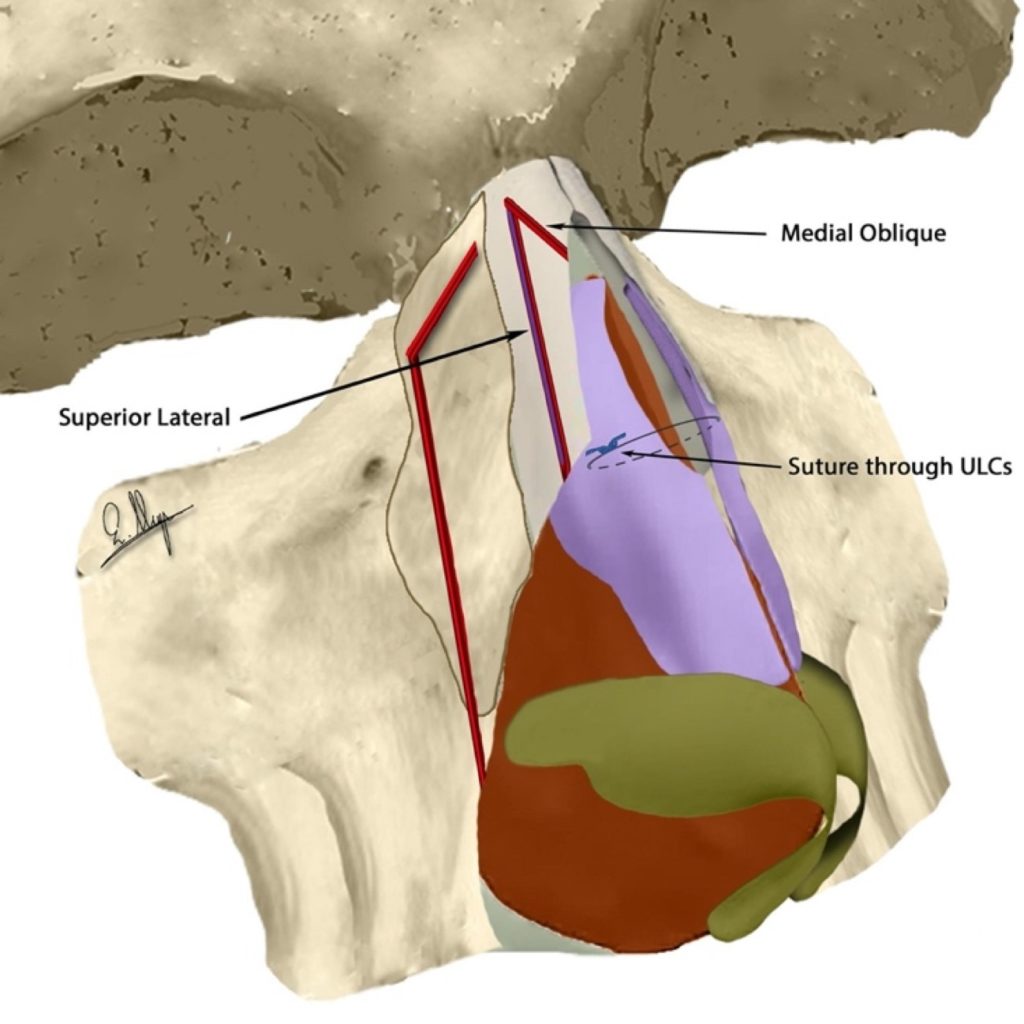
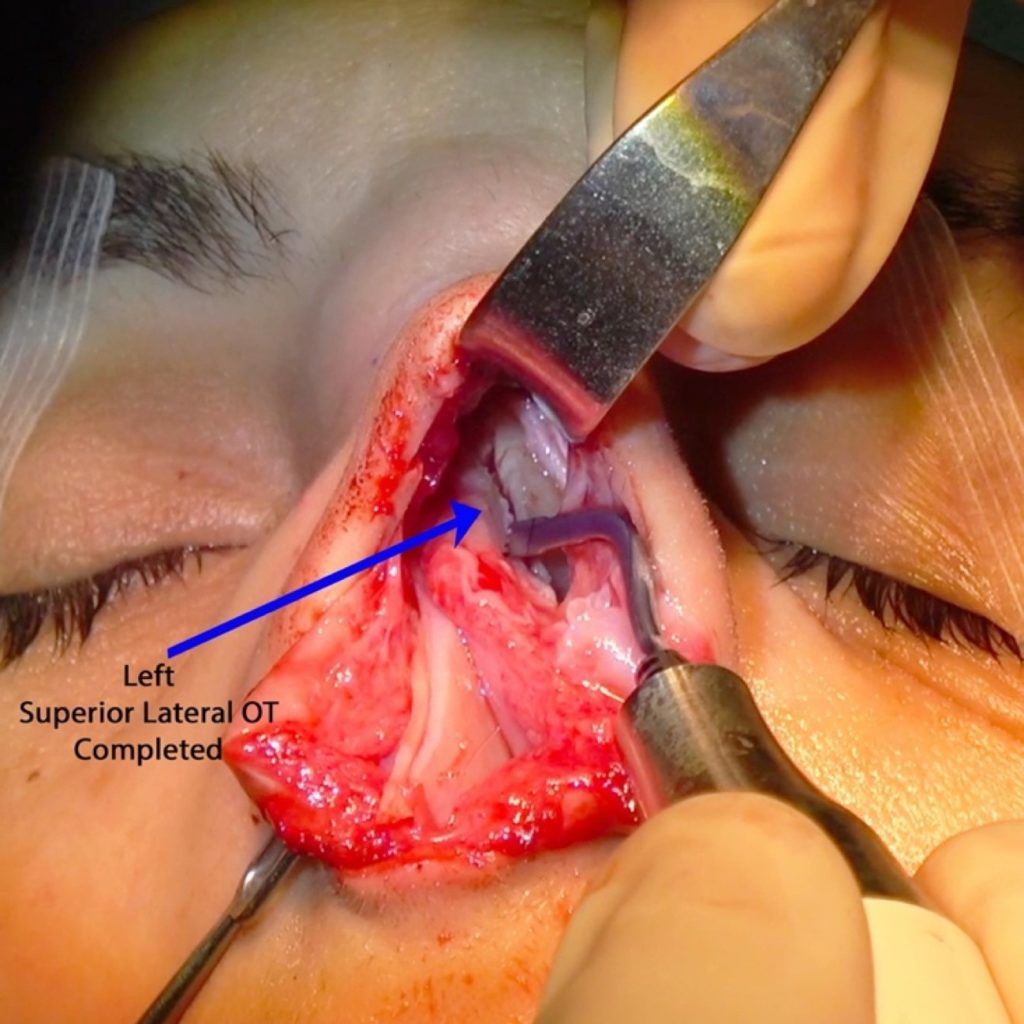
E)Satellite (Superior Lateral) Osteotomy (SL-OT)
Sometimes the outcome of the U-shaped or the V-shaped OT we have performed is not satisfactory and more improvement is needed. One reason is that by definition the final result of these osteotomies is always one united bony wall on each side and sometimes its shape cannot be changed enough. In other cases, we have already achieved a good result, but it feels risky to continue with completing the osteotomies or we simply want to avoid any destabilization after that.
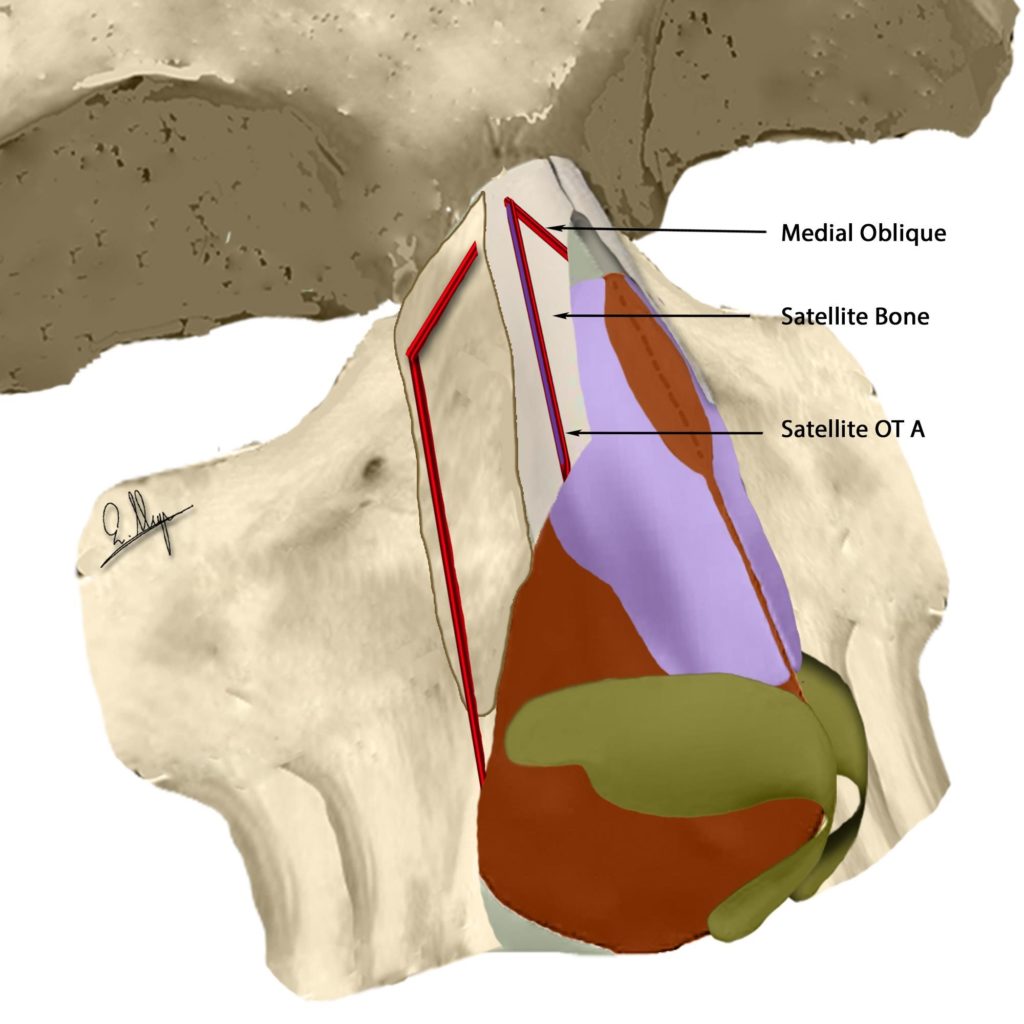
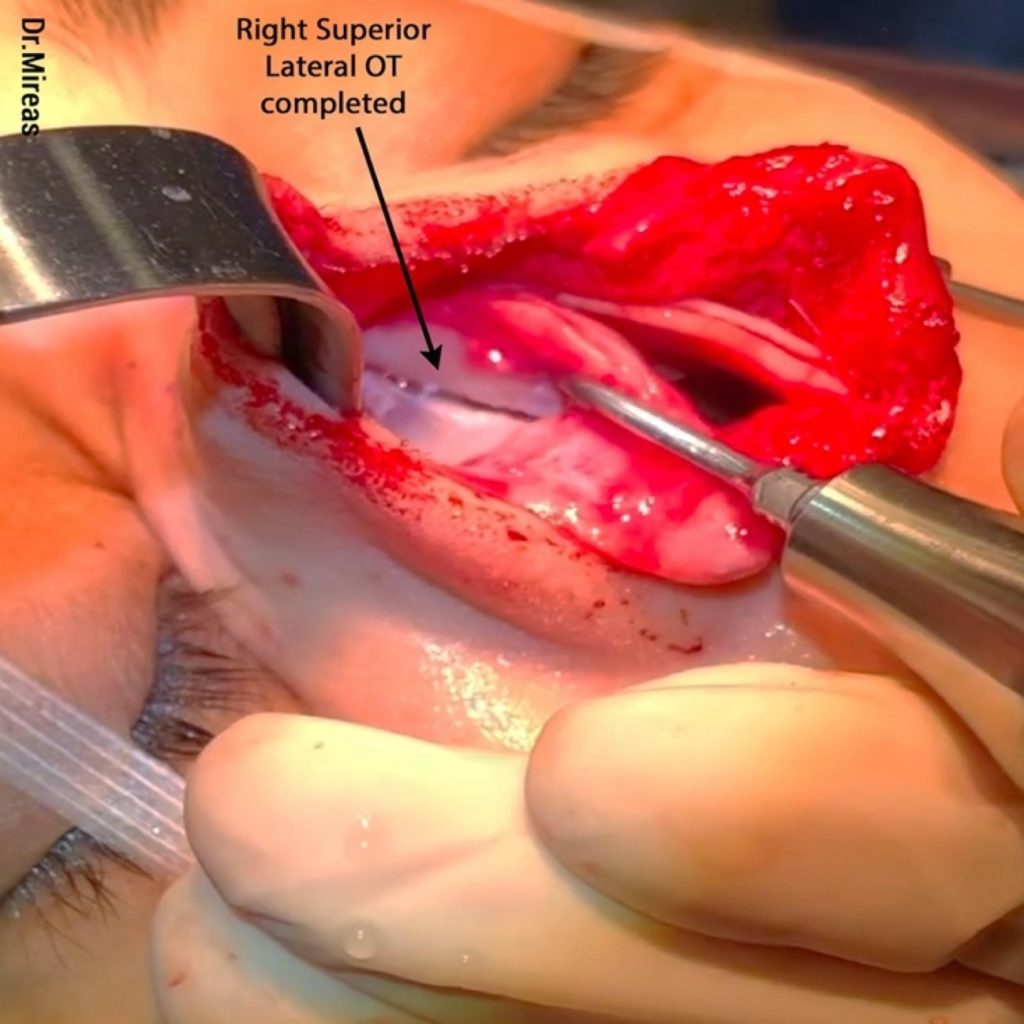
The author (GM) suggests the introduction of a new osteotomy as an alternative to such cases, which creates a small bony portion -a “satellite bone”- at the upper part of the lateral bony wall. This new bone can be triangular, rectangular, or whatever shape fits best in the specific case. The SL-OT is either parallel to a low-to-low OT or to the dorsal aesthetic line while its starting point and level depend on the final shape we want to achieve, e.g. Satellite OT A and Satellite OT B (Fig. 86-88). Addition of medial/paramedial or transverse OT is often needed for better bone shaping.

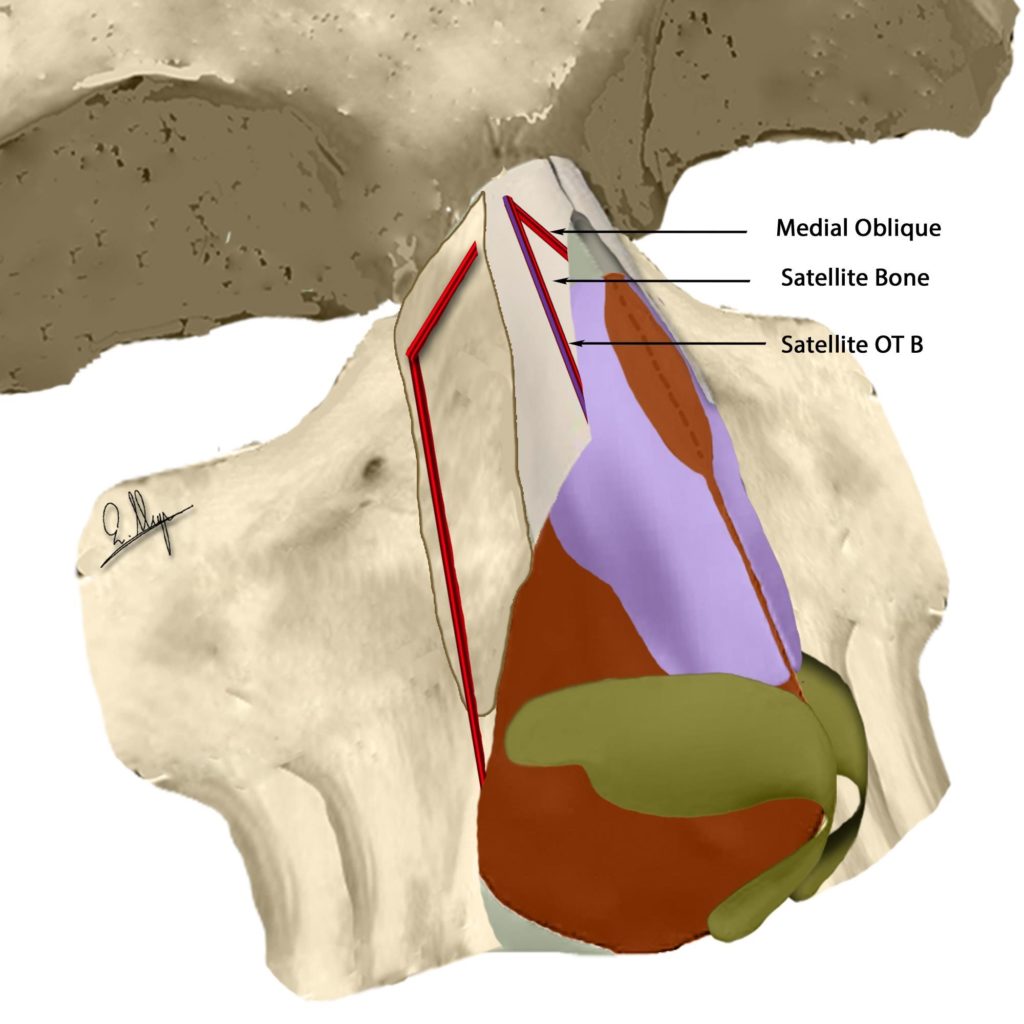
Satellite osteotomy has proven to be extremely useful in cases where a specific local deformity can quickly and easily be addressed by this particular osteotomy alone, totally avoiding extended elevation and lateral osteotomies. Especially in cases with extra thin nasal walls and revision surgeries, the use of this osteotomy has shown impressive results (Fig. 89-91).
In noses with a very wide hump and verticalized nasal walls, one can see that the bony cap is almost rectangular with one horizontal and two perpendicular elements. Gradually removal of the bony cap reveals a firm cartilaginous structure between the bony walls. The distance between the bony walls is big, and the manipulation of these strong cartilages is problematic. We can proceed with the aforementioned procedures (RS, L-OT, UT-OT) or we can preserve the vertical sections of the bony cap and create a new narrower dorsal line by using SL-OT.
Fixation of the new structure can be done with sutures that pass through the bones or the upper later cartilages, or the spreader flaps/grafts that have possibly been created (Fig. 92-97). The stitches can also be used to control the desired angulation and position of every single portion and drill-tips are used to drill holes into the bones. Sutures can be absorbable or not, with PDS 5.0 or 4.0 or Nylon 5.0 or 4.0 being most often used.
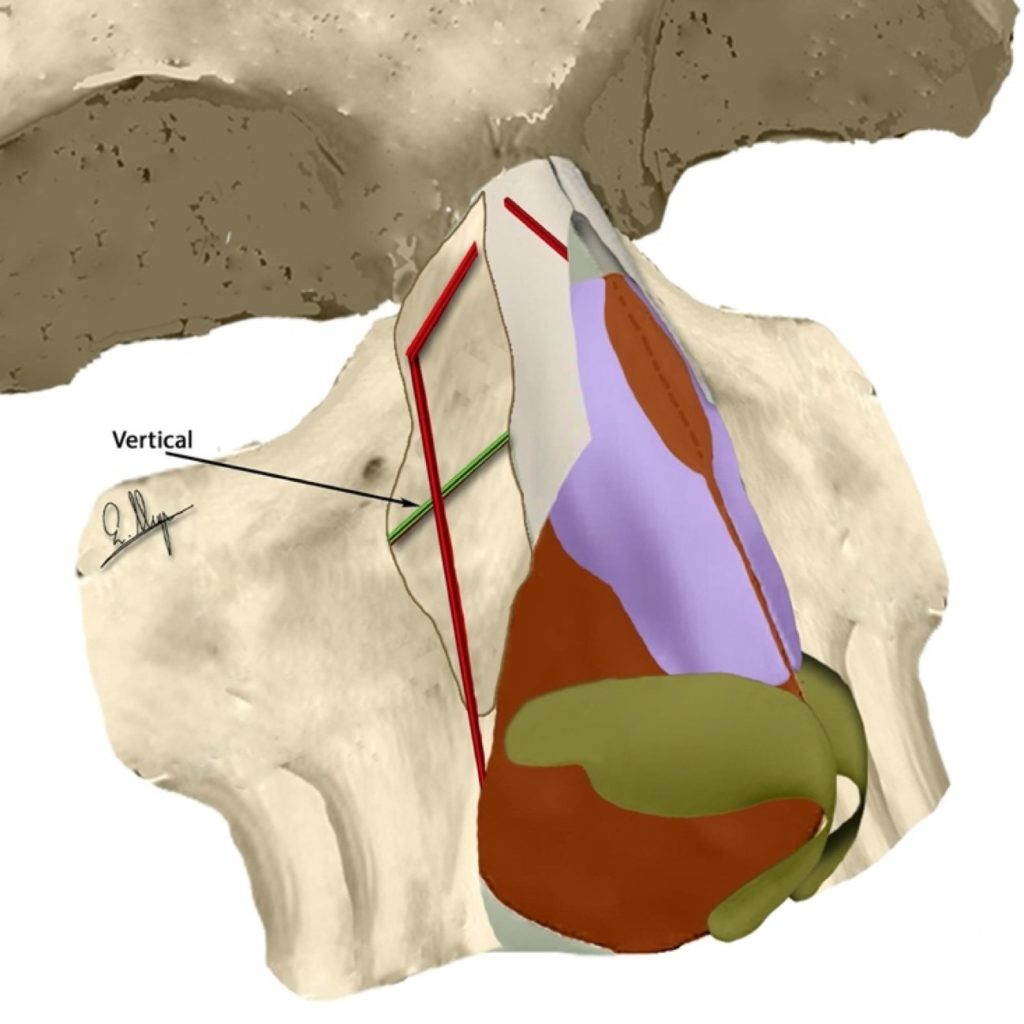
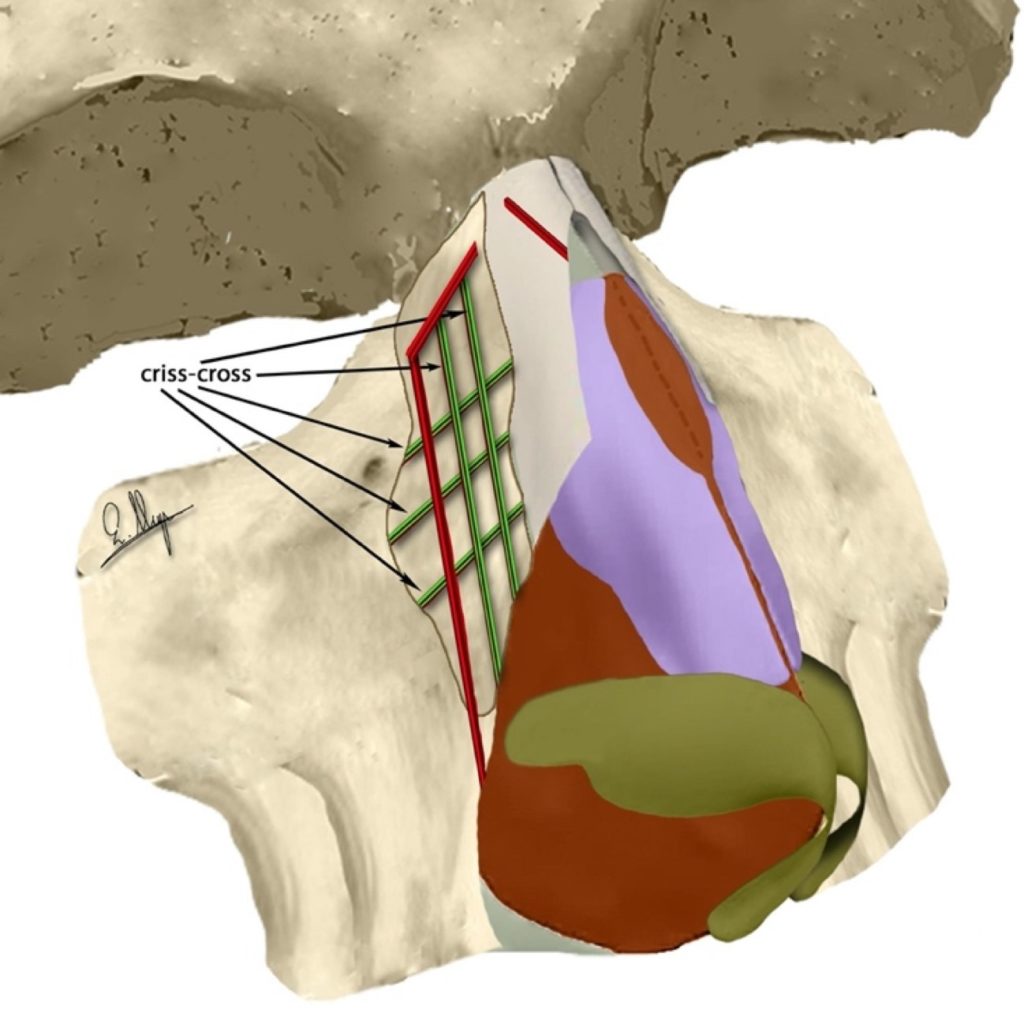
F)Vertical – Horizontal – Angulated – Criss-cross Osteotomies
In some patients, the convexity of the lateral nasal wall is excessive, unilaterally or bilaterally, and with conventional equipment our choices of how to deal with it are limited. A double-level osteotomy29 can be used in cases of a convexity parallel to a low-to-low osteotomy line, while in cases of a convexity vertical to a low-to-low osteotomy line, some surgeons suggest a single vertical external osteotomy to reduce it. In fact, in both cases we are trying to reduce the phenomenon in one single axis by “dividing” the convexity into two smaller portions.
With piezo, under continuous inspection we can execute as many osteotomies as are necessary to eliminate convexities that follow different axes at the same time. We can perform horizontal, vertical, angulated or criss-cross (Fig. 98-100)3,15 osteotomies in various combinations because the precious internal support is not compromised.

In cases of thick nasal bones, we start by thinning them with ultrasonic rhinosculpture in order to reduce the convexity and perform the osteotomies on thinner bones that are easier to cut with accuracy.
In revision and posttraumatic cases, one can observe very unusual shapes of bones because of the unnatural position during bone healing after the surgery or injury. In these cases, we can perform one or multiple osteotomies of different length, shape and angulation that are completely customized to tackle the particular deformity.
Improvements & Complications
A)Surgery time
During the first period of use, a surgeon needs about 30-45 minutes more to finish a piezo rhinoplasty than the time needed with standard surgery sets. After performing about 20-30 piezo surgeries the time needed is significantly reduced and it can be even better than the time needed for a conventional rhinoplasty, mainly because there is usually no need for after-osteotomy improvements/corrections or last-minute modifications that are often time-consuming. It is universally accepted that in every new surgery technique there is a learning curve a surgeon must follow3 in order to achieve desired surgical results in the same surgical time as with the old technique.
B)Vibrations – Water irrigation – Burns
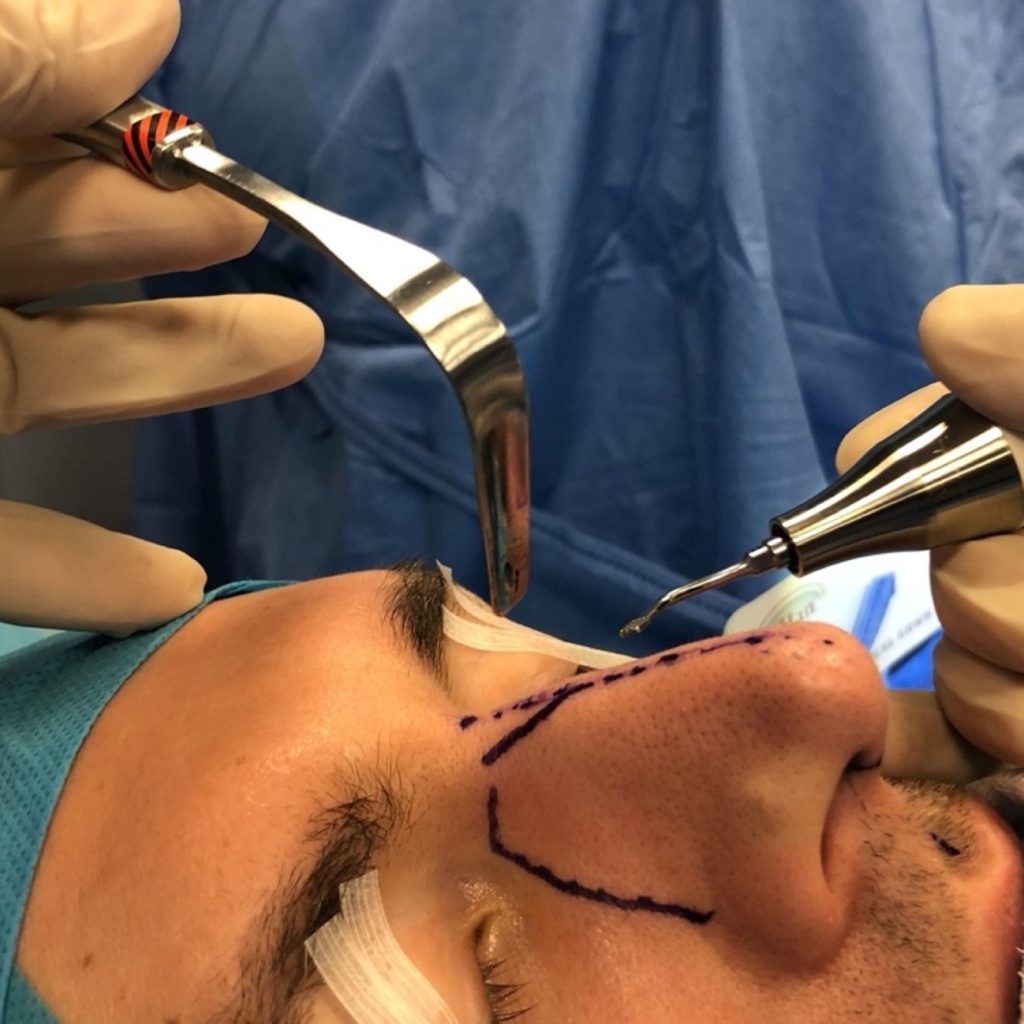
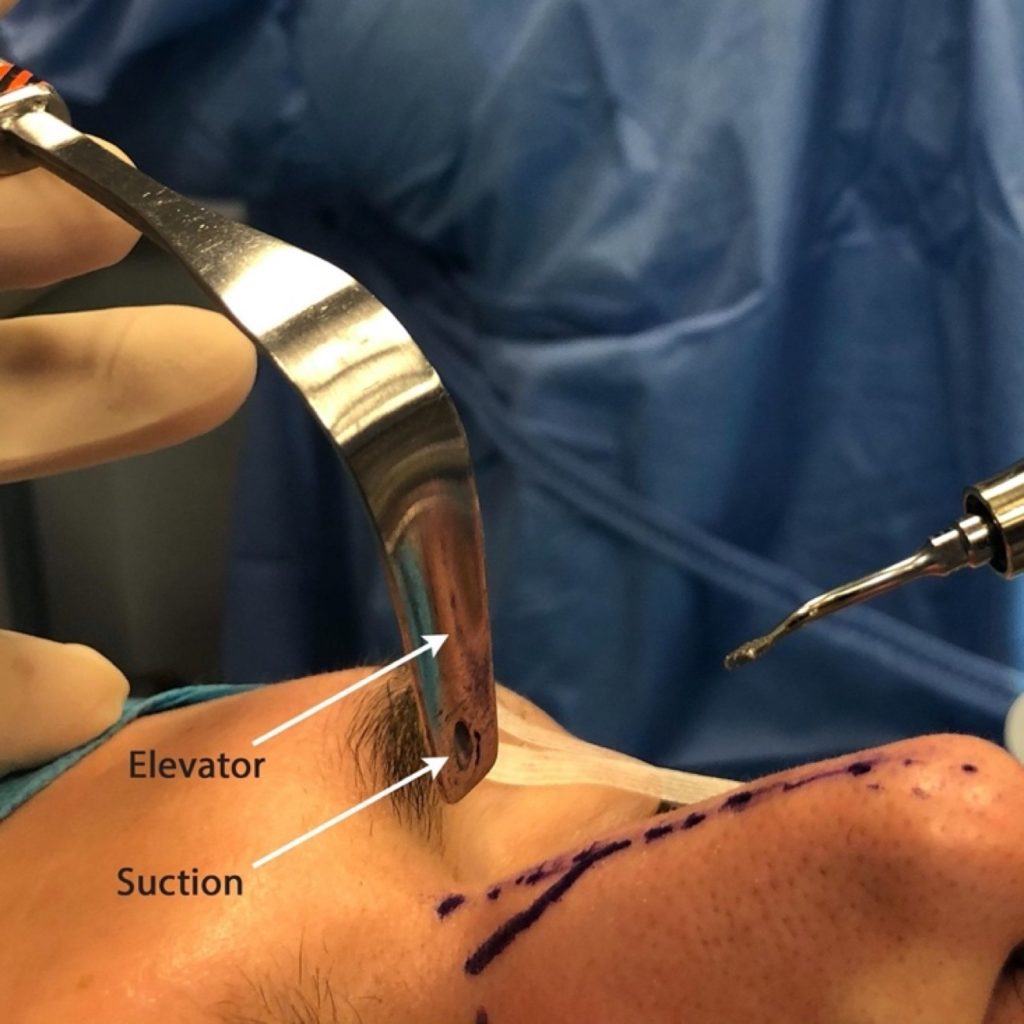
The piezo system uses high frequency vibrations and water irrigation must always be used to prevent handle temperature increasing, as well as bone and skin burns.30 It is recommended to use a waterflow of at least 50 ml/min to be totally protected. This is a large amount of water, and a suction is definitely needed to continue the surgery. Conventional suctions can be used, but in order to avoid the presence of water in the operating field and to “free” another “surgery hand”, it is suggested that specially designed elevators and rhinoscopes with an integrated suction should be used (Fig. 101-102).
C)Callus formation
In some cases, surgeons have reported soft tissue callus formation at the area of lateral osteotomies due to bone reaction and not to extended exposure15. The cases were successfully treated with one, or rarely two, local steroid injections.
D)Post-op Edema and Hematoma
In piezo surgery, the preservation of internal structure and the decrease of osteotomies have led to diminished hematomas and edemas compared to conventional rhinoplasties, where mucus destruction, extended osteotomies and bone mobilization have often led to excessive bruising and swelling.15,31,32 The only thing that must be reported is that the extended elevation about 5-10 mm beyond the nasofacial groove may lead to a local edema that may persist for about 2-3 months until absorption is complete. This can be prevented by using a larger-than-usual external nasal splint.15
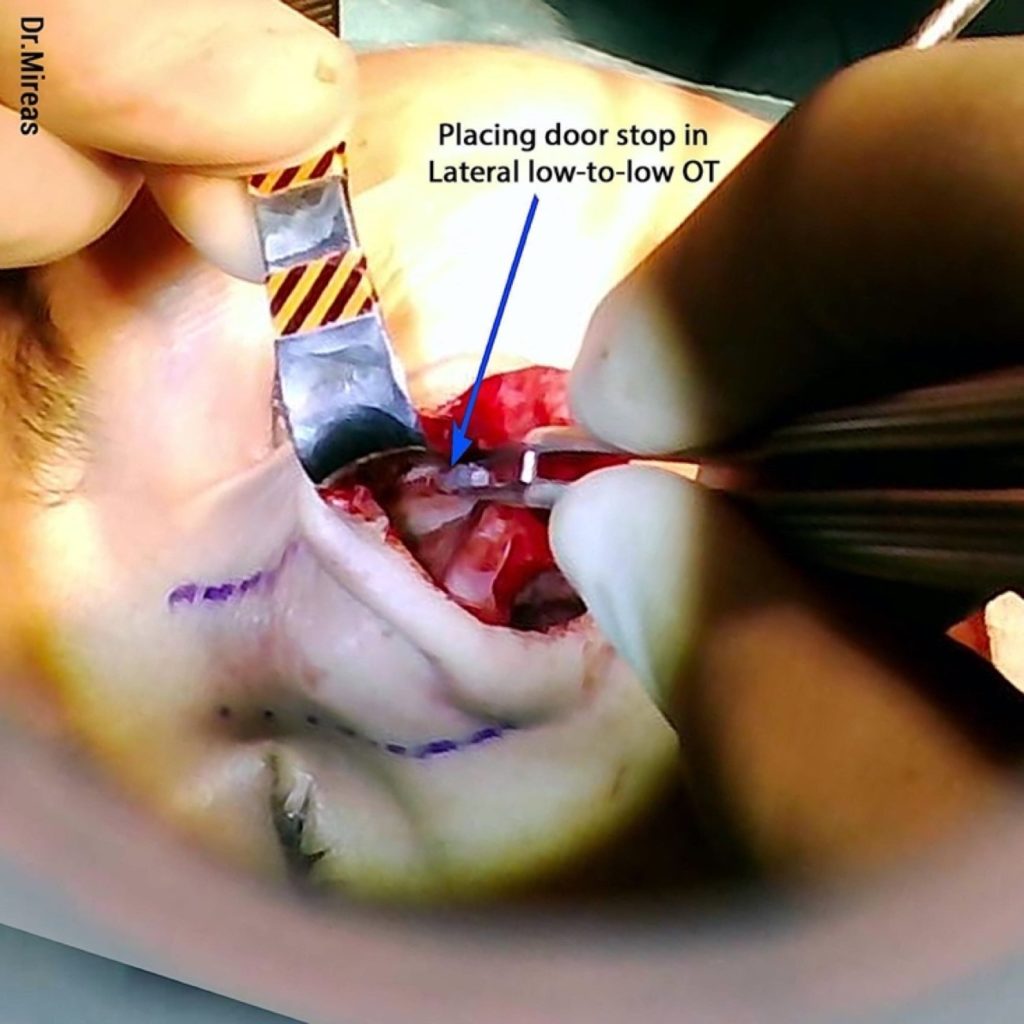
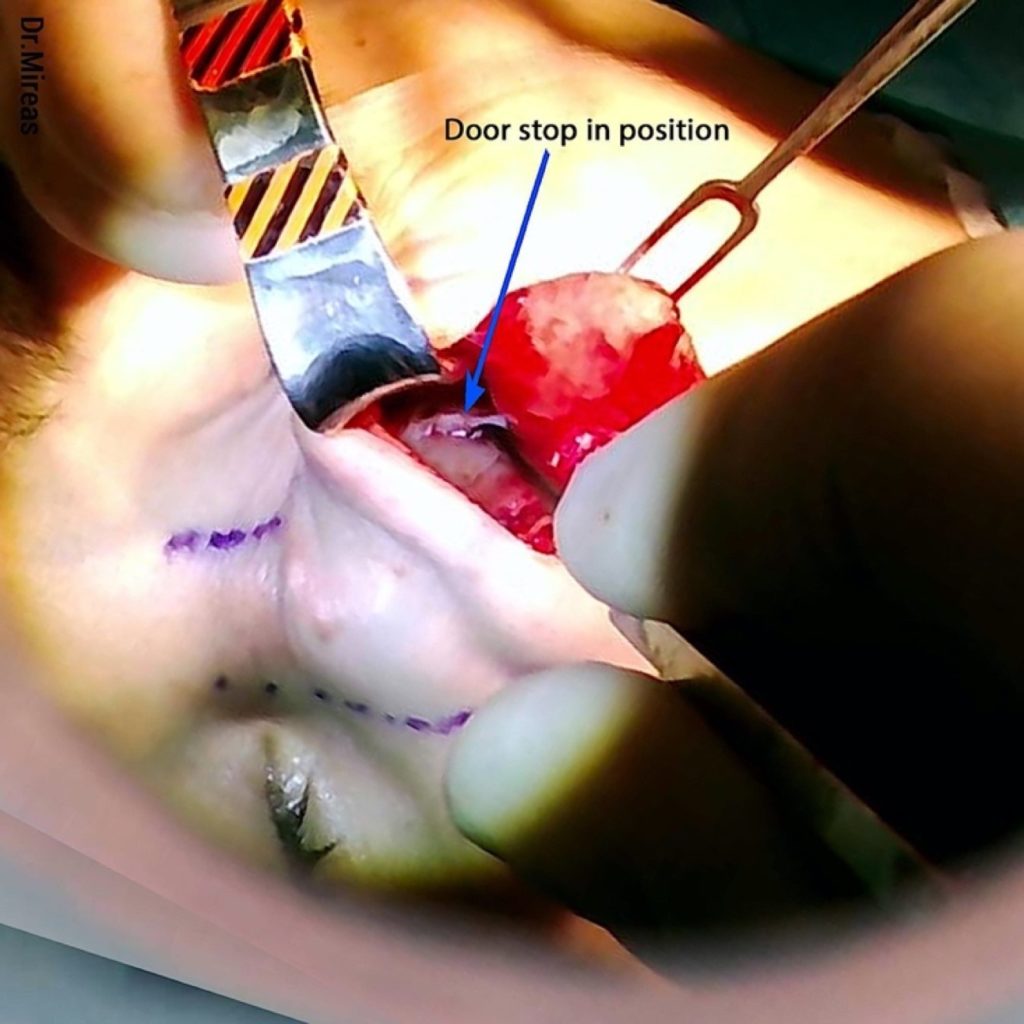
E)Double security – Doorstop
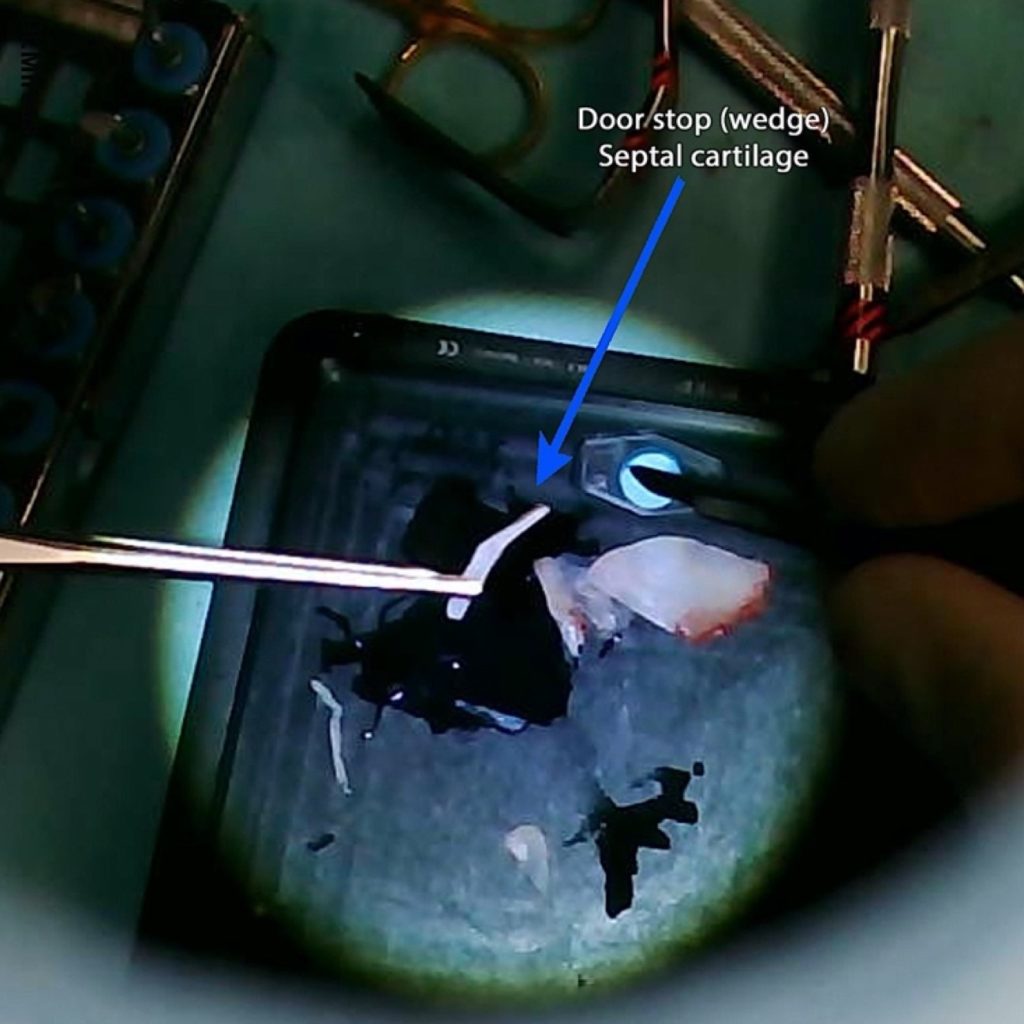
In some cases, we want to double-secure the new position of our bones, most often in lateral osteotomies where we want to preserve a large 5 mm movement of the nasal wall.
A wedge-shaped piece of cartilage may be placed in the osteotomy line in order to secure the distance between the two bones (Fig. 103-107).

F)Bone Healing
Extended exposure of the osseocartilaginous vault is not known to cause any problems to bone healing or permanent damage to bone vascularization and there are no relevant reports.17
In general, extended elevations in face surgery are considered to be safe, and even much greater dissections performed in facial/maxillofacial surgeries have not been reported to lead to permanent bone necrosis.
G)Piezo Contouring and Camouflage Techniques
A final contouring with fine rasps at the end of the surgery can be used safely and easily so as to achieve a smooth, compact new osseocartilaginous vault.3,15,18,,24 Sometimes diced cartilage, temporal fascia or other camouflage techniques can be added to further improve the final outcome, especially in revision surgeries as well as on noses with extra thin or damaged skin.
H)Contra-Indications
No contra-indications concerning piezo use in rhinoplasty surgery have ever been reported.15
REFERENCES
- Manbachi A, Cobbold RSC. Development and application of piezoelectric materials for ultrasound generation and detection.” Ultrasound. 2011;19(4):187-196.
- Labanca M, Azzola F, Vinci R, et al. Piezoelectric surgery: twenty years of use. Br J Oral Maxillofac Surg. 2008;46(4):265-269.
- Gerbault O, Daniel RK, Kosins AM. The role of piezoelectric instrumentation in rhinoplasty surgery. Aesthet Surg J. 2016;36(1):21-34.
- Pavílková G, Foltán R, Horká M, et al. Pizeosurgery in oral and maxillofacial surgery. Int J Oral Maxillofac Surg. 2011;40(5):451-457.
- Landes CA, Stübinger S, Ballon A, et al. Piezoosteotomy in orthognathic surgery versus conventional saw and chisel osteotomy. Oral Maxillofac Surg. 2008;12(3):139-147.
- Robiony M, Polini F, Costa F, et al. Piezoelectric bone-cutting in multipiece maxillary osteotomies. J Oral Maxillofac Surg. 2004;62(6):759-761.
- Salami A, Dellepiane M, Proto E, et al. Piezosurgery in otologic surgery: four years of experience. Otolaryngol Head Neck Surg. 2009;140(3):412-418.
- Hoigne DJ, Stübinger S, Von Kaenel O, et al. Piezoelectric osteotomy in hand surgery: first experiences with a new technique. BMC Musculoskelet Disord. 2006;7:36.
- Joseph J. Nasenplastik und sonstige gesichtsplastik nebst einem anhang über mammaplastik, 1931.
- Toriumi DM, Hecht DA. Skeletal modifications in rhinoplasty. Fac Plast Surg Clin North Am. 2000;8(4):413-432.
- Ghassemi A, Prescher A, Hilgers RD, et al. Effect of the sequence of lateral osteotomy and hump removal on the aesthetic outcome. Aesthetic Plast Surg. 2011;35(4):603-607.
- Robiony M, Polini F, Costa F, et al. Ultrasound piezoelectric vibrations to perform osteotomies in rhinoplasty. J Oral Maxillofac Surg. 2007;65(5):1035-1038.
- Robiony M, Toro C, Costa F, et al. Piezosurgery: a new method for osteotomies in rhinoplasty. J Craniofac Surg. 2007;18(5):1098-1100
- Pribitkin EA, Lavasani LS, Shindle C, et al. Sonic rhinoplasty: sculpting the nasal dorsum with the ultrasonic bone aspirator. Laryngoscope. 2010;120(8): 1504-1507.
- Gerbault O, Daniel RK, Palhazi P, et al. Reassessing surgical management of the bony vault in rhinoplasty. Aesthet Surg J. 2018;38(6):590-602.
- Daniel RK, Palhazi P. Rhinoplasty: An Anatomical and Clinical Atlas. New York: Springer; 2017.
- Gerbault O, Daniel RK, Kosins AM. Response to “Comments on ‘The Role of Piezoelectric Instrumentation in Rhinoplasty Surgery’”. Aesthet Surg J. 2016 May;36(5):NP189.
- Palhazi P, Daniel RK, Kosins AM. The osseocartilaginous vault of the nose: anatomy and surgical observations. Aesthet Surg J. 2015;35(3):242-251.
- Sheen J, Sheen A. Aesthetic Rhinoplasty, 2nd edition. St Louis: Quality Medical Publishing, 1997.
- Tardy ME, Denneny JC. Micro-osteotomies in rhinoplasty— a technical refinement. Facial Plast Surg. 1984;2:137-145.
- Millard DR. Rhinoplasty Tetralogy: Corrective, Secondary, Congenital, Reconstructive. Boston: Little, Brown and Company; 1996.
- Sheen JH. Aesthetic Rhinoplasty. St Louis, MO: Mosby; 1978.
- Gruber RP, Melkun ET, Woodward JF, et al. Dorsal reduction and spreader flaps. Aesthet Surg J. 2011;31(4):456-464.
- Zholtikov V, Golovatinsky V, Palhazi P, et al. Rhinoplasty: A Sequential Approach to Managing the Bony Vault. Aesthet Surg J. 2020 Apr 14;40(5):479-492.
- Oneal R.M., Berkowitz R.L. (1998) Upper lateral cartilage spreader flaps in rhinoplasty. Aesthet. Surg. J. 18:370-371
- Sheen JH. Spreader graft: a method of reconstructing the roof of the middle nasal vault following rhinoplasty. Plast Reconstr Surg. 1984;73: 230 –239.
- Pribitkin E, Greywoode JD. Sonic rhinoplasty: innovative applications. Facial Plast Surg. 2013;29(2):127-132.
- Webster RC, Davidson TM, Smith RC. Curved lateral osteotomy for airway protection in rhinoplasty. Arch Otolaryngol. 1977;103(8):454-458.
- Parkes M, Kamer F, Morgan W. Double Lateral Osteotomy in Rhinoplasty. (Arch Otolaryngol 103:344-348, 1977)
- Labanca M, Azzola F, Vinci R, et al. Piezoelectric surgery: twenty years of use. Br J Oral Maxillofac Surg. 2008;46(4):265-269.
- Gerbault O, Kosins AM. Commentary on: Double-blind comparison of ultrasonic and conventional osteotomy in terms of early postoperative edema and ecchymosis. Aesthet Surg J. 2016;36(4):402-403.
- Ilhan AE, Cengiz B, Caypinar Eser B. Double-blind comparison of ultrasonic and conventional osteotomy in terms of early postoperative edema and ecchymosis. Aesthet Surg J. 2016;36(4):390-401.